solutions for e-commerce

14 years of business 2578 reviews 4.9 average rating
Magento 2

ERP & Logistics suite

Easily connect your ERP or your logistics software with your Magento 2 store and make import and export tasks problem-free using the ERP Suite.

from €490
User guide

The basic knowledge about ERP with Magento 2

Before starting to use the ERP Suite, you should be aware of some of the basic knowledge about sync ERP or logistics software with Magento 2.

What is an ERP?

The ERP (C) or logistics software can be defined as a group of modules linked to a single database.

It is a software package that makes it possible to manage all of a company's operational processes by integrating several management functions:

  • orders
  • inventory
  • payroll and accounting
  • e-commerce
  • BtoB or BtoC
  • ...

In other words, the ERP represents the core of a business.

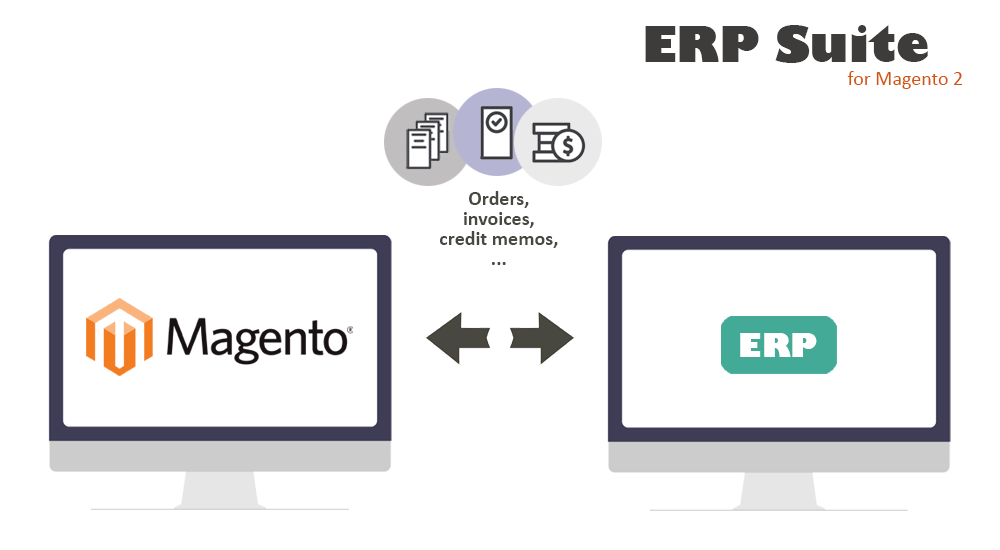
How the ERP works with Magento

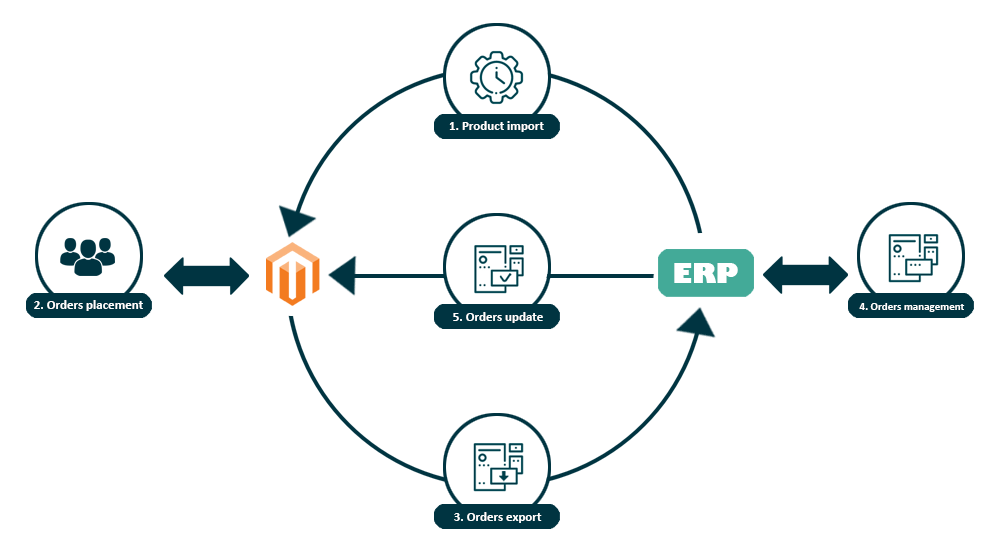
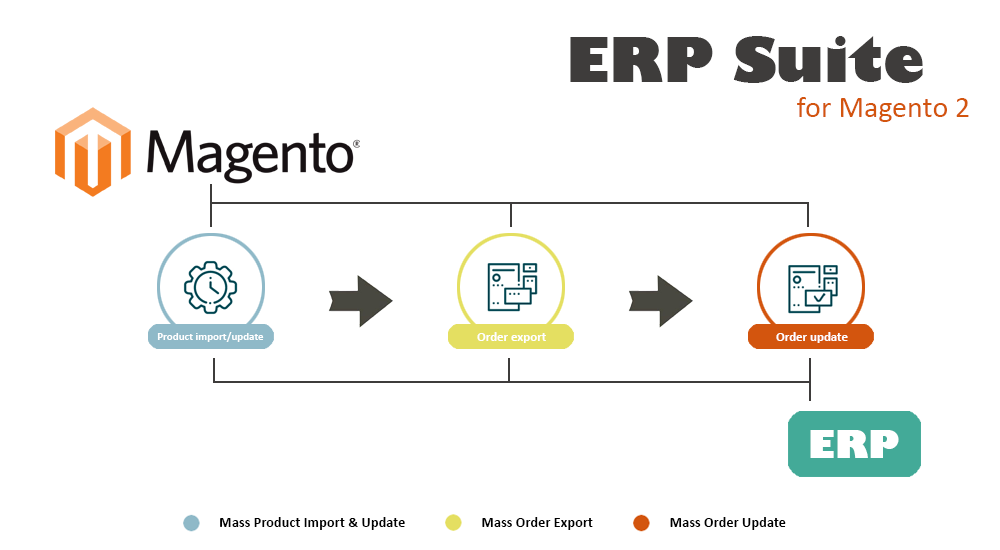
Generally, using Magento with an ERP works that way:

  1. Products are imported to Magento from the ERP
  2. Customers place orders on the website
  3. Orders are sent to the ERP
  4. Orders are handled and the order processing is entered in the ERP by assistants
  5. Updates are sent to Magento from the ERP

How to use the ERP Suite for Magento 2

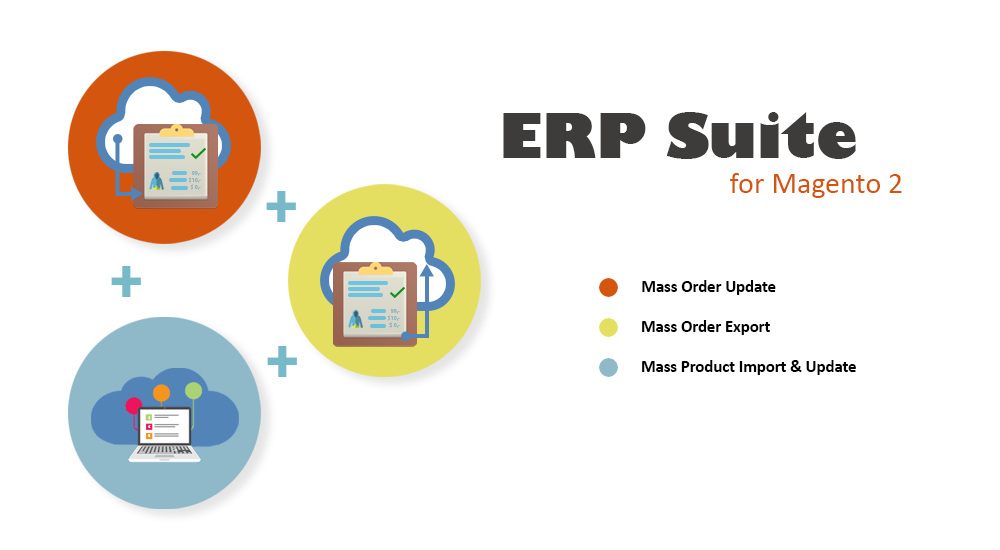
The ERP Suite is composed of 3 extensions:

Each module will help you sync your ERP or logistics software with your Magento 2 website in peace. 

STEP 1: Import your products

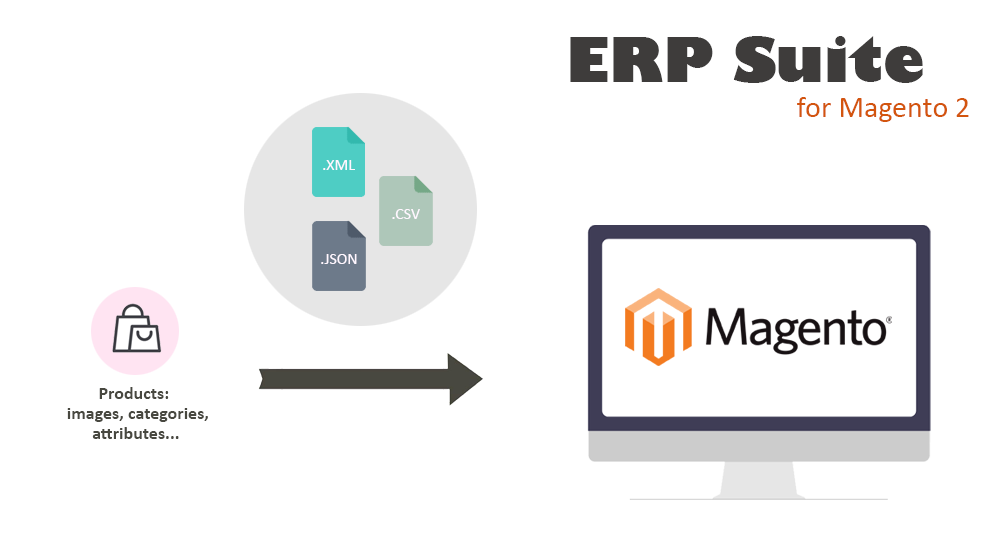
The Mass Product Import & Update extension available in the Suite can help you to import your products to your Magento site. 

For this, edit one of the sample profile patterns or create a new profile by clicking CREATE A NEW PROFILE from:
SystemData TransferMass PRODUCT IMPORT & Update
Black Box

The black-box is a tool that will help you configure your mapping seamlessly. It is composed of 3 major features.

Input Data

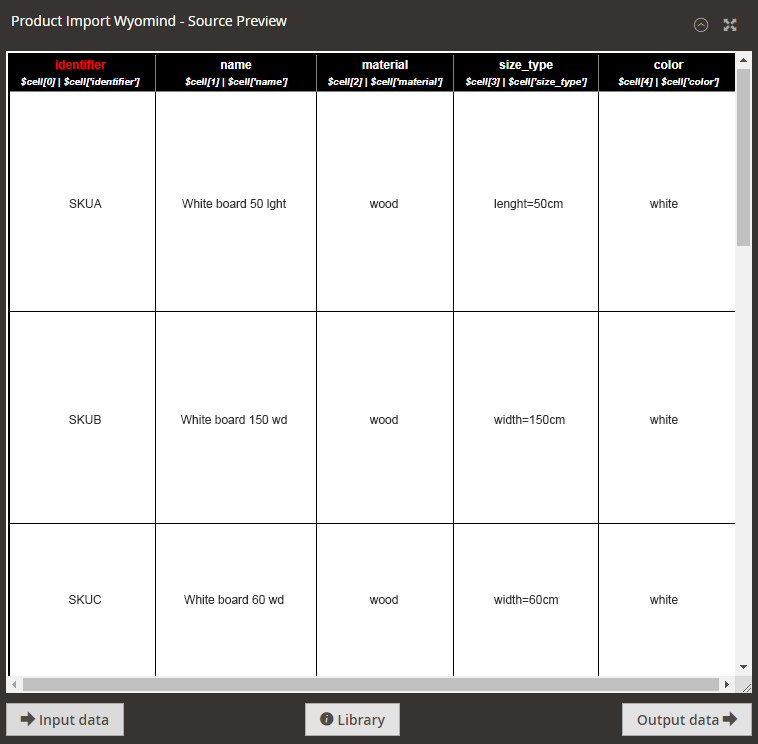
To get a preview of the input data, click on INPUT DATA.

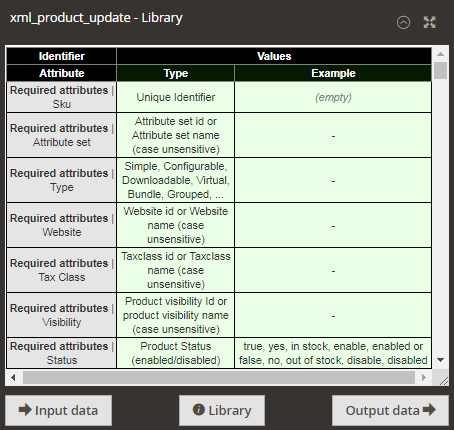
Library

The library allows you to check what are the values you can use for each attribute. You will also find some examples to help you.

Output Data

Clicking on OUTPUT DATA will give you a preview of the data as they'll be updated. 

Settings

In this section, you will be able to define the source of the data.

Profile settings

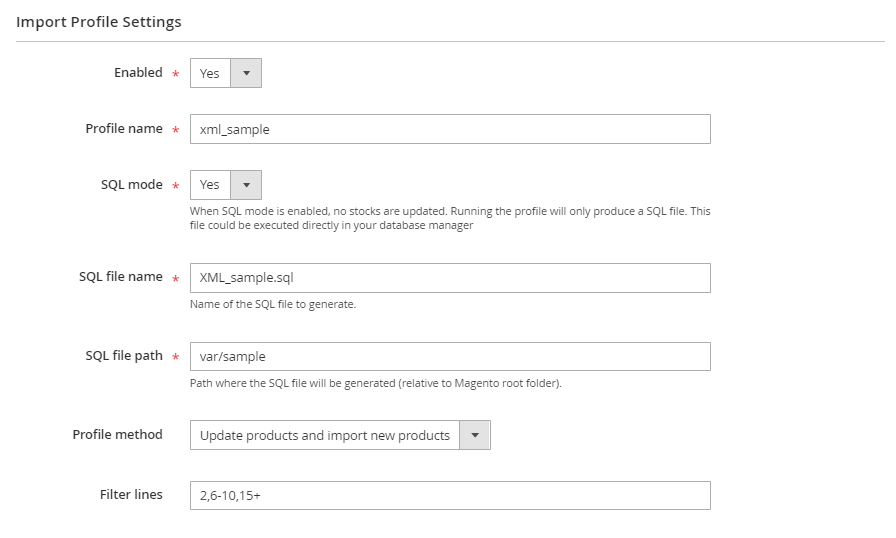
Define the settings for your profile.  

  • Enabled
    You can enable/disable the profile.
    Note that the profile is disabled by default when it results from a duplication.
  • Profile Name
    Only alphabetic and number are allowed + hyphens (-) and underscores (_).
    The profile's name must be unique.
  • SQL mode
    When SQL mode is enabled, no data are updated. Running the profile will only produce a SQL file. This file could be executed directly in your database manager.
    If you activate SQL mode, you'll need to fill in several fields:
  • SQL file name
    Name of the SQL file to generate.
    XML_sample.sql
  • SQL file path
    Is the path where the SQL file will be generated (relative to Magento root folder). 
    var/sample
  • Profile method
    You can choose the action that the profile will trigger:
    Update products only
    Import new products only
    Update products and import new products
  • Filter lines
    Leave empty to export all lines:
    e.g:means all lines will be imported
    Type the numbers of the lines you want to import, making sure to separate each line or range with a comma (,):
    e.g: 2,4,6,8,10means lines 2,4,6,8,10 will be imported
    Use a dash (-) to denote a range of lines:
    e.g: 8-10means lines 8,9,10 will be imported
    Use a plus (+) to import all lines from a line number:
    e.g: 4+means all lines from line 4 will be imported  
    Use regular expressions surrounded by # to indicate a particular group of identifiers to import:
    e.g: #ABC-[0-9]+#
    means all lines with an identifier matching the regular expression will be imported 
Note you can combine all those options. For example 2,6-10,15+ means line 2,6,7,8,9,10,15,16,17,... will be imported.

When the Profile method option is on Update products and import new products, in the Mapping & Rules tab, you can define for each Target attribute dropdown if the value applies to the new products, or/and to the existing products:

  • New products only
  • Existing products only
  • Both, new and existing products

You can then click Input data from the black box to see your source file

File Location

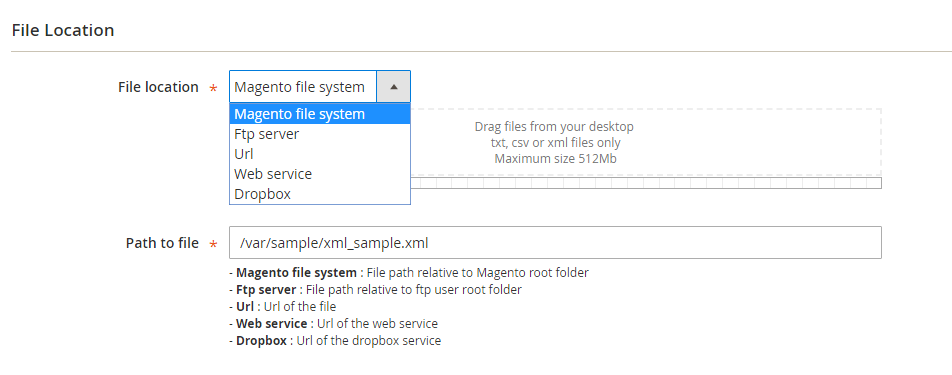
This section allows you to specify where the source data file is stored and what is the file path including the file name and the extension as it appears in the file system of the server. Note that you won't be able to save the source file path if the path is invalid.

You have several options:

  • Magento File System
    The file is stored in the Magento root directory or a subdirectory of the Magento root directory.
    File path relative to the Magento root folder.
    See how to use regular expression in the file name.
  • FTP server
    The file is stored on a remote server available from FTP or SFTP. Do not prefix the domain name or the IP with FTP://.
    You'll be able to check if the FTP connexion is valid.
    The file path is relative to the FTP user root folder.
    You can also use regular expression in the file name when it is stored remotely via FTP.
  • URL
    The file is stored on a remote server available from HTTP or HTTPS.

    The file path is the URL of the file.
    http://www.website.com/Inventory/AvailableInventory  
    If you' are using HTTP authentication, you must add the login and the password before the URL in the below format:http://login:[email protected]/Inventory/AvailableInventory

    If you are using a specific port, you can use the below format:
    http://login:[email protected]:port/Inventory/AvailableInventory

  • Webservice
    The file is available on a remote server accessible as web services.
    The extension uses the CURL PHP library to connect the web service.
    The file path is the URL of the web services.
    You can provide the web service a login/password couple and any parameters formatted as URL parameters, as follows:
    parameter1=value1&parameter2=value2&parameter3=value3
  • Dropbox
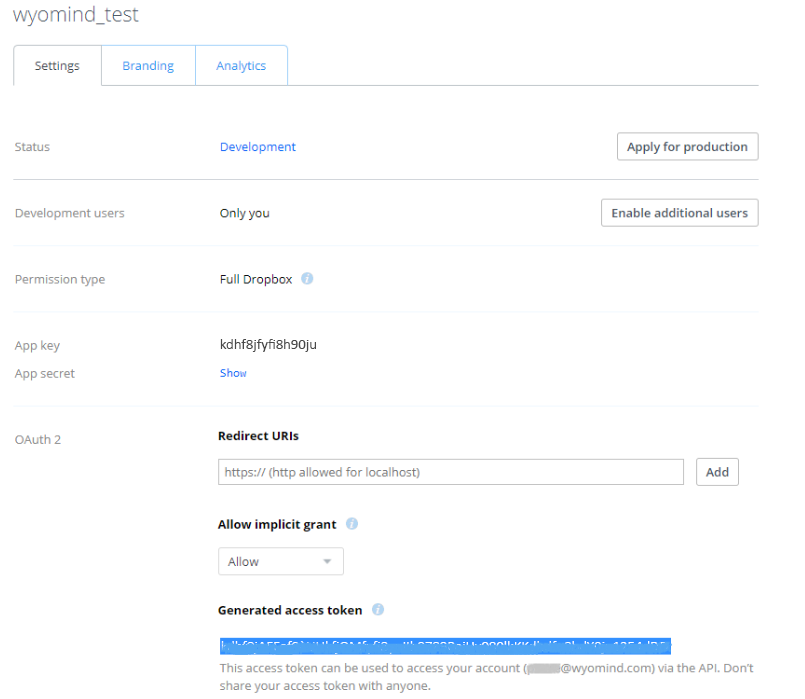
    You can generate your token from your Dropbox account https://www.dropbox.com/developers/apps
    The file path is the URL of the dropbox service.
    Have a look at our faq to see How to configure a file available from your Dropbox

Note you can drag and drop files from your desktop. Only TXT, CSV, or XML files are allowed.

File Type

Allows you to specify the file type used for the update, XML, JSON, or CSV.

  • File type
    You have the choice between CSV, XML, and JSON files.

For CSV files, define:

  • Column separator
    Define the column separator.
  • Text delimiter
    Select the text delimiter.
  • The first line is a header
    Specify when the first line is a header.
  • Magento export file
    Magento default export files are made of empty rows with values related to main rows, activating this option will merge the values into the main rows.


For XML and JSON files, define: 

  • Path to products
    Fill in the path that targets the products. The path is case-sensitive.
    See how to define the path to your products for XML or JSON files. 
  • Data structure
    You have two options: Automatic detection or Predefined structure
    The automatic detection fits for simple files made of only one nesting level.
    If you've selected the Predefined structure, see how to define your own file structure for XML or JSON source file. 

Post Process Action

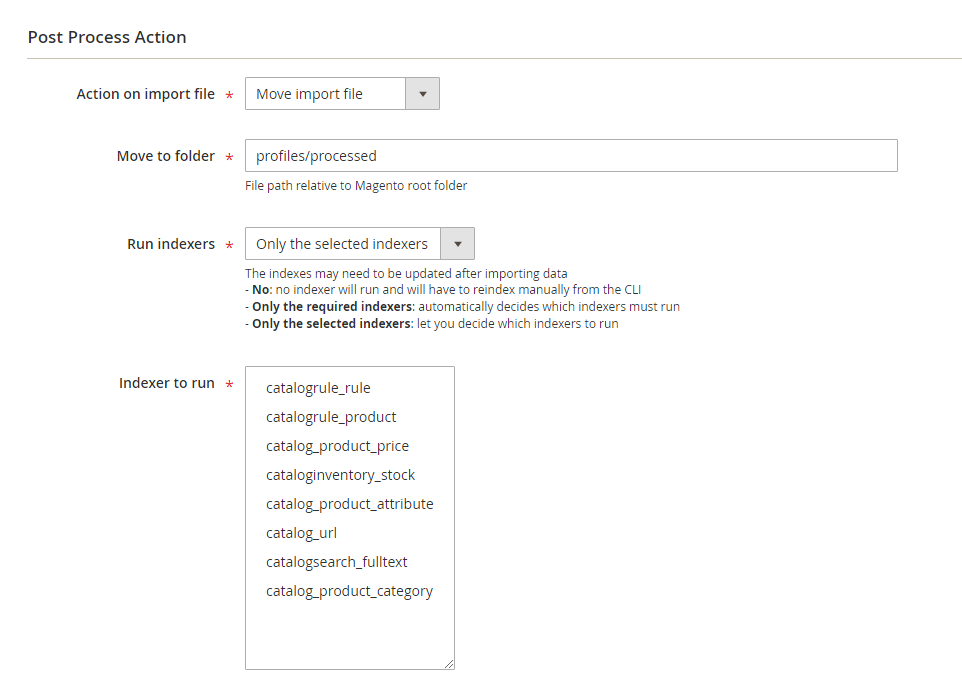
You have the possibility to define an action after the file is processed.
  • Action
    Do Nothing
    Delete the import file
    Move import file
  • Move to folder
    Define the file path where you want to move the import file, relative to your Magento root folder.
Note that this option is available only for update files locally hosted in your Magento File System.
  • Run indexers
    You can choose to run the indexers after the import or not:
    No: no indexer will run and you will have to reindex manually from the CLI
    Only the required indexers: automatically decides which indexers must run
    Only the selected indexers: let you decide which indexers to run
    If the profile takes too much time to load, you can disable the indexers.
  • Indexer to run
    Choose the indexers to run: 
    catalogrule_rule
    catalogrule_product
    catalog_product_price
    cataloginventory_stock
    inventory
    catalog_product_attribute
    catalog_url
    catalogsearch_fulltext
    catalog_category_product
    catalog_product_category
    Catalog_product_flat and catalog_category_flat are managed if the option is enabled in:
    StoresSettingsConfiguration Catalog CatalogStoreFront

Advanced Settings

System Settings

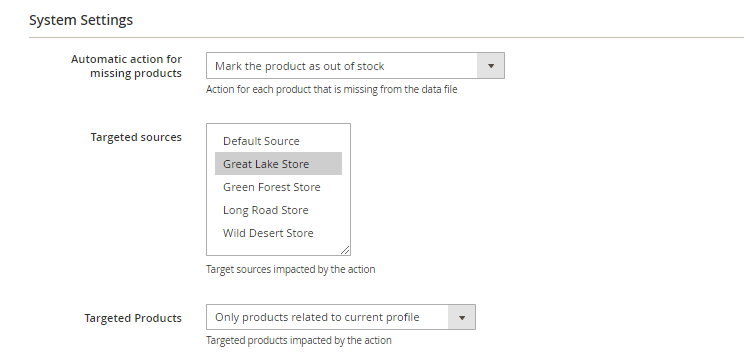
In the System Settings, define the automatic action for missing products from the data file. You have several options:
  • Do Nothing
  • Disable the product
  • Delete permanently the product
  • Mark the product as out of stock
  • Mark the product as out of stock and set qty to 0
When using Advanced Inventory with Mass Product Import & Update, you will be able to Set qty to 0 and select the targeted points of sale.

When you decide to mark products that are missing from the data file as out of stock, you must select the targeted sources impacted by the action.

Great Lake Store

When a product is imported using Mass Product Import & Update, it is associated with the profile. If you've selected action for missing products, you'll need to choose the targeted products

  • Only products related to current profile: products that are imported/updated with the same profile.
  • Only products not related to current profile: all the products that are not created/updated by the profile.
  • All products

Stock Settings

From the Stock Settings, you can define:

  • Automatic stock status update
    You can choose to automatically update the stock status (in stock / out of stock).
  • Use relative quantity update
    Quantity will be added/subtracted to/from the current quantity.

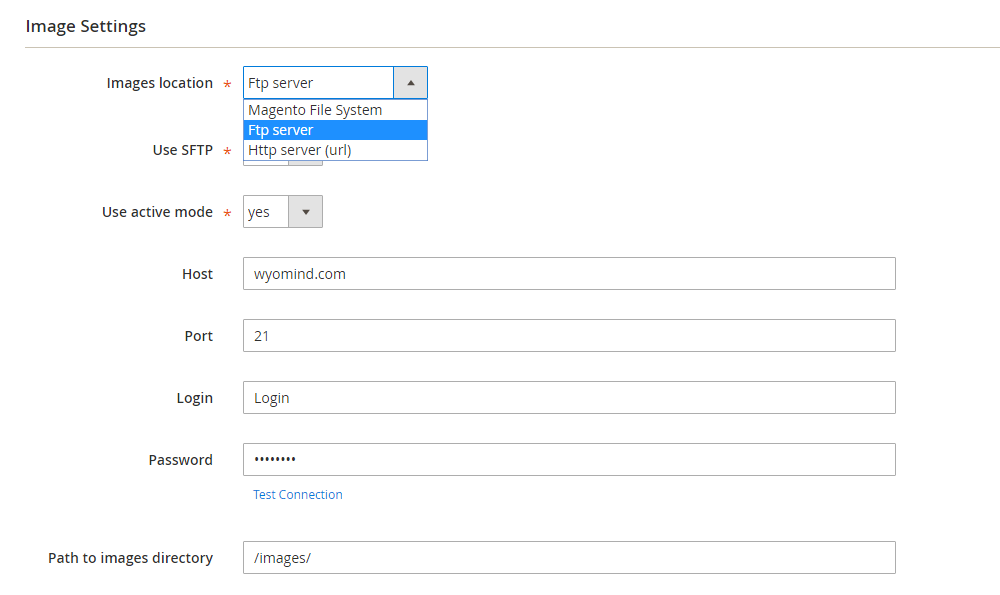
Image Settings

Indicates the path to the directory in which the images to import are stored.

  • Images location
    Http server (URL)
    Magento File System
    Ftp server

Depending on what you've selected as the location of the images, you'll need to fill in several fields.

For the FTP server:

  • Use SFTP
  • Use active mode
  • Host
  • Port
  • Login
  • Password

For the FTP Server and the Magento file System:

  • Path to images directory

Category Settings

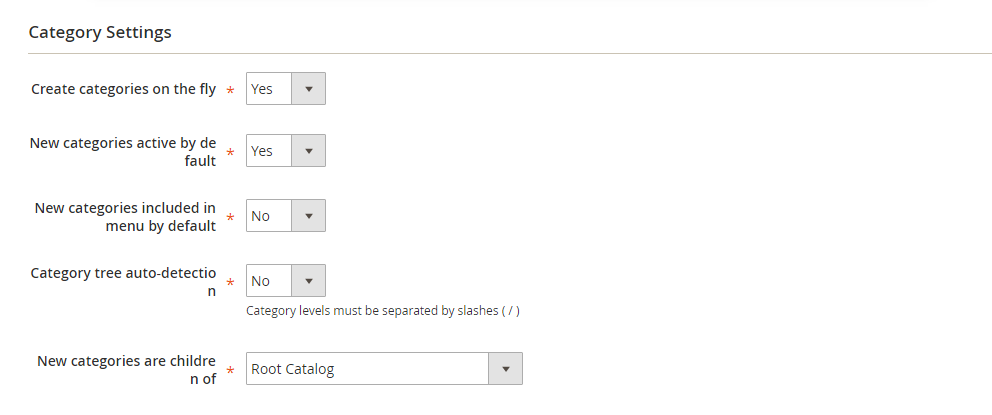
Mass Product Import & Update allows you to create categories on the fly. 

  • Create categories on the fly
    Yes or No.
  • New categories active by default
    Yes or No.
  • New categories included in menu by default
    Yes or No.
  • Category tree auto-detection
    To automatically detect the category tree.
    You need to use the complete path to the category. The category levels must be separated with slashes: A/B/C.
    For example, instead of "Shirts", you should write:
    Default Category/Men/Shirts
    When the Category tree auto-detection is disabled, the category is added to the root category defined in New categories are children of.
  • New categories are children of
    Choose the parent category.

When the categories associated with the products are updated, then all previous products and categories associations are deleted. 
Take a look at our documentation for more details about the configuration of the category attribute.

Configurable Product Settings


Create parent of configurable products on the fly
You can also create/update a configurable product from the simple products available in the source file by enabling this option.

Enable that option only if the configurable products don't exist in the source file and if you want to create/update these products from the simple products information.


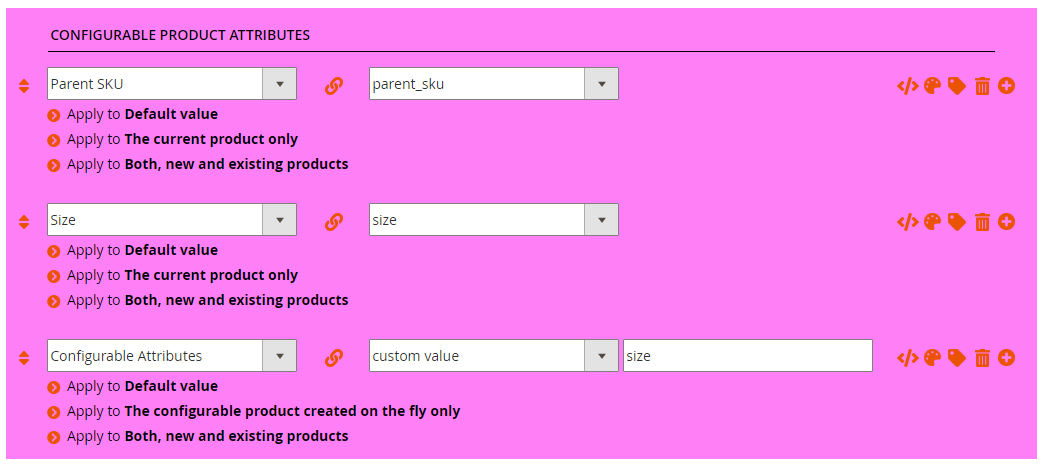
When that option is enabled, in the Mapping & Rules tab, you can find for each Target attribute dropdown an option for the configurable products to create on the fly. You have the choice to apply the settings on: 

  • The current product only
  • The configurable product created on the fly only
  • Both, configurable product created on the fly and simple product associated

System attributes of the configurable products created on the fly must receive a value either by mapping a field from the source file for the simple product and the configurable product or for the configurable product only.

So that the configurable product and the simples variants are linked, the following attributes must be mapped:

Note that if you want to update or import a product whether it is a configurable or not, you need to use standard attributes.

Mapping & Rules

In this section, you can map each column of the file with one of the stock attributes.

Note that you won't be able to save the mapping if the file path is invalid. See how to specify your file location.

Column Mapping

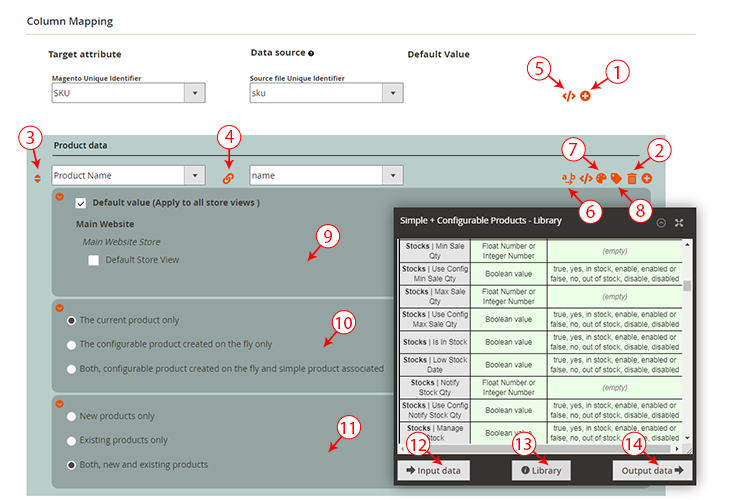
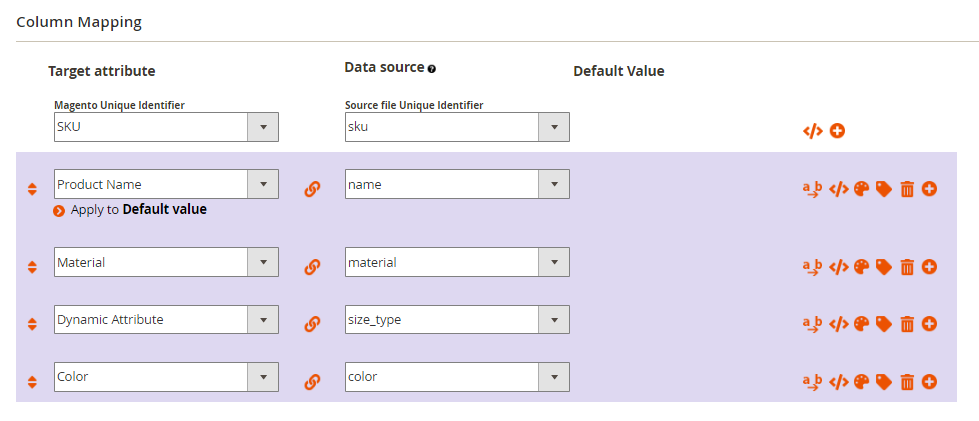
Each column can be mapped with one of the stock attributes. Note that at any time, you can preview the input and output data in the black box directly.

  • Target Attribute 
    Select the target attribute from the ones available in your system.
    You can find all the attributes grouped by type in our documentation.
    The first line is where you define the identifier of your products. The identifier must be unique, 
    SKU
  • Data source
    In the Data source, you can define the attribute source that matches with the target attribute from your source file. 
    id
  • Default value
    Sometimes, some columns can be missing. For example, when updating all stocks, the file does not necessarily include all stock attributes (backorders, minimum quantity in the cart...). In that case, you can choose custom value in the Data source and apply a default value. 
    yes


QUICK OVERVIEW OF THE INTERFACE

  1. Add as many columns as you want by clicking on + ADD A NEW ROW. In many cases, the update file may contain more columns than necessary; you don't need to add these columns and match them.
  2. DELETE a row easily.
  3. Change the order of each row using the drag and drop.
  4. Deactivate a line while conserving the settings by clicking on the LINK symbol.
  5. Add your own custom script </>. These scripts can be previewed in the output. Note that when there is a script filled in, </>  is underlined. See how to use the PHP API
  6. Add your own replacement rule by clicking on the  b icon. These rules can be previewed in the output. Note that when there is a rule selected, a b is underlined. See how to create your replacement rules
  7. Apply the color of your choice to the row.
  8. Apply a label to the row.
  9. Define to which store view(s) you want to apply these settings by clicking APPLY TO DEFAULT VALUE.
  10. Define to which product(s) you want to apply these settings by clicking APPLY TO THE CURRENT PRODUCT ONLY.
    For this setting to appear, the Create parent of configurable products on the fly option must be activated.
  11. Define to which product(s) you want to apply these settings by clicking Apply to Both, new and existing products.
    For this setting to appear, the Profile method must be set on Update products and import new products.
  12. Preview your file by clicking INPUT DATA.
  13. Find all the attributes grouped by type in the LIBRARY.
  14. Check the data as they'll be updated by clicking OUTPUT DATA.

Scheduled tasks

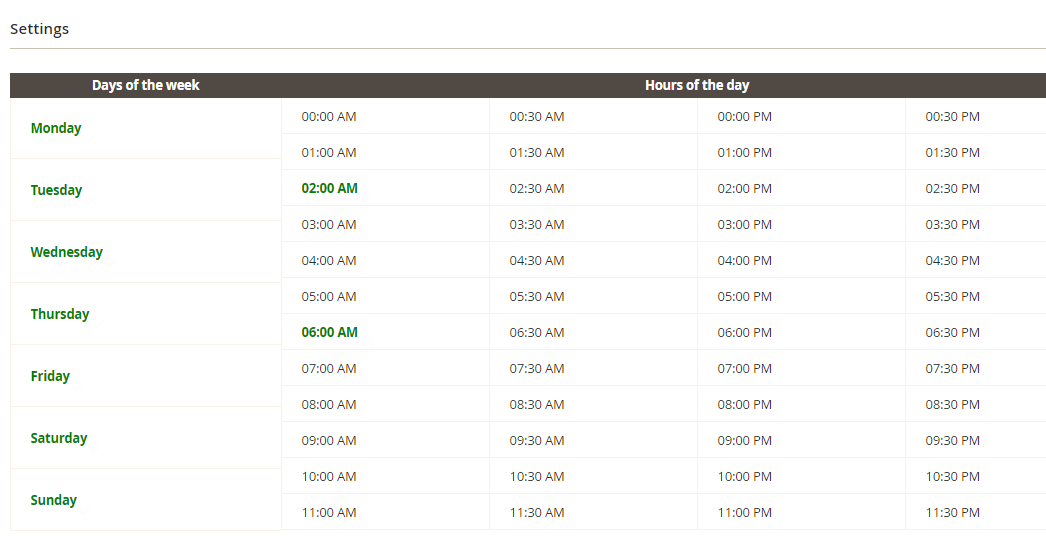
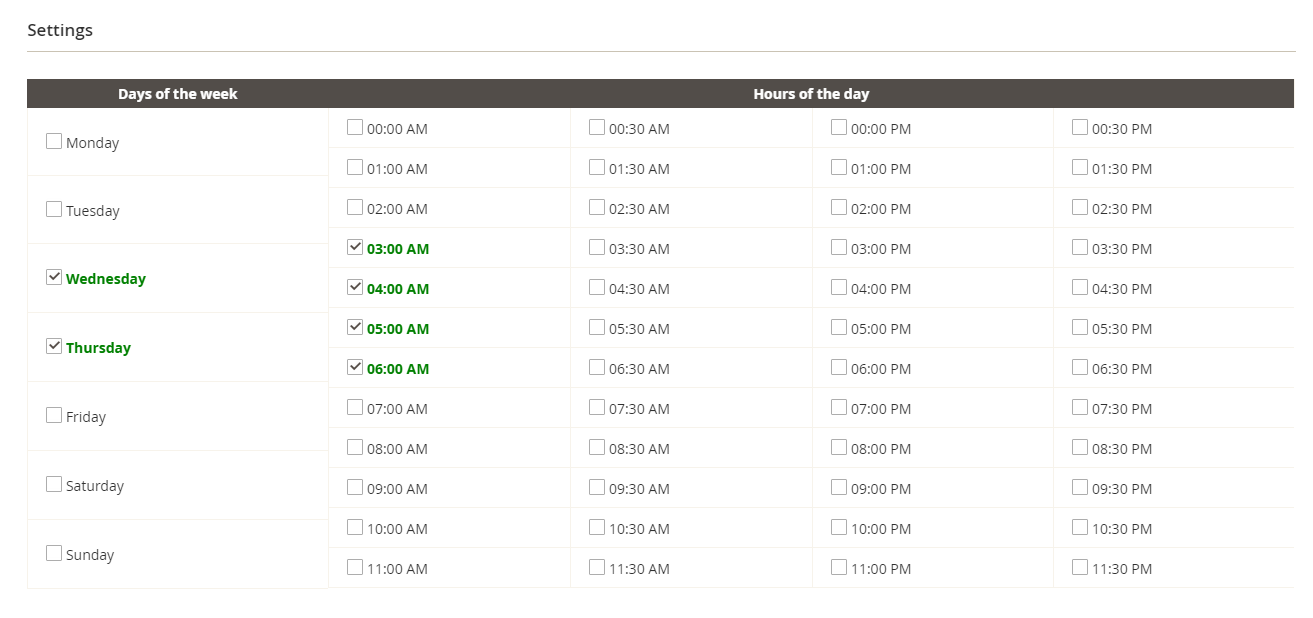
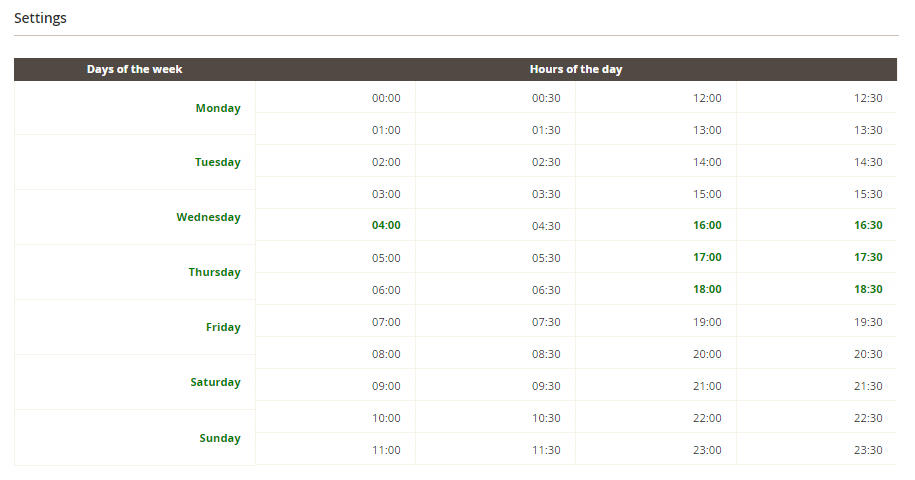
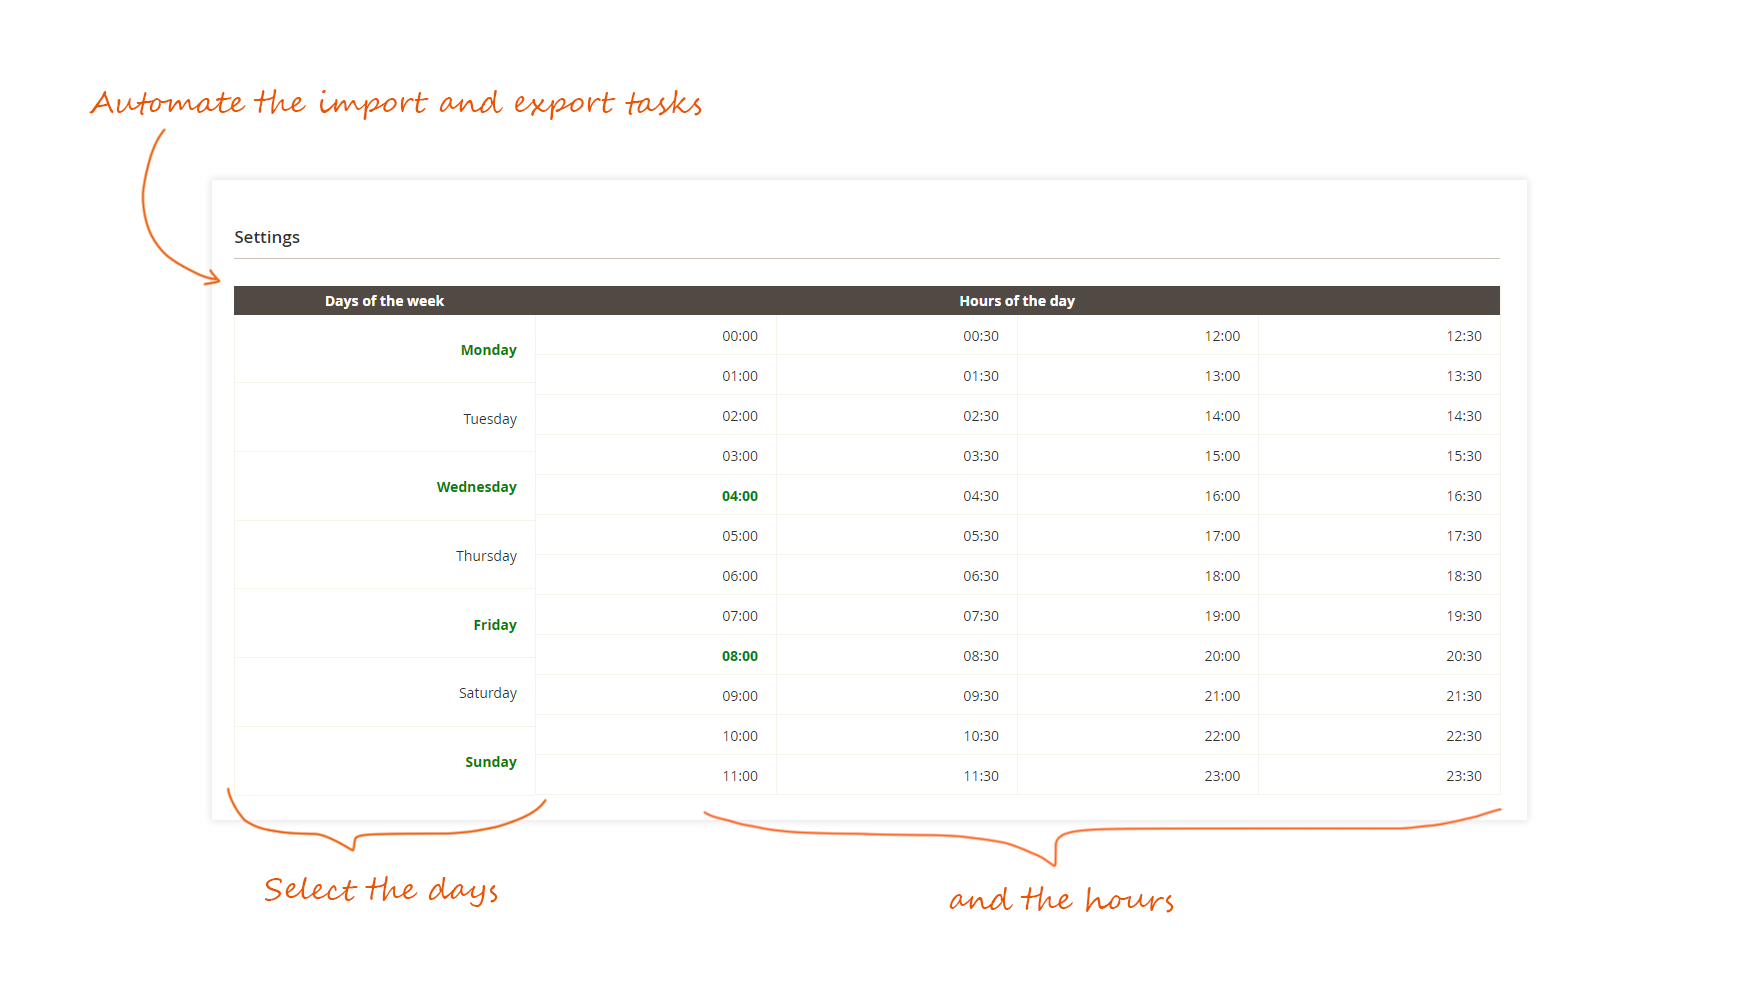
You can schedule the profile to be executed for all days of the week and with a default interval of 30 minutes between each execution.

You have the possibility to change the cron task interval from the General Settings tab. 

For good working of scheduled tasks in Mass Product Import & Update, the main cron task in Magento must be configured properly.

Action History

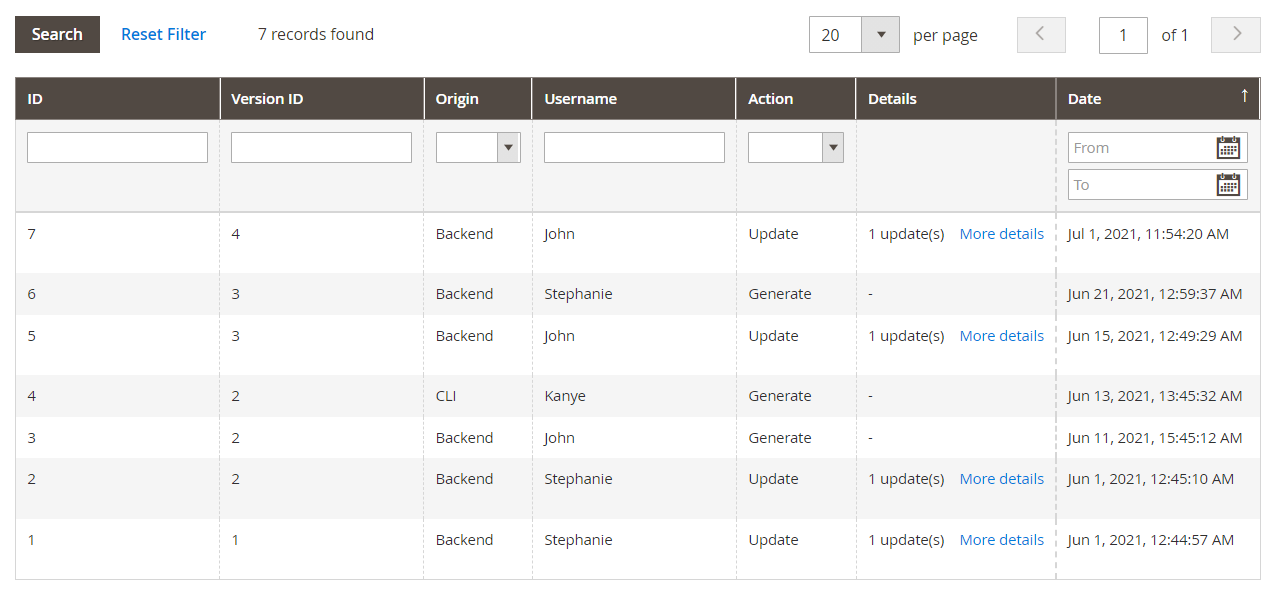
In the Action History tab, you can find a history of your previous generation and configurations. 

You'll find: 

  • ID
    It is the ID of the history line. 
  • Version ID
    It is the ID of the profile configuration version.
  • Origin
    The origin of the action can be: Backend / Cron / CLI / API
  • Username
    It is the name of the user behind the action.
  • Action
    The available actions are: create / generate / update / delete
  • Details
    If you click on More details, you can see the detail of the profile update from a grid.

    If you click on a line of the above grid, you can check the differences of the updated field: red parts are the removed data and green parts are the inserted data.

  • Date
    It is the date of the modification.
Read more documentation about the Mass Product Import & Update module.

STEP 2: Export your orders

Mass Order Export will help you to export your orders to your ERP or logistics software. 

You can create or edit an existing profile from:
SaleSMass Order ExportProfiles

The Tool Box or so-called Black Box

Mass Order Export provides you with a tool to help you configure your profiles as you want. When editing a profile you'll find a toolbox on the right of the window.

The toolbox is inevitably a very useful tool. This will help you to configure your profiles more quickly.

Here are the different options of the black box.

Preview
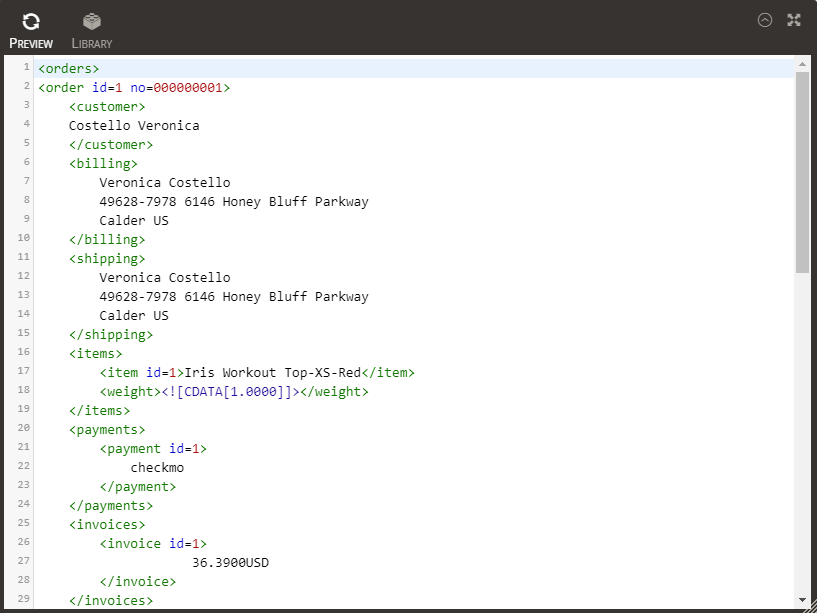
This will help you to check in real-time the data retrieved by the values you added in the profile template.

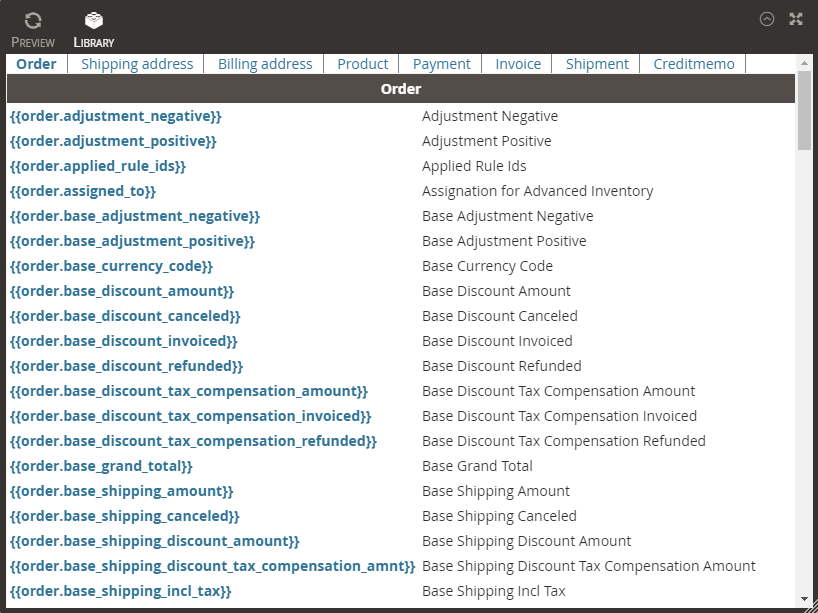
Library

It will list all data available for each instance: Order, Shipment, Products, Payment, Invoice, Credit memo...

Profile Configuration

When creating or editing an export profile in Mass Order Export, you have to be aware of some basic settings.

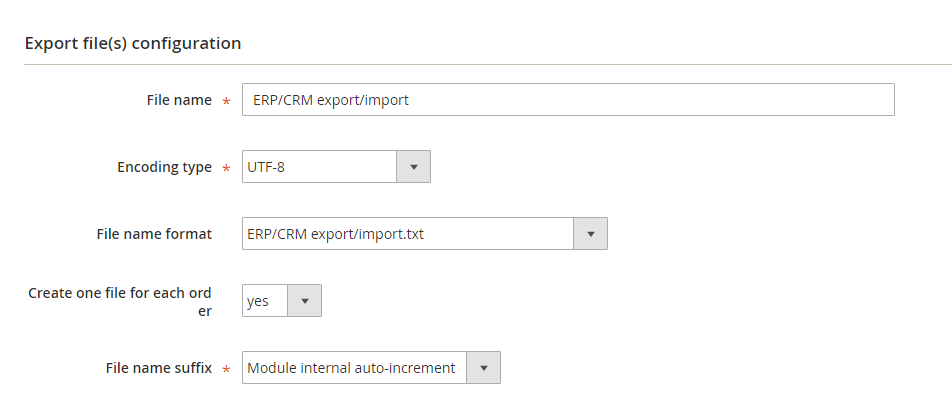
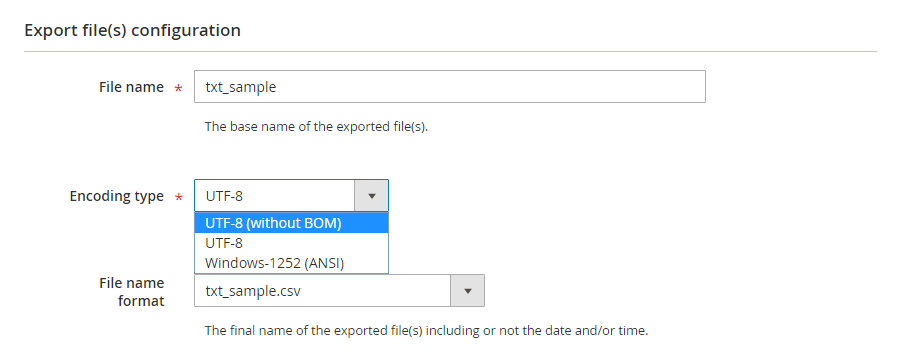
Export file(s) Configuration

You can start with the file configuration of the file.

  • File name:
    It is the base name of the exported files. Note that there is no need to add any file extension (XML, CSV, TXT) as the extension does it automatically.
    file
  • Encoding type
    Choose the encoding type you want to use between:
         UTF-8: It is the most common format
         UTF-8 without BOM: See more about BOM
         ANSI
  • File name format
    Your file name can be completed with the current date at the time of the exportation. Different formats are available.
    file.txt2019-07-03-file.txt
    file-2019-07-03.txt
  • Create one file for each order
    Choose to export one order per file or not.
  • File name suffix
    When choosing to export one order per file, you need to select a file name suffix between the order increment ID, the Magento internal order ID or the module internal auto-increment.

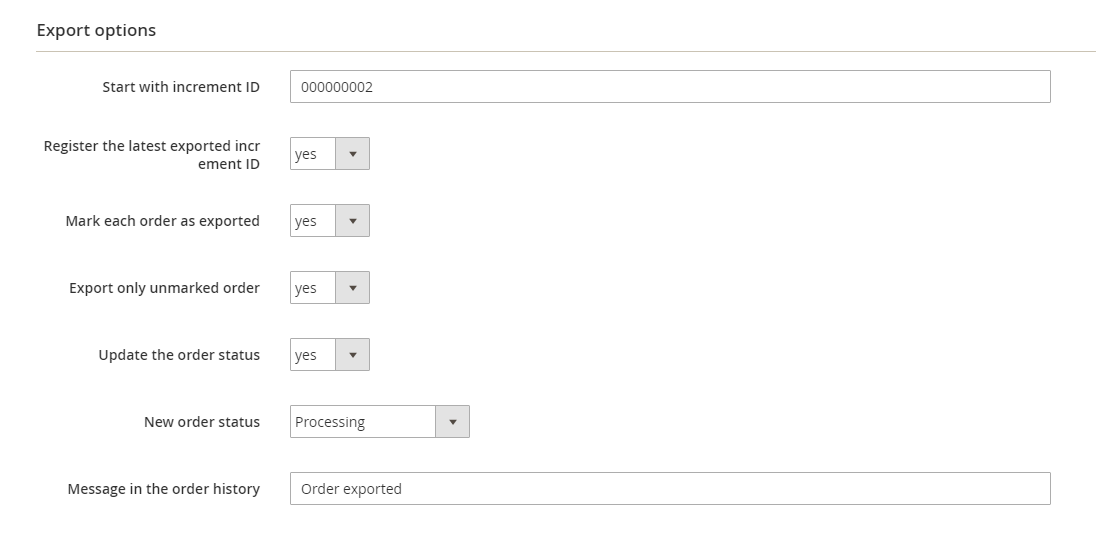
Export options

In that section, define how you want the file to be exported.

  • Start with increment ID
    You can add an ID from which the orders should be exported.
    000000002To export all the orders, you can leave this field empty.
  • Register the latest exported increment ID
    If enabled, this will automatically be updated with the latest ID.
  • Mark each order as exported
    If enabled, this will mark each exported order with the name of the profile. Note that an order can receive several flags.
    Exported toERP/CRM export/import
  • Export only unmarked order
    If enabled, only orders that are not yet marked will be exported. Note that the orders must also match with the filters.
    You should find an Exported to column inSalesOperations Orders . This will display for each order the profile to which the order has been exported. Orders will be marked only if they have been exported to a profile. If you need to export orders that have already been exported whereas you've defined Export only unmarked orders on YES, you can untag them by clicking on the cross.
  • Update the order status
    You have the possibility to update the order status.
  • New order status
    Choose the status to apply to the exported orders. 
    For example:
    Processing
  • Message in the order history
    You also have the possibility to add a comment to the history.
    Order exportedIf you don't want to add any message, you can leave this field empty.

Filters

In the Filters tab, you can define the types of orders and customers you want to include in your export profile. You have also the possibility to create more advanced filters that will best meet your needs.

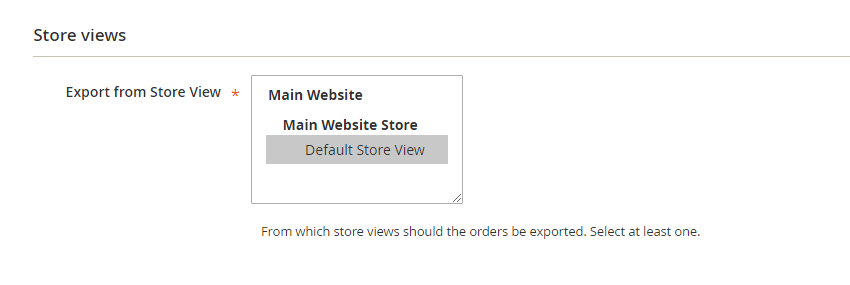
Store view

In this tab, choose the store view from which to export the orders. At least one store view must be selected

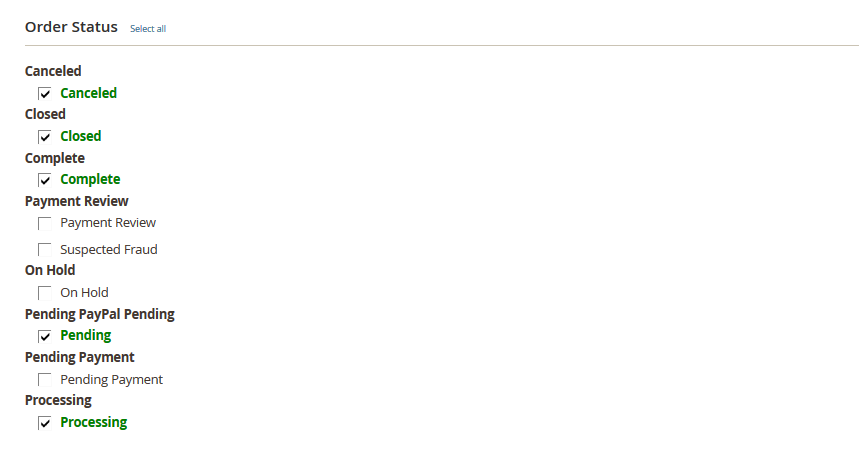
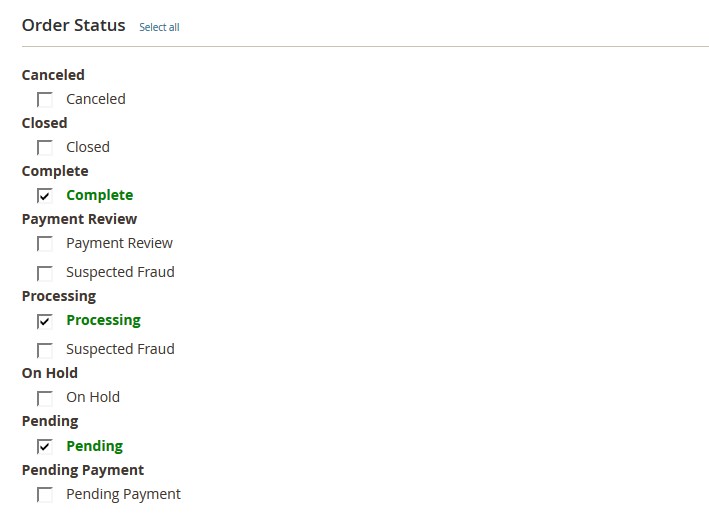
Order status

This section allows you to specify the type of order you want to export. At least one status must be selected.

Customer Group

In this tab, choose the customer group of the orders you want to export. At least one customer group must be selected.

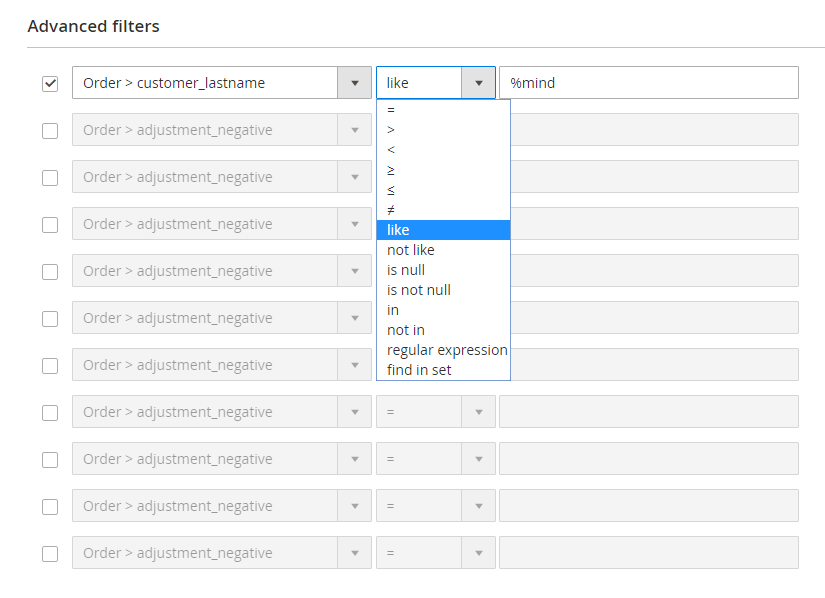
Advanced Filters

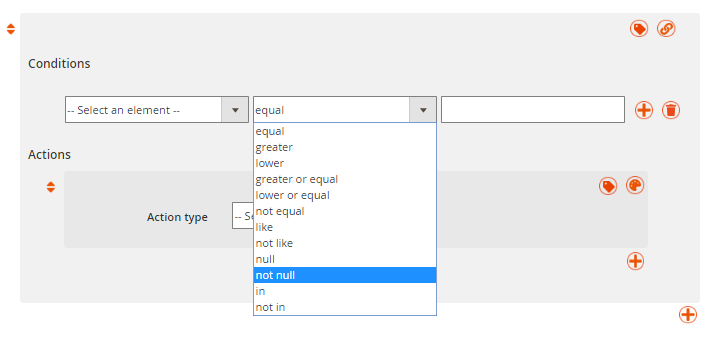
In that tab, you can create more precise filters. For example, you can choose to export only one specific order by setting a filter:
order > increment_id | = | ID of your order

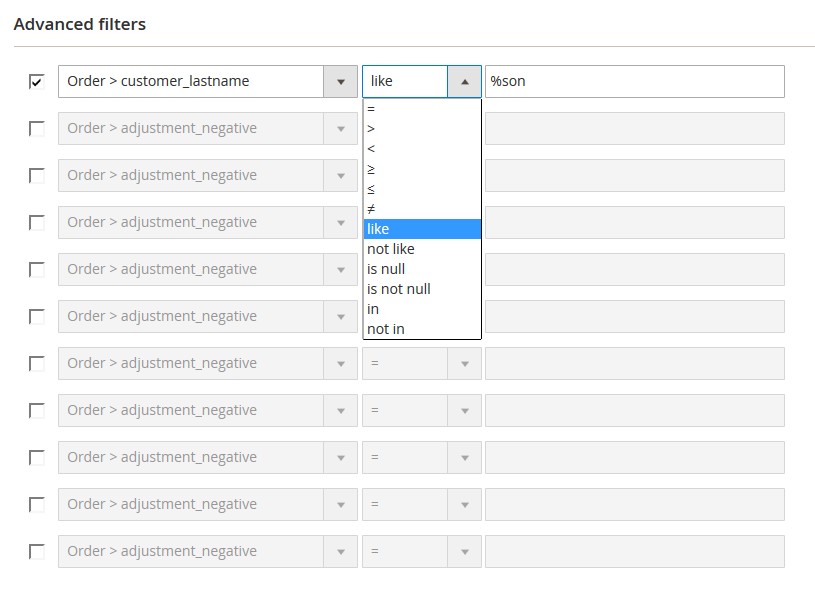
You can also export orders placed by customers whose last name ends with 'son':
order > customer_lastname | like | %son

You have a choice between several options:

  • =, >, <...
    Equal to, greater than, lower than, greater than or equal to, less than or equal to, different from.
  • LIKE / NOT LIKE
    like: starts/ends with the character string / includes the character string.
    Not like: doesn't start / end with the character string / doesn't include the character string.
  • IS NULL / IS NOT NULL
    is null: the value is null.
    is not null: the value is not null.
  • IN / NOT IN
    in: is in (selection of several options).
    not in: is not in (selection of several options).

Template

In this tab, you'll be able to configure your profile template according to your needs. Mass Order Export allows you to create different kinds of file:

  • XML
  • CSV
  • TXT
  • TSV
  • DIN
Note that you have the possibility to use some PHP code directly in your template.

XML Export file settings

You can select the XML file type.

  • File type
    XML
  • Enclose XML tag content inside CDATA
    When enabled, this encloses all node values with CDATA and avoids issues with special characters such as < (lower than), > (higher than) or & (ampersand). Note that this is recommended.

XML file template

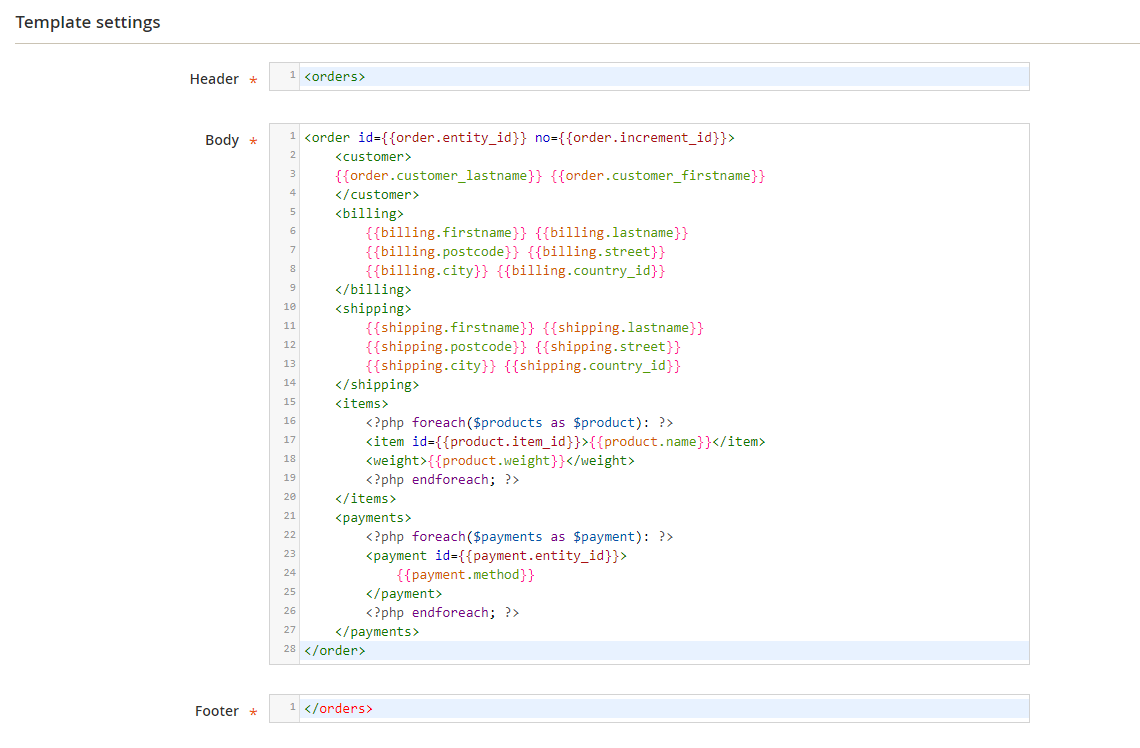
An XML template is made up of 3 parts:

  • Header
    Is at the start of the file:
    <orders>
  • Body 
    Is iterated for each order included in the file.
    <order> 
    ...
    </order>​​
  • Footer
    Is at the bottom of the file:
    </orders>


The XML structure allows you to use iterative syntax in different parts of the template, as follows:

<items>
<?php foreach($products as $product): ?>
<item id={{product.item_id}}>{{product.name}}</item>
<weight>{{product.weight}}</weight>
<?php endforeach; ?>
</items>

In most cases, orders contain more than one product, so it may be useful to create an iteration that loops for each ordered product. All the content between the opening and closing markers will be repeated for each product and all dynamic values will be replaced:

<?php foreach($products as $product): ?>
...
<?php endforeach; ?>

These iteration markers can be used for all order instances:

<?php foreach($payments as $payment): ?>
...
<?php endforeach; ?>
<?php foreach($invoices as $invoice): ?>
...
<?php endforeach; ?>
<?php foreach($shipments as $shipment): ?>
...
<?php endforeach; ?>
<?php foreach($creditmemos as $creditmemo): ?>
...
<?php endforeach; ?>

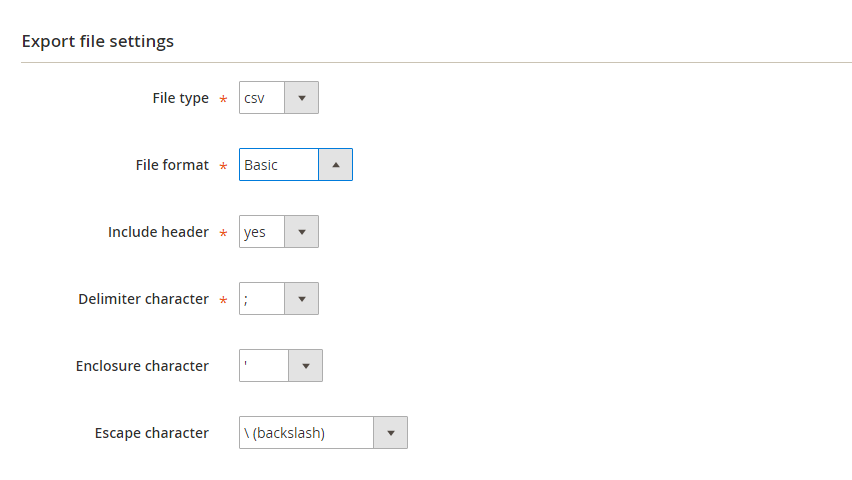
CSV/TXT/TSV/DIN Export file settings

The file type can be CSV, TXT, TSV, or DIN. You have the possibility to create basic or advanced files.

  • File format: Advanced format
    It consists of a complex file structure divided into several blocks.

  • File format: Basic format 
    It consists of one optional header and several rows applying the same pattern.
  • Include header
    Allows you to include or not the column's name in the first row of your file.
  • Delimiter character
    Lets you choose which kind of delimiter you want to use to separate your fields.
  • Enclosure character
    Character that surrounds each field of the rows.
  • Escape character
    Lets you choose which kind of enclosure character you want to use for your data.

CSV/TXT/TSV/DIN file template

The template tab will be updated to match the file type you've selected.

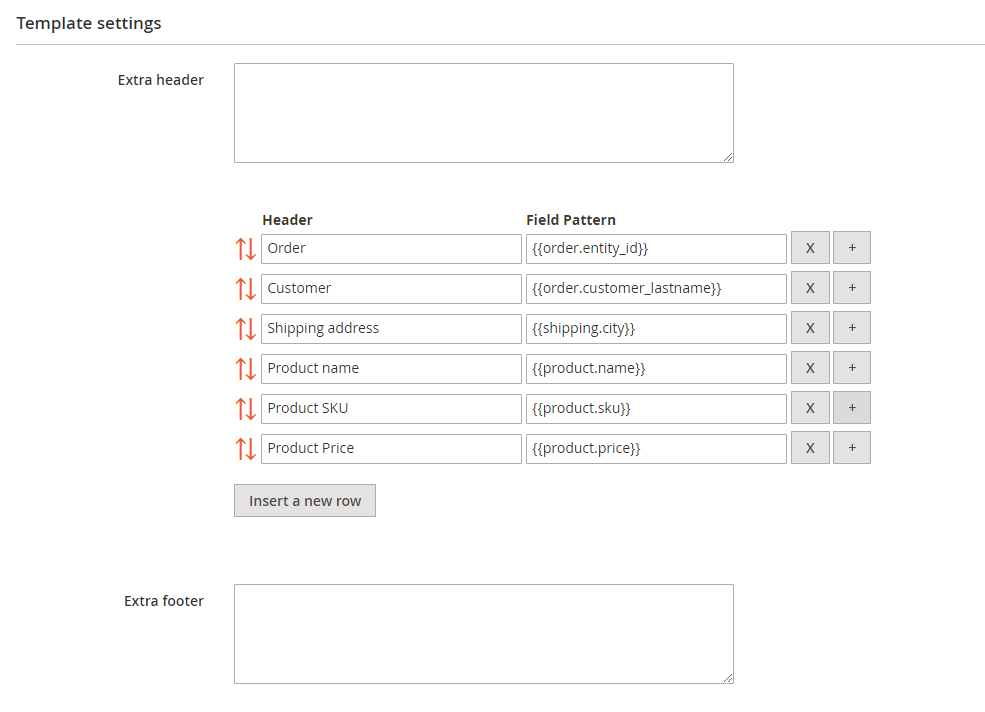
Basic file format

Basic format for txt-like files consists of one optional header and several rows applying the same pattern.

  • Extra Header
    These are additional row(s) of headers that will be added at the very top of the file.
  • Header
    Is for the attribute name that can be displayed at the top of the file.
  • Field Pattern
    Works in the same way as in XML files. Like for XML files, you're allowed to use PHP code if you want to customize the pattern. You just have to write your PHP code in one single line.
  • Insert a new field
    You can add a field by using this button. The fields can then be re-ordered easily by using the drag and drop arrows.
  • Extra Footer
    These are additional row(s) that will be added at the very bottom of the file.

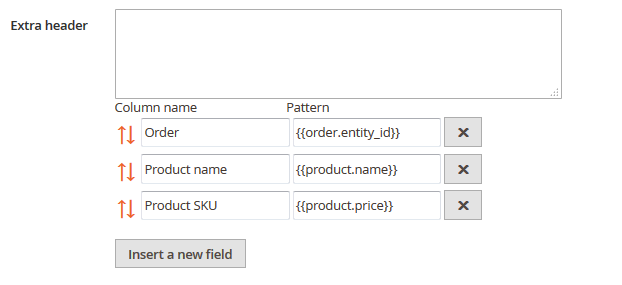
The main difference with the XML mode is that you can't use any iteration instructions. Instead, Mass Order Export uses an auto-consolidation internal process. This simply means if you try to get the value of any attribute of an instance (product for example) that contains several items, then the extension will automatically duplicate the TXT/CSV line for each item.

With the following configuration:

Logically the module should export one line for each order, but some orders may contain several product items. The extension will create several lines for the same order, as in the following output example:

Order#         Product Name          Product Sku
#10000001      my product A          AAA
#10000001      my product B          BBB
#10000001      my product C          CCC
#10000002      my product D          DDD
#10000003      my product B          BBB
#10000003      my product E          EEE
...

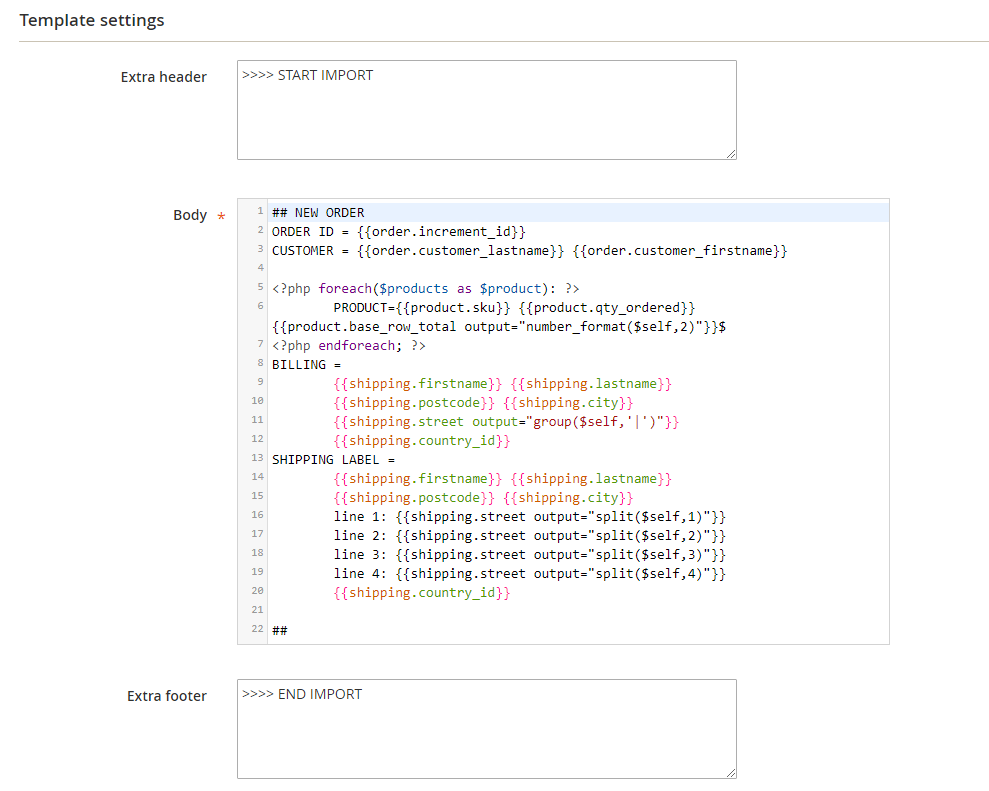
Advanced file format

Advanced format for txt-like files consists of a complex file structure divided into several blocks.

  • Extra Header
    These are additional row(s) of headers that will be added at the very top of the file.
  • Body
    Is iterated for each order included in the file.
  • Extra Footer
    These are additional row(s) that will be added at the very bottom of the file.

This format allows you to use iterative syntax in different parts of the template, as follows:

<?php foreach($products as $product): ?>
PRODUCT=
{{product.sku}}
{{product.qty_ordered}}
{{product.base_row_total output="number_format($self,2)"}}$      
<?php endforeach; ?>

Output

With Mass Order Export, you have many possibilities to export your profiles.

Storage settings

The first solution is to store your file directly on your server.

FTP settings

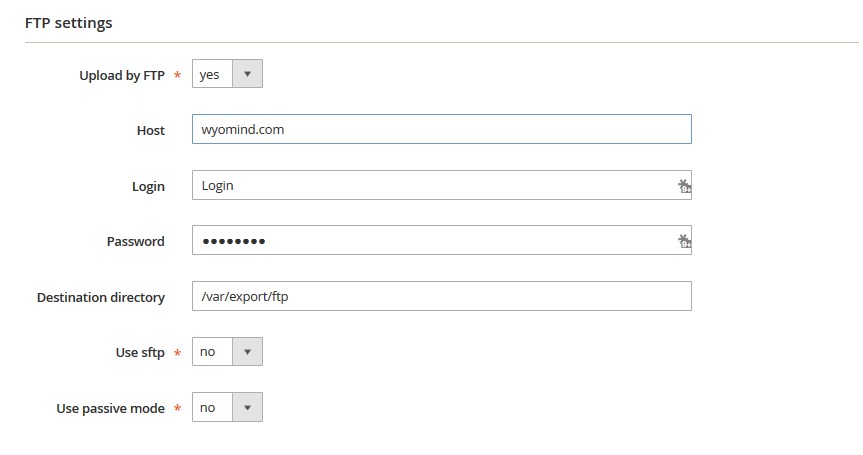
You can also configure the FTP settings in order to upload the generated profile to an external FTP server. For example:

  • Upload by FTP
    Select Yes if you want to upload your profile using FTP.
  • Use SFTP
    Select Yes if you are using SFTP.
  • Use passive mode
    If you are using SFTP, you don't have to care about the passive/active mode.
  • Host
    In that field, fill in the host.
    wyomind.com
  • Port
    It is the port to connect to server.
  • Login
    It is your login to connect to server.
  • Password
    It is your password to connect to server.
  • Destination directory
    It is a relative path from the entry directory when you connect to the ftp.
    /var/export/ftp

Email settings

Finally, you can choose to send your profiles by email. Don't forget to separate the email addresses with a comma.

  • Send by email
    You have the possibility to send the profile by email. 
  • Email sender
    This is the email of the sender. 
  • Email recipients
    This is the email(s) of the recipient(s). 
  • Email subject
    Define the subject of the email. 
  • Email body
    Add the content of your choice in the email body. 

You have the possibility to check the email by clicking on Test Email

A popup will confirm that the email has been. 

  • Send all files in the same email
    You have the possibility to send all the files in the email. 
  • Send all files in a zipped file
    You can add the files in a zip file.

The file is saved, uploaded, or sent each time the feed is generated manually or automatically.

Cron Schedule

In that tab, you can choose the days and hours when you want your profiles to be generated.

Read more documentation about the Mass Order Export module.

STEP 3: Update your orders

Finally, Mass Order Update will allow you to update your orders. 

Here is how to create a profile with Mass Order Update. 

Click on create a new profile from:
SalesMass Order UpdateProfiles

The Tool Box

The toolbox is very useful as this will help you to configure your update file more quickly.

Below are the different options for the toolbox.

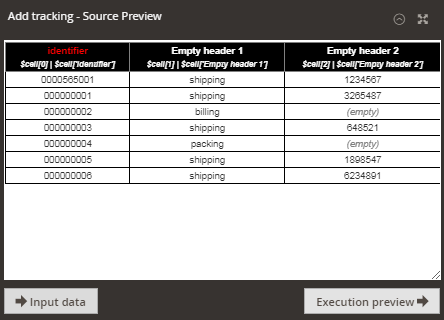
Input Data

To get a preview of the source file, click on INPUT DATA.

Output Data

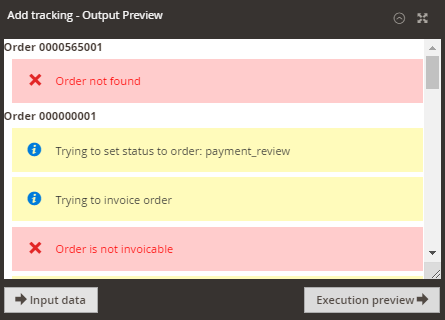
Clicking on Execution Preview will show you what actions will be performed on your orders during the profile execution depending on your current configuration.

You can have different notifications among which:

  • Order not found
    The order cannot be found among your Magento instance.
  • Order is not...
    The order cannot be shipped, invoiced...
  • Conditions not fulfilled for rule ***
    The order doesn't meet the conditions for the rule.
  • Trying to ...
    The order meets the conditions for the rule, and the action will be performed on the order.

Settings

Import Profile Settings

Define the settings for your profile.  

  • Profile Name
    The profile's name must be unique.
  • Filter lines
    Leave empty to import all lines:
     means all lines will be imported
    Type the numbers of the lines you want to import, making sure to separate each line or range with a comma (,):
    2,4,6,8,10means lines 2,4,6,8,10 will be imported
    Use a dash (-) to denote a range of lines:
    8-10means lines 8,9,10 will be imported
    Use a plus (+) to import all lines from a line number:
    4+means all lines from line 4 will be imported

    Use regular expressions surrounded by # to indicate a particular group of identifiers to import:#0000002[0-9]+#
    means all lines with an identifier matching the regular expression will be imported
    Note you can combine all those options. For example 2,6-10,15+ means line 2,6,7,8,9,10,15,16,17,... will be imported.

File Location

This section allows you to specify where the source data file is stored. You have several options:

  • Magento File System
    The file is stored in the Magento root directory or a subdirectory of the Magento root directory.
    The File path is relative to Magento root folder.
  • FTP server
    The file is stored on a remote server available from FTP or SFTP. Do not prefix the domain name or the IP with FTP://.
    You'll be able to check if the FTP connexion is valid.
    The File path is relative to FTP user root folder.
  • URL
    The file is stored on a remote server available from HTTP or HTTPS.
    Fill in the File path with the URL of the file.
  • Webservice
    The file is available on a remote server accessible as web service.
    Fill in the File path with the URL of the web service.
    The extension uses the CURL PHP library to connect the web service. You can provide the web service a login/password couple and any parameters formatted as url parameters, as follows:
    parameter1=value1&parameter2=value2&parameter3=value3
  • Dropbox
    Fill in the File Path with the URL of the dropbox service.
    Generate your token from your Dropbox account https://www.dropbox.com/developers/apps

Order Identification

Choose how your orders will be identified in the imported file:

  • Order identification
    You have the possibility to choose the order id or the order increment.
    For example:
    3420
    or
    1000003421
  • Identifier offset
    You need to select the field which contains the order identifier.

File Type

This allows you to specify the file type used for the update between XML and CSV.

For CSV files, define:

  • Column separator
    Define the column separator.
  • Text delimiter
    Select the text delimiter.
  • The first line is a header
    Specify when the first line is a header.
Note that our module rules will process your file line by line, so all data for a rule needs to be in the same line.

For XML files, define:

  • Xpath to orders
    In case of an update from an XML file, fill in the XPath that targets the orders. The Xpath is case sensitive.
  • XML structure
    You have two options; the Automatic detection or the Predefined structure.
    The automatic detection fits for simple files made of only one nesting level such as the above file sample.
  • Predefined structure
    If you've selected the Predefined structure, you have the possibility to define your own file structure. When the structure of your file is quite complex, the info may be dispatched in deep nodes and sometimes in tag attributes such as:
    url="something"


    Below is an example of complex file where you need a predefined structure:
    <orders>
     <order>
      <CustomerOrderId>000000028</CustomerOrderId>
      <order-shipment>
       <OrderTrackingNumber>334678MCLK</OrderTrackingNumber>
       <OrderCarrier>ups</OrderCarrier>
       <OrderTrackingURL>https://www.fedex.com/apps/fedextrack/?action=track&amp;trackingnumber=334678MCLK&amp;cntry_code=us&amp;locale=en_US</OrderTrackingURL>
      </order-shipment>
     </order>
    </orders>

    The XPath that targets the orders in the above file is /orders/order

    The JSON syntax you need to use is:
    { 
    "incrementid":"CustomerOrderId", 
    "tracking_number":"order-shipment/OrderTrackingNumber", 
    "carrier":"order-shipment/OrderCarrier"
    }

Post Process Action

You have the possibility to define an action after the file is processed.

  • Action
    Do Nothing
    Delete the import file
    Move import file
  • Move to folder
    Define the file path where you want to move the import file, relative to your Magento root folder.

Note that this option is available only for files locally hosted in your Magento File System.

Rules

In that section, you can define your own rules and give them a Rule name

A rule is a combination from 0 to n conditions and from 1 to n actions. Rules are tested for each order corresponding to an element of the file. If the conditions are met for the current element, the actions of the rule will be executed for the order.

If there is no condition for a rule, the actions are always executed for the order.

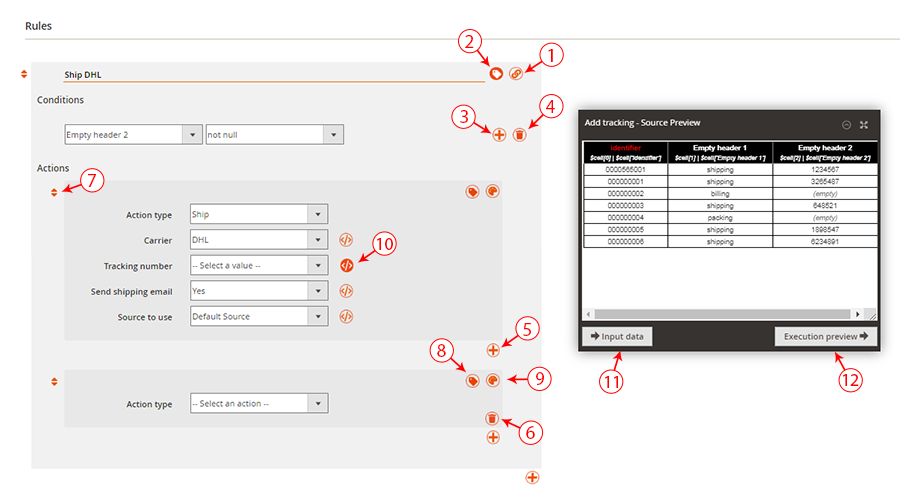
Overview of the interface

Find below a quick overview of the Rules section. 

  1. Enable or disable a rule by clicking on the LINK symbol.
  2. Apply a label to the rule.
  3. Add a condition to your rule by clicking on +
  4. Delete a condition from the rule.
  5. Add a new action. 
  6. Delete an action from the rule.
  7. Change the order of each row using the drag and drop.
  8. Apply a label to the action.
  9. Apply the color of your choice to the action.
  10. Apply a custom script </> to the action options.
    These scripts can be previewed in the output. 
    See how to use the PHP API.
  11. Preview your file by clicking INPUT DATA.
  12. Check the actions that will be performed on your orders by clicking Execution preview.

Conditions

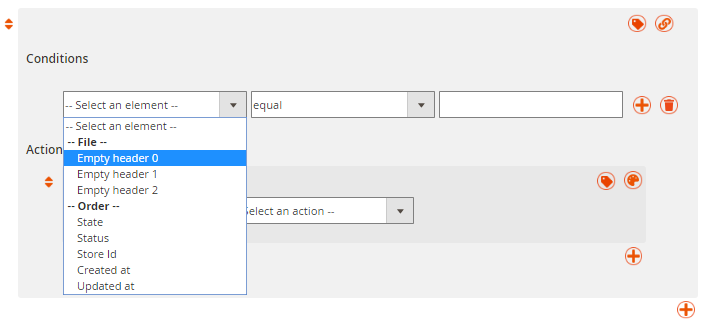
You can define conditions based on:

  • the file: the conditions are based on the data available in the source file
  • the order: the conditions are based on the orders data

You have the possibility to define conditions according to several options such as:

  • EQUAL / NOT EQUAL
  • GREATER / LOWER
  • GREATER OR EQUAL / LOWER OR EQUAL
  • LIKE / NOT LIKE
  • IS NULL / IS NOT NULL
  • IN / NOT IN

Actions

You can select the below actions: 

  • Set status
    You will have to select the status you want to apply to the orders. 
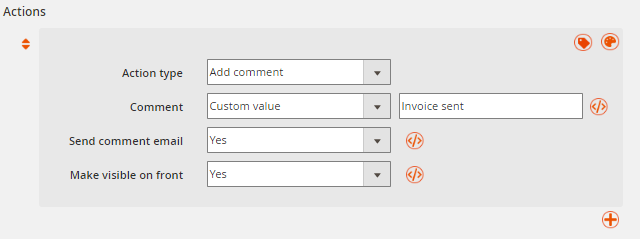
  • Add comment
    You can define the comment you want to add to the orders as well as if you want to send the comment email and make the comment visible on the front-office, in the customer account.
  • Invoice
    You can define if you want to send the invoice and the email.

  • Creditmemo
    You can define if you want to send the credit memo and the email.

  • Ship
    Define the carrier to apply, the tracking number, the source to use, and if you want to send a shipping email.
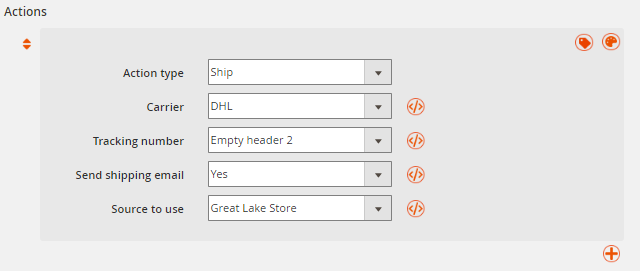
Note that the Source to use field will only be displayed if the Magento MSI module is enabled. 
  • Cancel
    Define if you want to cancel the orders. 

Scheduled Tasks

You can schedule the profile to be executed for all days of the week and with a default interval of 30 minutes between each execution.

The cron interval can be configured in the General Settings from: 
StoresSettingsConfigurationWyomindMass Order Update

Read more documentation about the Mass Order Update module.

ERP Suite: connect your ERP or logistics software with your Magento® website!

If you have any trouble making the link between your Magento® store and your ERP, the ERP Suite is an all-in-one solution for smoothly importing your product data and synchronizing your orders!

  • Lifetime license
  • 12 months support & upgrade
  • 60 days money-back guarantee
  • Extensible source code
  • Free composer access
  • Marketplace approved
Want to know more?

Enjoy smooth connection

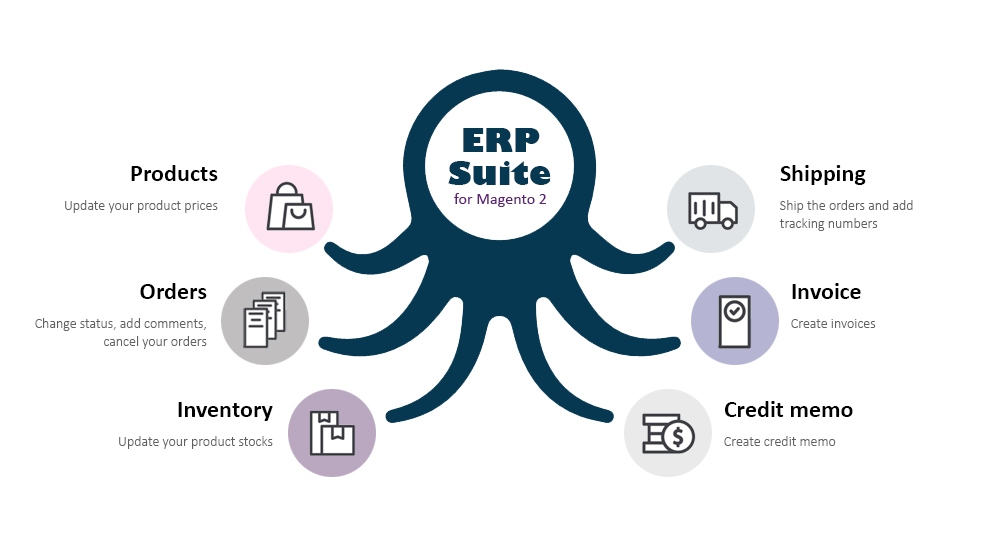
Gain in agility and easily implement the interface of your Magento® store to your ERP since ERP Suite already includes all the tools to allow a quick and flawless synchronization:

Mass Product Import & Update
to import/update your products

Mass Order Export
to export your orders

Mass Order Update
to update your orders


Import your product catalog in one go

Product types
Import all types of products: simple, configurable, bundle...

File types
Use CSV, XML, or JSON files to import your products. 

Product attributes
Import your products' images, categories, and attributes.

Save huge time updating your data

Products
Massively update the prices of your products in record time.

Orders
Quickly update orders: add comments, change status, cancel.

Inventory
Automatically update all Magento® stocks attributes in one go.

Shipping
Ship orders and add tracking numbers very simply and quickly.

Invoices
Generate the invoice and send the email to the customer.

Credit Memo
Send credit notes and confirmation emails to customers.

Export your orders

Easily synchronize your orders between your Magento® 2 store and your ERP with Mass Order Export. Configure your export profiles with all the necessary data and quickly export your orders and all linked data (invoices, credit memos...). 

Automate your data synchronization

Schedule the automation of the import and export tasks for your orders, products, inventory...
Choose the right moment to massively change prices, add new products and keep your store information up to date.

Check out all the possibilities you have with the ERP Suite trying our demo, or contact us if you have any questions.

Freqently Asked Questions
Pre-sales informations

This extension works with Magento Community Edition and also Magento Enterprise Edition. To know if ERP & Logistics suite is compatible with your Magento version, please check the Compatibility tab.

Magento offers three variations of its product.

As their names have changed over the past few years, here is a recap:

  • Magento Open Sourcepreviously Magento Community Edition (CE), is a free and non-hosted e-commerce platform.
  • Magento Commerce: previously Magento Enterprise (EE), is the paid version of Magento and offers support services.
  • Magento Commerce Cloud: is the paid version of Magento and offers support and hosting services.
License and domains

A license is valid for an unlimited period of time on one single installation

  • If you're using more than one installation, you will have to buy a separate license for each instance.
  • if you're running several domains on a same installation, you will need only one license for all of them.
Although your license doesn’t have a limited period of validity, your Support & Upgrade period does. By purchasing a module, you’ll be granted a 12-month support period for free. Passed this period, you will have to pay for a new one (see FAQ: Extend your Support period)

You can pre-register your live domain to your license in advance.

Thanks to this option, you'll be able to get the module ready to use on your domain before it goes live.

To pre-register your production domain: 

  1. Go to:
    mY accountLicenses & DOwnloads
  2. Click on the Settings icon next to the module you want your domain to pre-register on.
  3. Click on the link at the bottom of the page saying:
    Do you want to pre-register your domain in order to be ready to go live?
  4. Finally, enter your domain name and click on pre-register now .

Attention, this doesn't mean your license is activated. You'll still have to activate it on your new domain when the module is installed. 

One license is valid for an unlimited period of time on one installation only. However, it is possible to extend or transfer your license in 2 cases: 

  • If you would like to add your testing environments to your license. 
    In that case, it is possible to extend your license to an unlimited number of domains for free.
    For  mywebsite-staging.com or mywebsite-dev.com
  • If you want to transfer your license to another live domain.
    In that case, the Support & Upgrade period for your license must still be active.

To be able to use ERP & Logistics suite on both your production and testing environments, follow the instructions below:

  1. Download ERP & Logistics suite.
    (see FAQ: Extensions download)
  2. Install ERP & Logistics suite on your environment.
    (see FAQ: Modules installation in Magento or in WooCommerce)
  3. Activate the license.
    (see FAQ: Licenses activation in Magento or in WooCommerce)

Also, if you are managing a large amount of domains, please contact us so that we can automatically whitelist these domains.
Modules versioning and download

In order to download ERP & Logistics suite, log into your Wyomind account:

    1. Go to:
      my accountLicenses & downloads 
    2. Click on the settings icon next to ERP & Logistics suite.

      A new window opens.

    3. Click on the download icon.


Only the latest extension version released within your Support & Upgrade period is available. In order to get the very latest extension version make sure your Support & Upgrade plan is up to date.

When purchasing a module from wyomind.com, you benefit from 12 months of upgrade. Within this period you can at any time download the latest version of the module directly from your account.

To upgrade ERP & Logistics suite, follow the steps below:

  1. Go to:
    my accountLicenses & Downloads
  2. Click on the settings icon next to ERP & Logistics suite.
  3. Click on the download icon.
  4. Install the new version of ERP & Logistics suite in your Magento admin or your WooCommerce back-office.

Modules Installation/Uninstallation

You can install ERP & Logistics suite manually.

  1. Download ERP & Logistics suite (zip file) on:
    mY ACCOUNTLicenses & Downloads
     
    Refer to the FAQ: Extensions download
  2. Once ERP & Logistics suite is downloaded, open the folder and unzip it.
  3. Copy the content of the unzipped folder and paste all files and directories in your Magento 2 root directory.
  4. In your Command Line Interface, execute:
    bin/magento setup:upgrade 

    If you are using a production mode, execute also:

    bin/magento setup:static-content:deploy  
    bin/magento setup:di:compile  

You can install ERP & Logistics suite using Composer software in two cases:

  • if you purchased ERP & Logistics suite on Magento Marketplace.
  • if you purchased ERP & Logistics suite on Wyomind.com AND requested access to our repository:
    repo.wyomind.com
  1. Add to your composer configuration our repository:
    composer config repositories.wyomind composer https://repo.wyomind.com 

  2. Execute Composer command:
    composer require wyomind/
  3. Then go in your Command Line Interface and execute:
    bin/magento setup:upgrade ​
  4. If you are using a production mode, also execute:
    bin/magento setup:static-content:deploy  ​
    bin/magento setup:di:compile​

To uninstall ERP & Logistics suite, start with disabling the extension running the following command:

bin/magento module:disable Wyomind_

Then, you have 2 ways to uninstall the extension depending on how the extension has been previously installed: 

  • Manual installation

    Run the -uninstall.sh file (you can find it in the extension zip folder) from your Magento root directory:

    sh -uninstall.sh


  • Installation via Composer

    Run the below command line:

    composer remove wyomind/

Once the uninstallation is over, refresh your cache and enable the compiler back again (if you use it). 

You can install ERP & Logistics suite via Web Setup Wizard if you purchased it from Magento Marketplace only.

To know how to proceed, all steps are described in the link below: 
http://docs.magento.com/m2/ce/user_guide/system/component-manager.html

Next step is to activate your license:
Extension activation

Modules activation

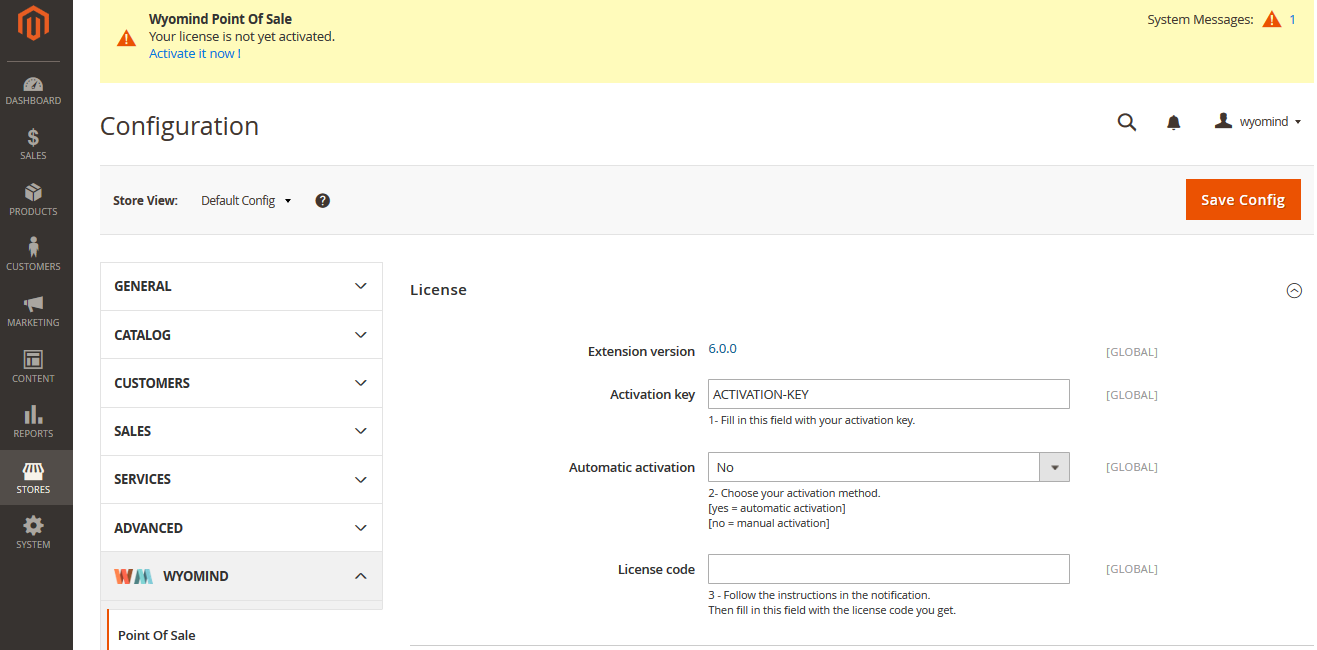
Once ERP & Logistics suite is installed, you have to activate the license. For previous versions, you can activate the license from your back-office:

    1. Go to your Magento admin panel. A message pops up at the top of the page.


      If the message doesn't appear then you must check that:

         1. The Adminhtml_Notifications and Wyomind_Core modules are well enabled.
         2. The HTML output of the Adminhtml_Notifications and Wyomind_Core modules are not disabled in:
      storesconfigurationadvanced advanced
         3. The encryption key well exists in app/etc/env.php:
      <?php
       return array(
       'backend' => array(
       'frontName' => 'admin'
       ),
       'crypt' => array(
       'key' => '1e8f3c6772b7a6a6689c3c8cefa4ccf0'
       ),
       /* ... */
       )
      ?>​
    2. Copy your activation key in:
      StoresConfigurationWyomind Your extension

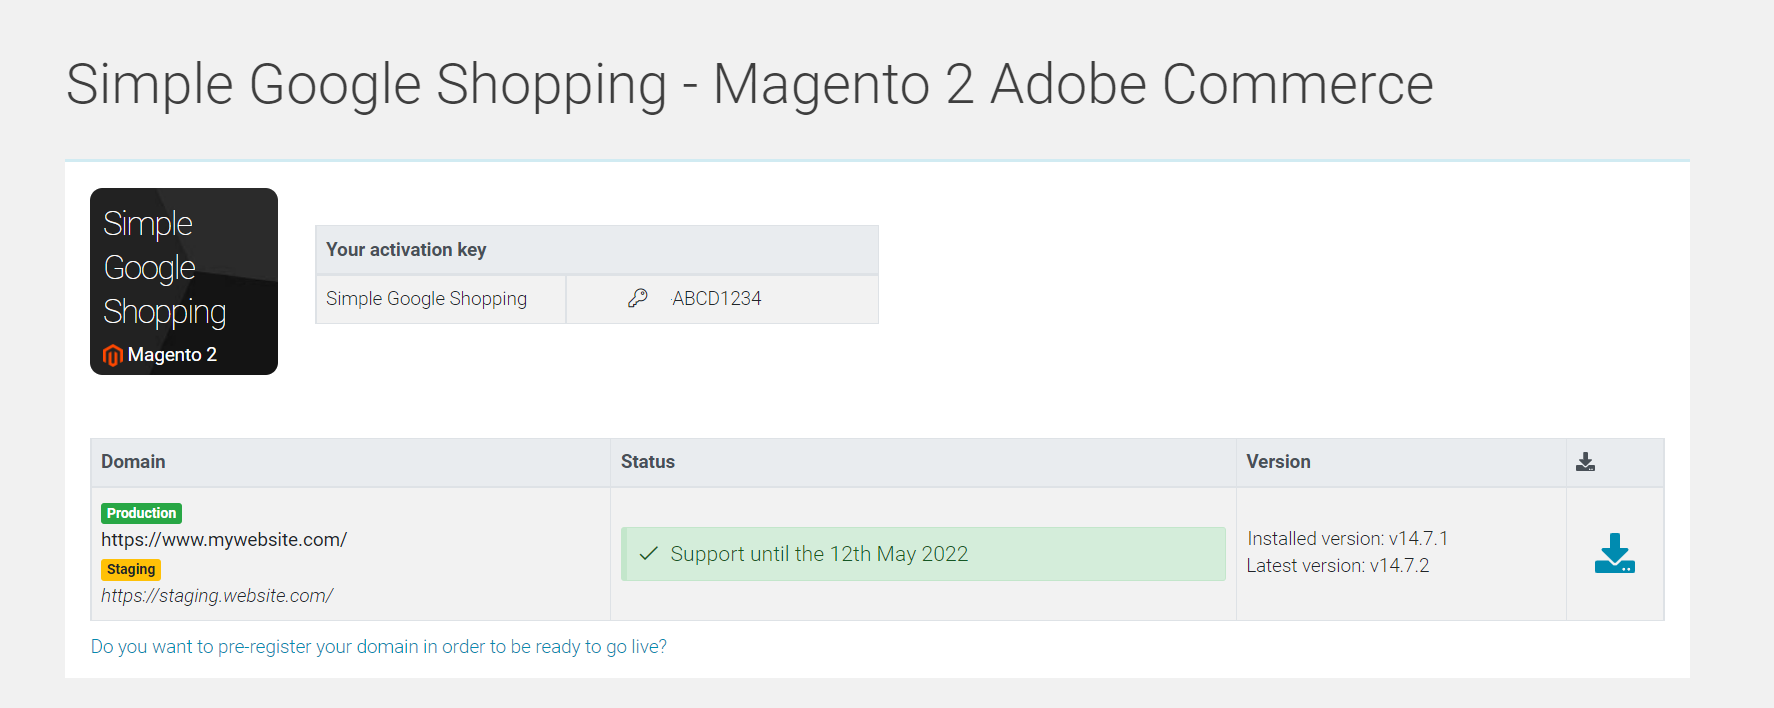
      You can find your activation key in 2 different places:
      In the confirmation email that you received after purchasing ERP & Logistics suite.
      In your Wyomind account:My account Licenses & downloads
      Select ERP & Logistics suite and click on  .

      A new page opens where you'll find your activation key (see below).


    3. In your Magento admin go to:
      StoresConfigurationWyomind Your extension

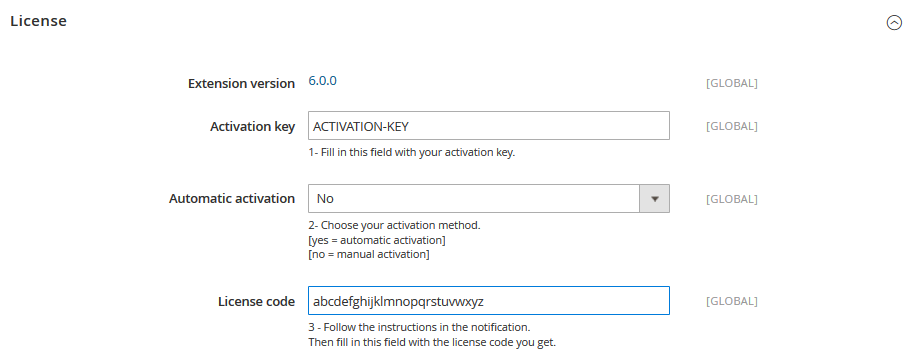
      Paste the activation key in the Activation Key field and choose between the automatic (yes) or the manual (no) activation method:
      By choosing Yes, the connection to Wyomind license server will be automatic.
      By choosing No, you will have to log on to Wyomind license server yourself.

    4. Click on Save config .
    5. A message appears at the top of your admin panel. Click on that link: 
      Activate it now!
    6. Copy and paste the license code in the License code field from your admin or simply click on Activate now! 


    7. Finally, refresh your cache, log out and log in back straight after, to complete the installation.

When the extension includes other modules, repeat the steps described above for each one, using the corresponding activation keys (each module has its own activation key).

Add another domain to your license


To activate the license on another domain (test, staging...):

  1. Once the extension is installed on the new domain, copy your activation key in:
    StoresConfigurationWyomind Your extension
  2. After having saved the configuration, a notification appears. Click on Add this domain to my license.

  3. A transfer request will then be sent to our team within an hour.
    Once the request is taken care of, you will receive a confirmation email.
    If your transfer request is accepted, you can use ERP & Logistics suite on both environments at the same time.

Note that the order in which you activate your license on your domains does not matter. You can start with your staging/dev/local environment or with your live domain, the process will be the same.

Also, if you have loads of staging domains, or if you are an agency managing load of domains for your customers, please contact us so that we can automatically whitelist these domains.

Once ERP & Logistics suite is installed, you have to activate the license.

For this, you can use the below command line (change the Activation key with the corresponding value):

bin/magento wyomind:license:activate Wyomind_ <YOUR_ACTIVATION_KEY>

To retrieve the list of all the available modules as well as the licenses status, please use:

bin/magento wyomind:license:status


 Among the different status, you can find: 

  • registered = your license is registered
  • pending = you need to run the activation command line
  • invalidated = the license has been invalidated due to a wrong activation key or a license infringement


To activate several licenses at the same time, use:

bin/magento wyomind:license:activate \
Wyomind_Extension1,Wyomind_Extension2 \
ACTIVATION_KEY_1,ACTIVATION_KEY_2

or:

bin/magento wyomind:license:activate \
Extension1,Extension2 \
ACTIVATION_KEY_1,ACTIVATION_KEY_2
Modules use

You have the possibility to open the generated CSV file with any spreadsheet application.

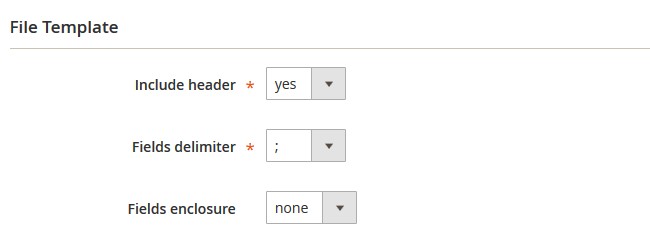
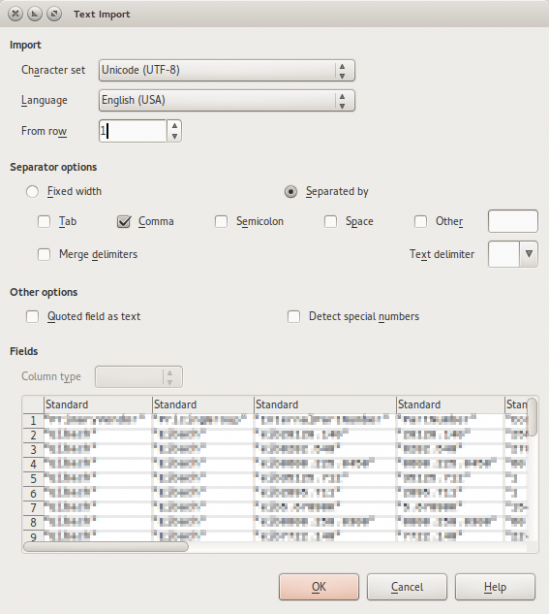
While opening your data feed, you need to make sure to select the delimiter options that correspond with your data feed configuration from your Magento 2 admin.
  1. In your data feed configuration (from Magento 2), choose how your columns will be separated with:
    tabulation, comma, semi-colon...
  2. Generate the data feed.
  3. Open the data feed with a spreadsheed application.
  4. Choose the same delimiter and enclosure characters as in your data feed configuration.

For example, if you've chosen semi-colon as Fields delimiter, then you'll need to open the file choosing ";" as field delimiter as well as if you've choosen double quotes as the Fields enclosure, then you'll have to make sure that you've selected the same character.

Note that the Excel application won't show this popup when opening the file.

The indexes may need to be updated after importing data.

You can define the post process action in your profile settings from: 
SystemData TransferMass PRODUCT IMPORT & Update


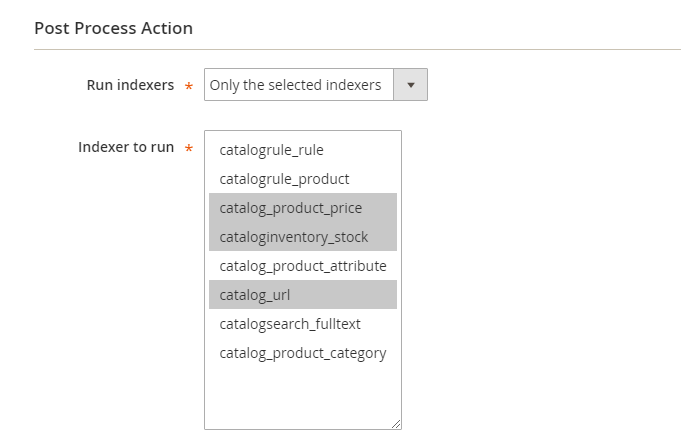
You can decide to run the indexers after the import or not:

  • No
    No indexer will run. You will have to reindex manually from the CLI
  • Only the required indexers
    Automatically decides which indexers must run
  • Only the selected indexers 
    You decide which indexers to run.
    For example:
    catalog_product_pricecataloginventory_stockcatalog_url

You can use regular expression in the File path field. This will make the file name dynamic and all files matching the regular expression will be processed by your profile.

For example:

  • filename-.*
    That expression will take into account all files starting with "filename-". You can also use this example to run the profile with files using the following format: filename-YYYY-MM-DD.ext
  • orders_update_[0-9].csv
    That expression will take into account all files starting with "orders_update_" followed by a number between 0 and 9 and ending with ".csv".

The profile will then run all the corresponding files one by one.

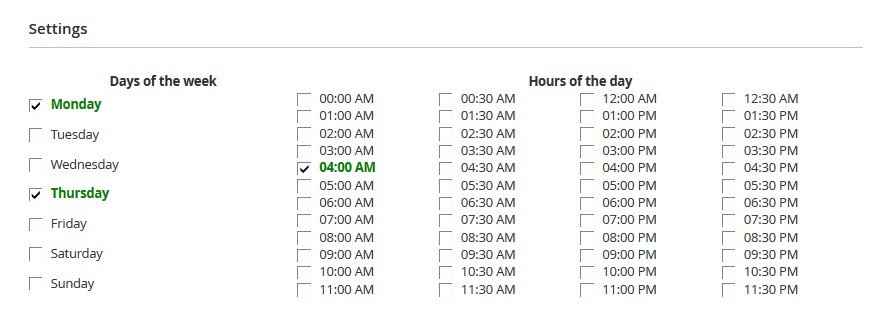
For your profile to be executed automatically, you need to define the days of the week and the time of execution directly from your profile configuration in:
SystemData TransferERP & Logistics suite

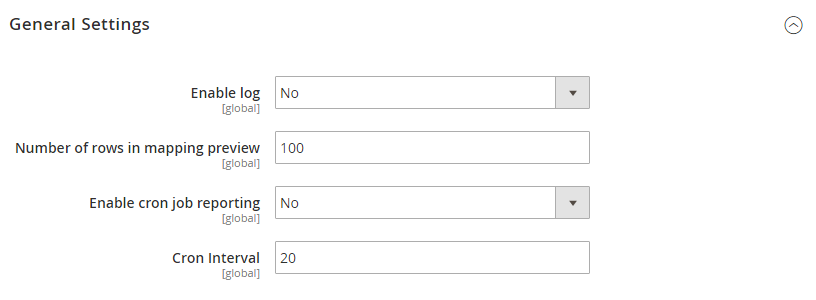
By default, cron tasks can be scheduled each period of 30 minutes. 

If you need a more precise hour, you can change that interval from:
SToresSettingsConfigurationWyomindERP & Logistics suiteSettings
Below is an example with an interval of 20 minutes: 

For a good working of the scheduled tasks, the main cron task in Magento must be properly configured. Check how cron tasks work.

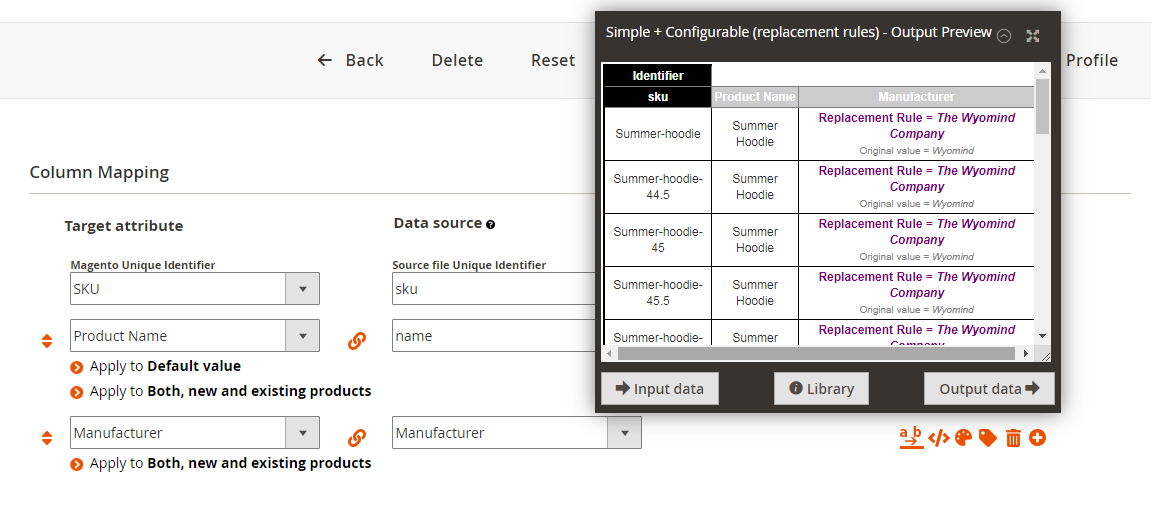
Mass Product Import & Update allows you to replace some values in the output data. 

For example, in your source file, the manufacturer name is Wyomind but you need to have The Wyomind Company. Then you can easily replace it using the replacement rules such as in the below example. 

See more about how to use replacement rules

ERP & Logistics suite offers you many possibilities to export your orders. You can set filters according to your needs. In the Filters tab of your profile configuration, you'll find 3 subtabs.

Order status

Select the types of orders you want to export. For example choose to export pending, processing and complete orders.

Customers group

In that tab, you can select the customers group of the orders you want to include in your data feed. For example choose to export orders placed by general and not logged in customers only.

Advanced filters

In that tab, you can create more precise filters. For example, you can choose to export only one specific order by setting a filter:

order > increment_id | = | Id of your order

You can also export orders placed by customers whose lastname ends with 'son':

order > customer_lastname | like | %son

You have the choice between several options:

  • =, >, <...
    Equal to, greater than, lower than, greater than or equal to, less than or equal to, different from.
  • LIKE / NOT LIKE
    like: starts / ends with the character string / includes the character string.
    Not like: doesn't start / end with the character string / doesn't include the character string.
  • IS NULL / IS NOT NULL
    is null: the value is null.
    is not null: the value is not null.
  • IN / NOT IN
    in: is in (selection of several options).
    not in: is not in (selection of several options).

You want to import several products into your Magento back-office but in your source file, you're using different attributes and values in a same column.

For example: length and width.

You can use the dynamic attribute with the following syntax:
attribute_code=value

And then map the column with the dynamic attribute. 

You also have the possibility to use PHP scripts to link values coming from different columns.

You can use regular expressions in the advanced filters. For example, with the Advanced Inventory extension, it can be useful to filter the orders and products that have been assigned to a particular store.

Instead of a unique store name, you can use a regular expression that will make the profile dynamic.

For example: 
Order > assigned_to     regexp     (,|^)(1)(,|$)
Product > assigned_to     regexp     (,|^)(1)(,|$)

That expression will take into account all orders and products assigned to a store.

To define the path to products, you must determine the path to the node where the products are stored.

For example, if your XML source file looks like the one below:

<products>
 <item>
  <name><![CDATA[Amazing product]]></name>
  <images>
   <img url="https://www.example.com/path/to/product/image/1.jpg" />
   <img url="https://www.example.com/path/to/product/image/2.jpg" />
  </images>
  <categories>
   <category><![CDATA[Category A]]></category>
   <category><![CDATA[Category B]]></category>
   <category><![CDATA[Category C]]></category>
  </categories>
  <description><![CDATA[Amazing product description]]></description>
 </item>
</products>​

Then, the path that targets the products is:
/products/item

The paths to the nodes and values are based on XPath. For more information on the syntax to use, see the following documentation: https://www.w3schools.com/xml/xpath_syntax.asp

In Orders Export Tool, you can specify FTP settings to upload your file.

From the Magento 2 admin, select a file and go to the Output tab. There you have 3 options to export your profile. If you choose to enable the FTP settings, here is how to configure each field:

  • Enable FTP upload
    Select Yes if you want to upload your data feed using FTP.
  • Host
    In that field, fill in the host.
    For example:
    wyomind.com
  • Login
    is your login to connect to server
  • Password
    is your password to connect to server
  • Destination director
    is a relative path from the entry directory when you connect to the ftp.
    For example:
    /var/export/ftp
  • Use SFTP
    Select Yes if you are using SFTP.
  • Use Active mode
    If you are using SFTP, you don't have to care about the passive/active mode.
    For more info about Active and Passive mode, have a look to that documentation.

The file is uploaded each time the feed is generated manually or automatically.

To define the path to products, you must determine the path to the node where the products are stored.

For example, if your JSON source file looks like the one below:

{"Productlist":[{
	"ITEMID":"0123456789",
	"ITEMNAME":"Item Name",
	"ITEMGROUPID":"4500",
	"BRAND":"BRAND",
	"YEAR":"0",
	"ORIGINCOUNTRYREGIONID":"FR",
	"PICTURE":"http://www.domain.com/pub/image.jpg",
	"STATUS":"1",
	"PRODUCTQTY":"0",
	"CURRENT_STOCK":"0",
	}]}

Then, the path that targets the products is:
$.Productlist

We use the JSONPath syntax from the SoftCreateR project. For more information, see the next page: https://github.com/SoftCreatR/JSONPath

With Mass Order Export, you can now define the encoding type of your files and choose to export them using UTF-8 with or without BOM.

BOM stands for Byte Order Mark and are the first 3 bytes of a file.

If there's no BOM, then the encoding type will be implicitly detected according to the file. On the contrary, BOM allow to declare the encoding type very clearly.

When the structure of your XML file is quite complex, the info may be dispatched in deep nodes and sometimes in tag attributes.

Then, you can define your own file structure.

Below is an example of a complex XML file where you need a predefined structure:

<offers xmlns:xsi="http://www.w3.org/2001/XMLSchema-instance" version="1">
 <offer price="165.07" msrp="189.00" availability="3">
  <name><![CDATA[Amazing product]]></name>
  <images>
   <img url="https://www.example.com/path/to/product/image/1.jpg" />
   <img url="https://www.example.com/path/to/product/image/2.jpg" />
  </images>
  <categories>
   <category><![CDATA[Category A]]></category>
   <category><![CDATA[Category B]]></category>
   <category><![CDATA[Category C]]></category>
  </categories>
  <description><![CDATA[Amazing product description]]></description>
  <attributes>
   <attibute name="sku"><![CDATA[XYZ]]></attibute>
   <attibute name="ean"><![CDATA[123456789]]></attibute>
   <attibute name="tax"><![CDATA[VAT 20%]]></attibute>
  </attributes>
 </offer>
</offers>​

The predefined structure you need to use is:

{ 
 "sku":"attributes/attribute[@name='sku']",
 "ean":"attributes/attribute[@name='ean']",
 "price":"@price",
 "msrp":"@msrp",
 "tax":"attributes/attribute[@name='tax']",
 "name":"name",
 "description":"description",
 "category_1":"categories/category[1]",
 "category_2":"categories/category[2]",
 "category_3":"categories/category[3]",
 "image_1":"images/img[1]/@url",
 "image_2":"images/img[2]/@url"
}

The paths to the nodes and values are based on XPath. For more information on the syntax to use, see the following documentation: https://www.w3schools.com/xml/xpath_syntax.asp

When the structure of your JSON file is quite complex, the info may be dispatched in deep nodes and sometimes in tag attributes.

Then, you can define your own file structure.

Below is an example of JSON file where you need a predefined structure:

{"Productlist":[{
 "ITEMID":"0123456",
 "ITEMNAME":"Product 0123456",
 "BRAND":"Best Brand",
 "BARCODE":"0123456-ABC",
 "CURRENT_STOCK":"0"
}]}

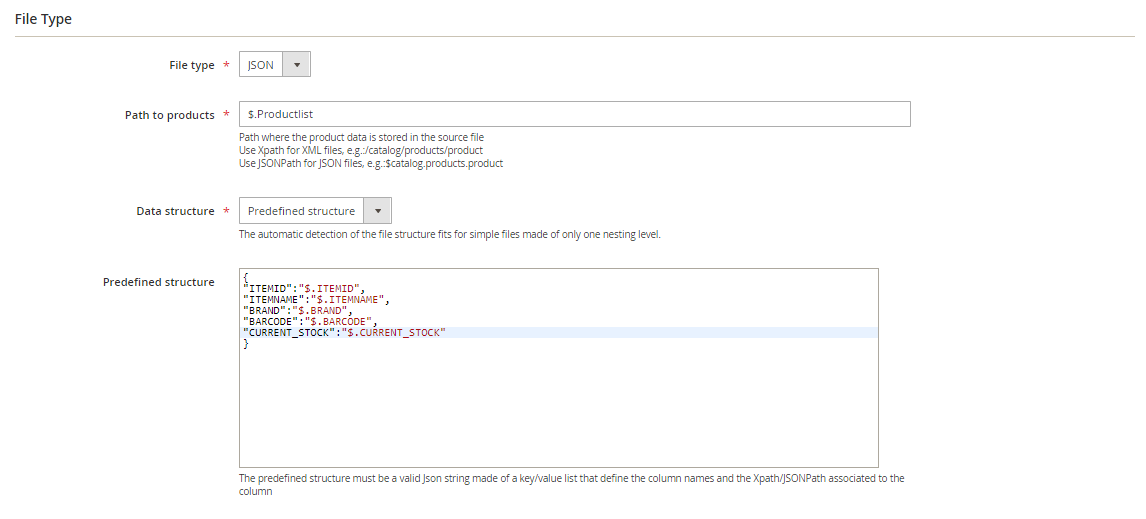
The predefined structure you need to use is:

{
 "ITEMID":"$.ITEMID",
 "ITEMNAME":"$.ITEMNAME",
 "BRAND":"$.BRAND",
 "BARCODE":"$.BARCODE",
 "CURRENT_STOCK":"$.CURRENT_STOCK"
}

We use the JSONPath syntax from the SoftCreateR project. For more information, see the next page: https://github.com/SoftCreatR/JSONPath

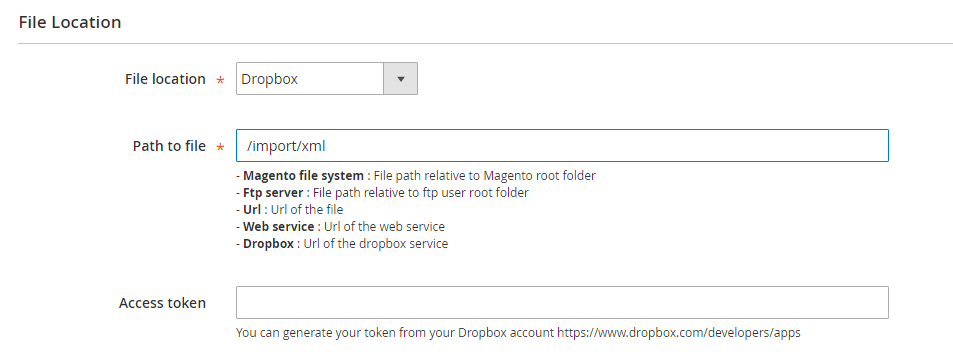
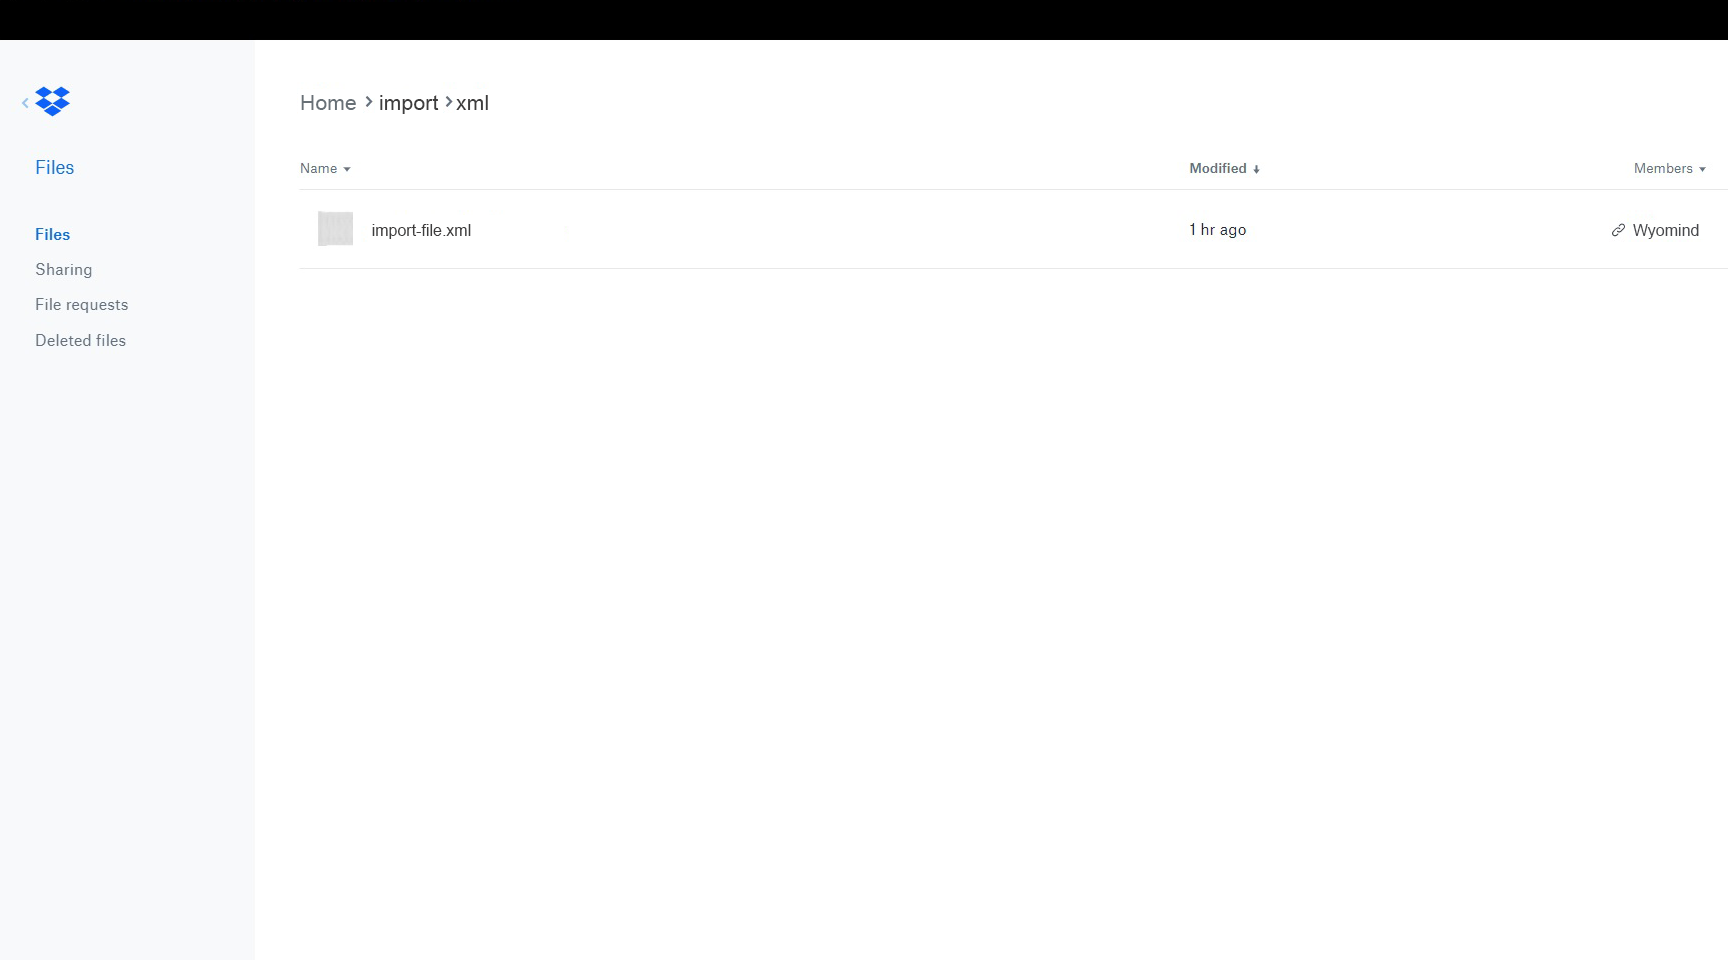
ERP & Logistics suite allows you to use files (for example XML or CSV) from your Dropbox.

Here is how to configure your profile for a file stored in your dropbox from the Settings part:

  1. In File location, select Dropbox

  2. Fill the Path to file field with the file path relative to the root directory of your Dropbox container.


    For example : /import/xml

  3. Configure your Dropbox app to allow the Full Dropbox.

    For example:


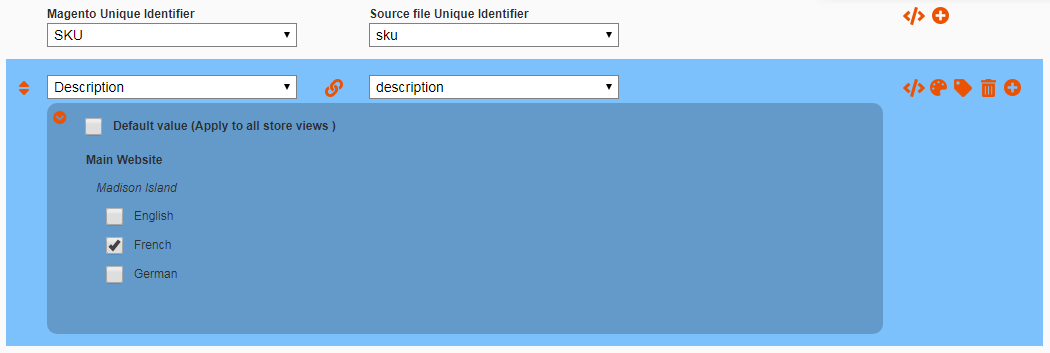
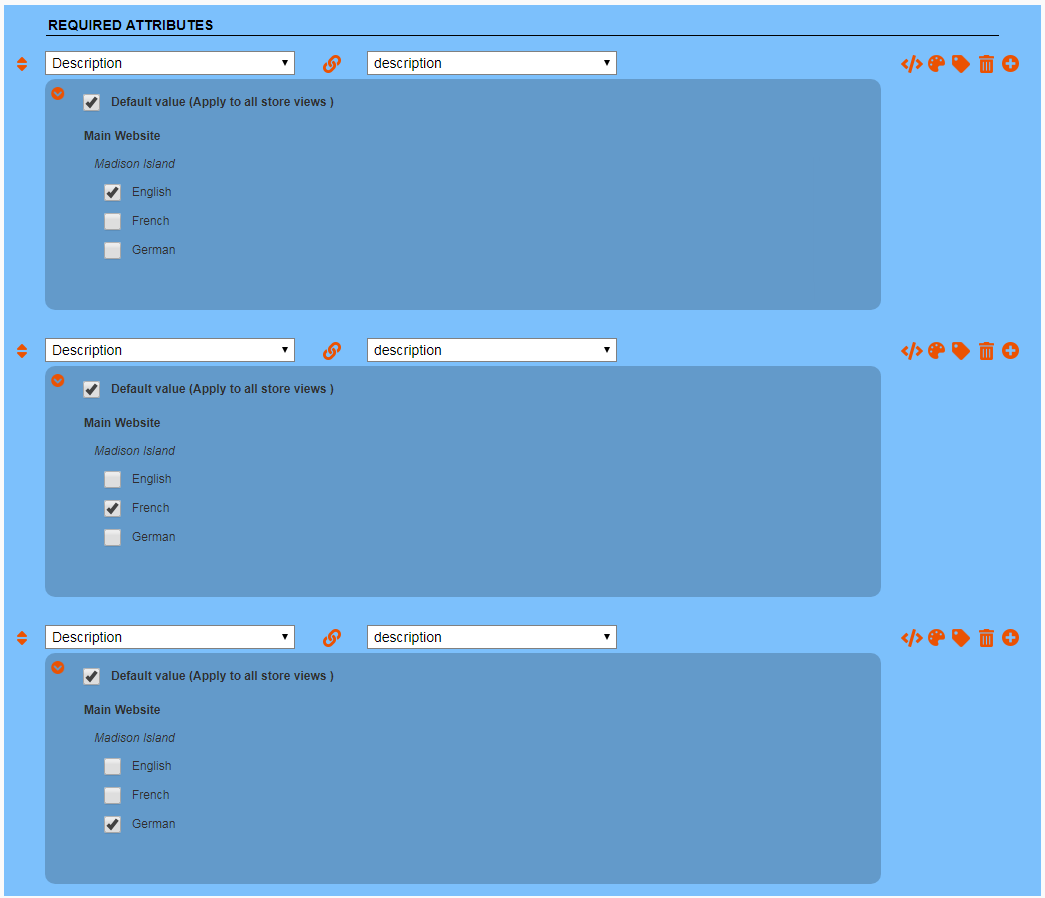
You can use the Mass Product Import & Update extension to import and/or update your data even if you're managing a multi-language Magento 2 store. 
For example, to update the description of your products for your French store view, you can select only the corresponding store view from the Column Mapping section.  

Note that you can add as many mapping row as there are languages. For example:

Data feed configuration

ERP & Logistics suite provides you with a fully configurable schedule in the Cron Schedule tab of your pattern configuration for each data feed or profile.

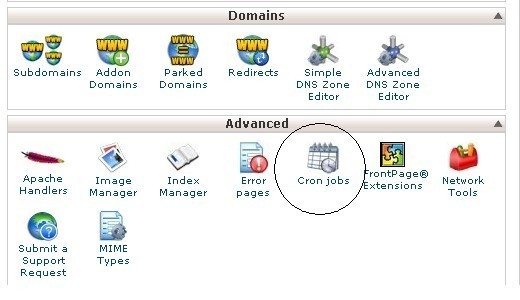
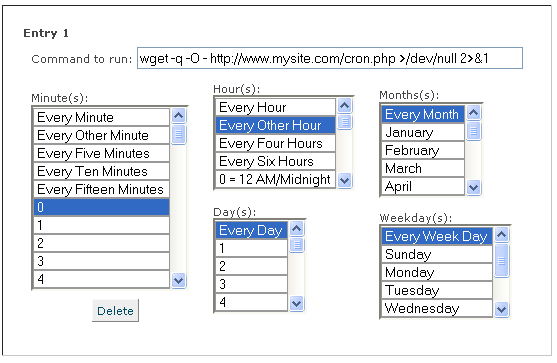
So that it works, you need to have one main scheduled task running from your server side and targeting cron.php located in the pub directory of Magento 2 root directory (ideally every hour).
If the management panel from your hosting compagny doesn't provide such a service, you should be able to use a remote service such as: http://www.mywebcron.com

ERP & Logistics suite also provides you with a cron job reporting, so that you can get email reports on each data feed or profile you're generating.

Here is the process to download your file:

  • Generate the file.
  • Right-click on on the generated link from the grid.
  • Choose the "Save as" option.

Troubleshooting

This issue may be due to a problem during the installation process.

You will be able to fix it by following these steps:

  1. Access your database via your control panel (Phpmyadmin for example).
  2. From the setup_module table, delete the entry Wyomind_extension.
    Be careful, that entry depends on your extension. For example, if you have the extension called Simple Google Shopping, you should delete Wyomind_SimpleGoogleShopping.
  3. Logout from your Magento 2 admin.
  4. Log into your Magento 2 admin.
How do cron tasks work?
  • The cron.php file (available in the pub directory of your Magento 2 root directory) is regularly launched from your server side (generally every 5 minutes).
  • The cron task for ERP & Logistics suite is targeted and evaluates if a data feed or a profile needs to be refreshed (depending on the timestamp stored in the database and on the schedule table for this specific profile).
  • If the above condition matches, then the data feed and the profile is re-generated.

Be sure that you have correctly configured a scheduled task from the server side (cpanel) targeting the cron.php file in your magento 2 installation.

The extension includes reporting and debug tools for the scheduled tasks available in:
StoresSettingsConfigurationWyomindERP & Logistics suite

For more information on the configuration of cron tasks in Magento 2, you can check their documentation.

If you are working on Magento 2.0.x, you'll have to rename:
Wyomind\\view\adminhtml\ui_component\sales_order_grid_Mage_2.0.xml

into:
Wyomind\\view\adminhtml\ui_component\sales_order_grid.xml

If your profile doesn't seem to be uploaded via FTP, it can be due to an incorrect configuration or to a problem from your server. Make sure that:

  • your server allows the FTP access
  • your credentials are entered without mistake
  • the host is entered without directory following it

Here is an example of FTP configuration for ERP & Logistics suite on Magento 2:

PHP features are disabled by default in ERP & Logistics suite.

If you're using PHP parameters in your variables or inline script in your patterns (<?php return ... ?>), you'll get an error saying: "PHP features are disabled".

In order to be able to use PHP script in your variables and patterns, you must make some modifications in:
app/code/Wyomind/OrdersExportTool/Helper/Data.php

Replace:

public function execPhp($script, $order = null, $data = array(), $item = null)
{
    return "Php features are disabled. In order to activate them please have a look at : https://www.wyomind.com/magento2/orders-export-tool-magento.html?section=faq";
}

with:

public function execPhp($script, $order = null, $data = array(), $item = null)
{
    return eval($script);
}

You should check that the var/flag and var/tmp folders exist in the Magento root directory. If not, create them with the writing permissions.

Basically, an Asymmetric transaction commit means you're trying to execute a query in which a constraint based on a foreign key fails.

For example, if you're trying to add a related product that doesn't exist to another product, then the constraint will fail and the import will fail as well.

The best way to know which constraint fails is to run the import from the CLI and the SQL error will display.

Magento 2 Compatibility

Magento 2® Open Source

  • 2.0.3
  • 2.0.3
  • 2.0.4
  • 2.0.4
  • 2.0.5
  • 2.0.5
  • 2.0.6
  • 2.0.6
  • 2.0.7
  • 2.0.7
  • 2.0.8
  • 2.0.8
  • 2.0.9
  • 2.0.9
  • 2.0.10
  • 2.0.10
  • 2.0.11
  • 2.0.11
  • 2.0.12
  • 2.0.12
  • 2.0.13
  • 2.0.13
  • 2.0.14
  • 2.0.14
  • 2.0.15
  • 2.0.15
  • 2.0.16
  • 2.0.16
  • 2.0.17
  • 2.0.17
  • 2.0.18
  • 2.0.18
  • 2.1.1
  • 2.1.1
  • 2.1.2
  • 2.1.2
  • 2.1.3
  • 2.1.3
  • 2.1.4
  • 2.1.4
  • 2.1.5
  • 2.1.5
  • 2.1.6
  • 2.1.6
  • 2.1.7
  • 2.1.7
  • 2.1.8
  • 2.1.8
  • 2.1.9
  • 2.1.9
  • 2.1.10
  • 2.1.10
  • 2.1.11
  • 2.1.11
  • 2.1.12
  • 2.1.12
  • 2.1.13
  • 2.1.13
  • 2.1.14
  • 2.1.14
  • 2.1.15
  • 2.1.15
  • 2.1.16
  • 2.1.16
  • 2.1.17
  • 2.1.17
  • 2.1.18
  • 2.1.18
  • 2.2.1
  • 2.2.1
  • 2.2.2
  • 2.2.2
  • 2.2.3
  • 2.2.3
  • 2.2.4
  • 2.2.4
  • 2.2.5
  • 2.2.5
  • 2.2.6
  • 2.2.6
  • 2.2.7
  • 2.2.7
  • 2.2.8
  • 2.2.8
  • 2.2.9
  • 2.2.9
  • 2.2.10
  • 2.2.10
  • 2.2.11
  • 2.2.11
  • 2.3
  • 2.3
  • 2.3.1
  • 2.3.1
  • 2.3.2
  • 2.3.2
  • 2.3.3
  • 2.3.3
  • 2.3.4
  • 2.3.4
  • 2.3.5
  • 2.3.5
  • 2.3.6
  • 2.3.6
  • 2.3.7
  • 2.3.7
  • 2.4
  • 2.4
  • 2.4.1
  • 2.4.1
  • 2.4.2
  • 2.4.2
  • 2.4.3
  • 2.4.3
  • 2.4.4
  • 2.4.4
  • 2.4.5
  • 2.4.6
  • 2.4.7

Magento 2® Adobe Commerce

  • 2.0.3
  • 2.0.3
  • 2.0.4
  • 2.0.4
  • 2.0.5
  • 2.0.5
  • 2.0.6
  • 2.0.6
  • 2.0.7
  • 2.0.7
  • 2.0.8
  • 2.0.8
  • 2.0.9
  • 2.0.9
  • 2.0.10
  • 2.0.10
  • 2.0.11
  • 2.0.11
  • 2.0.12
  • 2.0.12
  • 2.0.13
  • 2.0.13
  • 2.0.14
  • 2.0.14
  • 2.0.15
  • 2.0.15
  • 2.0.16
  • 2.0.16
  • 2.0.17
  • 2.0.17
  • 2.0.18
  • 2.0.18
  • 2.1.1
  • 2.1.1
  • 2.1.2
  • 2.1.2
  • 2.1.3
  • 2.1.3
  • 2.1.4
  • 2.1.4
  • 2.1.5
  • 2.1.5
  • 2.1.6
  • 2.1.6
  • 2.1.7
  • 2.1.7
  • 2.1.8
  • 2.1.8
  • 2.1.9
  • 2.1.9
  • 2.1.10
  • 2.1.10
  • 2.1.11
  • 2.1.11
  • 2.1.12
  • 2.1.12
  • 2.1.13
  • 2.1.13
  • 2.1.14
  • 2.1.14
  • 2.1.15
  • 2.1.15
  • 2.1.16
  • 2.1.16
  • 2.1.17
  • 2.1.17
  • 2.1.18
  • 2.1.18
  • 2.2.1
  • 2.2.1
  • 2.2.2
  • 2.2.2
  • 2.2.3
  • 2.2.3
  • 2.2.4
  • 2.2.4
  • 2.2.5
  • 2.2.5
  • 2.2.6
  • 2.2.6
  • 2.2.7
  • 2.2.7
  • 2.2.8
  • 2.2.8
  • 2.2.9
  • 2.2.9
  • 2.2.10
  • 2.2.10
  • 2.2.11
  • 2.2.11
  • 2.3
  • 2.3
  • 2.3.1
  • 2.3.1
  • 2.3.2
  • 2.3.2
  • 2.3.3
  • 2.3.3
  • 2.3.4
  • 2.3.4
  • 2.3.5
  • 2.3.5
  • 2.3.6
  • 2.3.6
  • 2.3.7
  • 2.3.7
  • 2.4
  • 2.4
  • 2.4.1
  • 2.4.1
  • 2.4.2
  • 2.4.2
  • 2.4.3
  • 2.4.3
  • 2.4.4
  • 2.4.4
  • 2.4.5
  • 2.4.6
  • 2.4.7
User's reviews
Log into your account to leave your review and get up to 3 months of free Support & Upgrade.
Changelog

This ERP Suite is a package composed of 3 extensions:

  • Mass Product Import and Update
  • Mass Order Export
  • Mass Order Update

To know more about the releases of this bundle, you can refer to the below changelogs:

Demo store
Front-end
Back-end
Login
ERP&Logisticssuite
Password
ERP&Logisticssuite123

Recommended Magento 2 extensions
from €245
4.9/5 rated
563 Reviews

Export your products from your Magento website into CSV, TXT, and XML data feeds for any shopping engine or marketplace! This extension includes all Google Shopping features and 19 sample templates.

more details
from €245
4.9/5 rated
31 Reviews

The Dynamic Category extension allows you to automatically associate products to categories according to your product attributes and to special conditions.

more details
from €690
4.5/5 rated
2 Reviews

Fully complete and enhance Magento 2 default workflow and perfect your inventory management as well as your selling process thanks to the MSI Suite to become a lot more productive.

more details

Stay tuned and get a coupon code of 10% off any purchase while creating your account!

Subscribe now for updates, promotions and products launch twice a month at most.

Please indicate a valid email