Terminology
- Sources
Represent physical sites where the available products are stocked and shipped from. It can be warehouses, stores, wholesalers...
See your sources from:
StoresInventorySources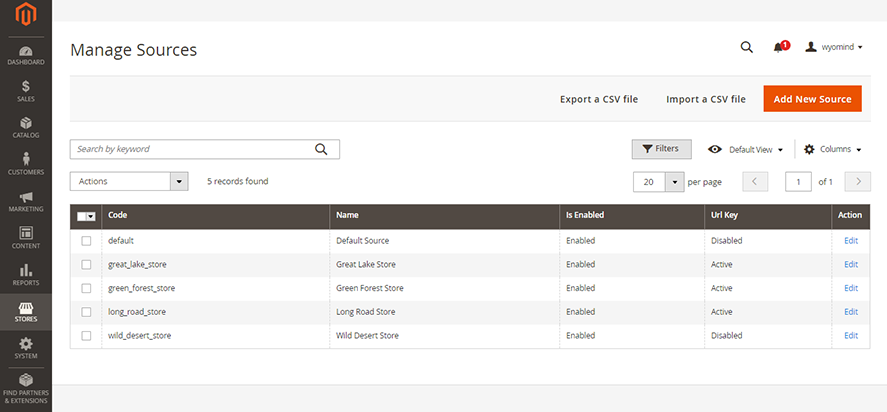
- Source Item
It is a source for a given product.
Assign sources to your products from the Sources tab of any product page in:
Catalog Products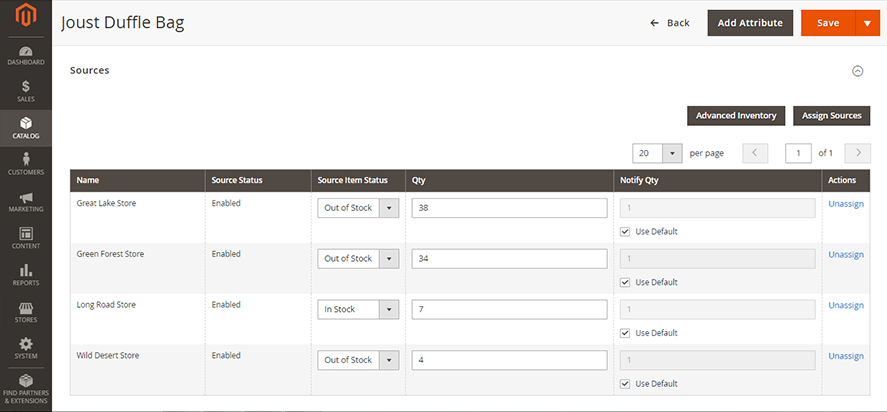
- Stocks
One stock can be linked to several websites and sources.
See your stocks from:
StoresInventorySTocks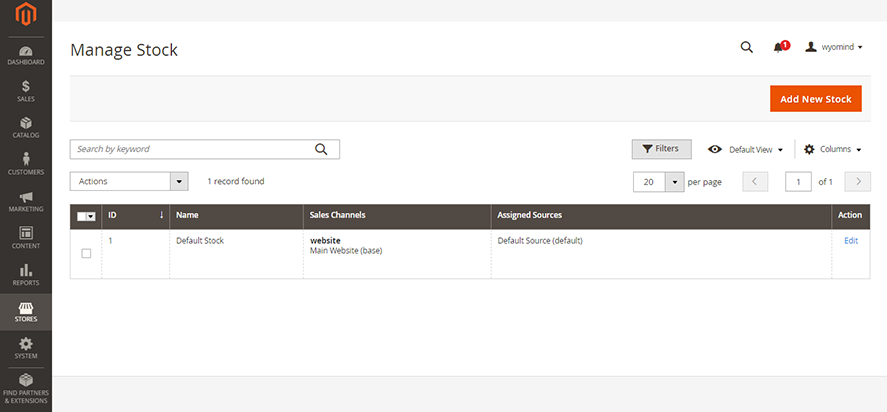
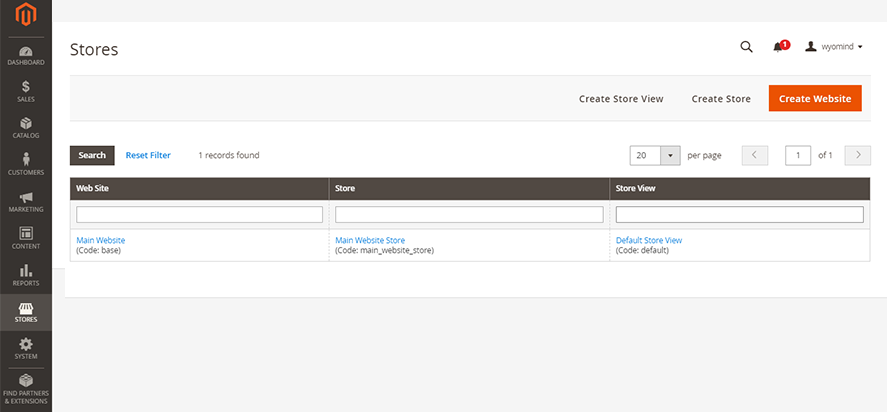
- Sales Channels
Refers to a website. It can only be linked to one stock.
See your websites from:
StoresSettingsALL Stores
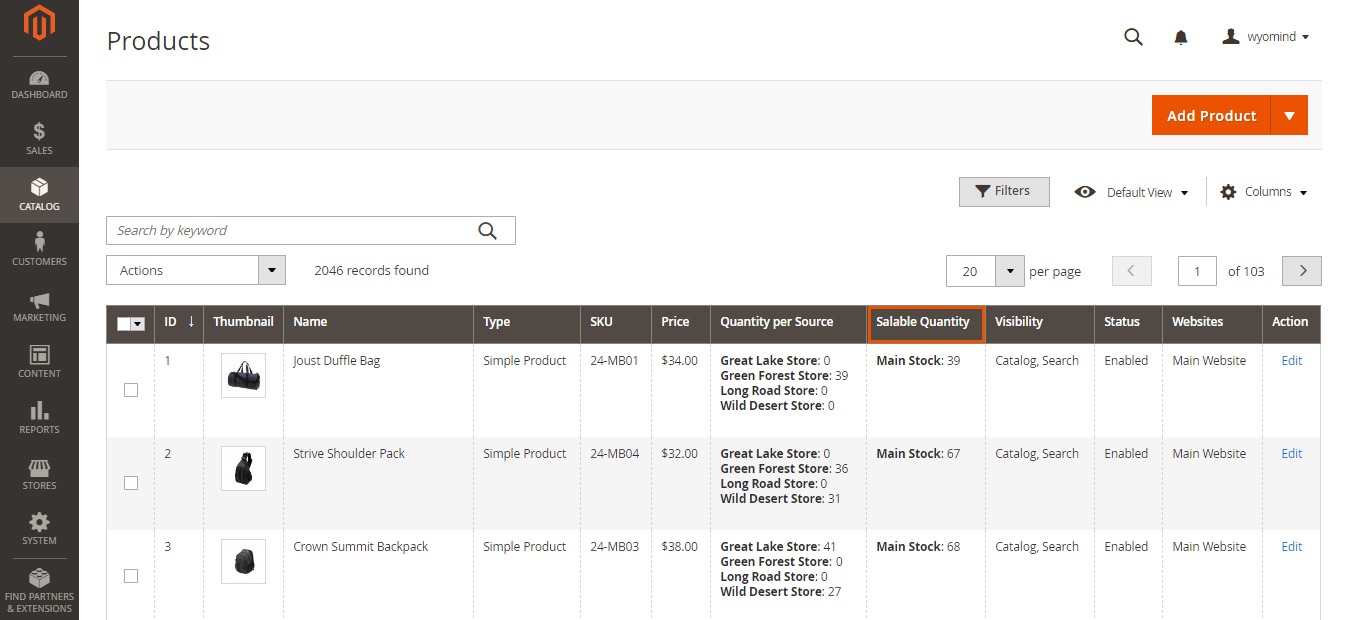
- Salable Quantity
It is the total virtual inventory that can be sold from a website.
Check the salable quantity from:
CatalogProducts
- Reservations
It is the number of products reserved and deducted from the salable quantity when customers add products to cart and pass their order.
Check the quantities reserved from:
CatalogProducts
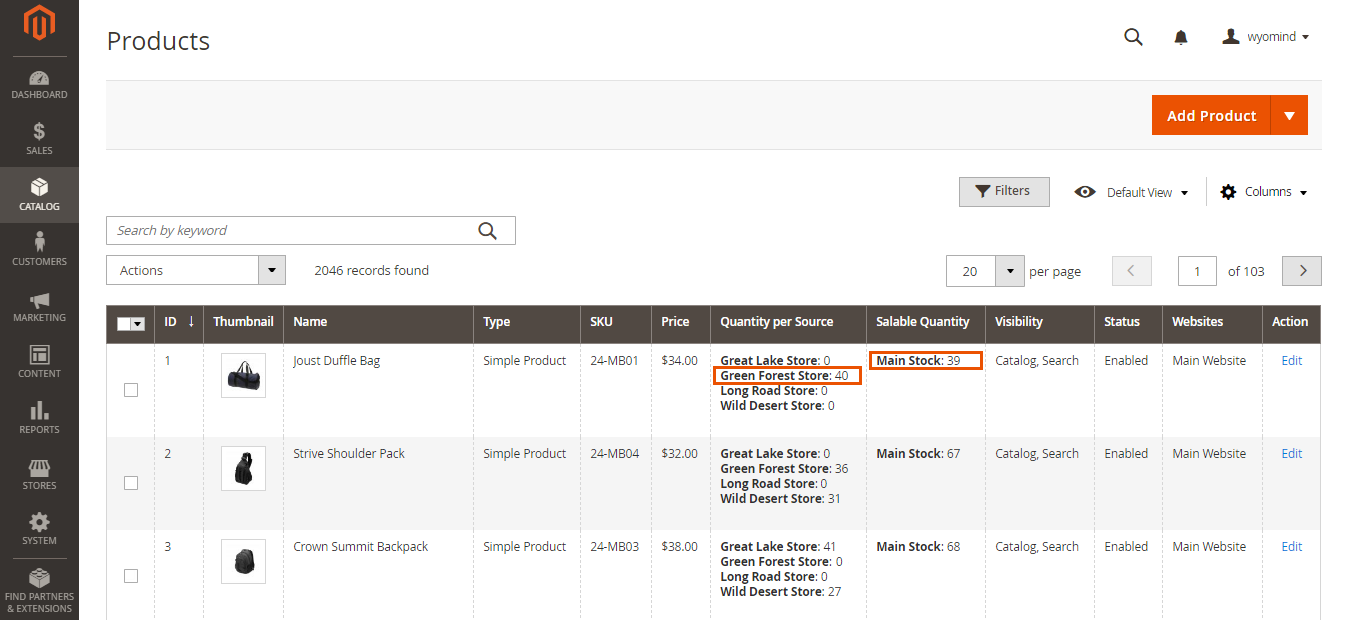 When an order is shipped, the quantity of reservations is reset and deducted from the quantities of the inventories of the appropriate sources.
Adopt the best way to manage your inventory with the MSI Suite
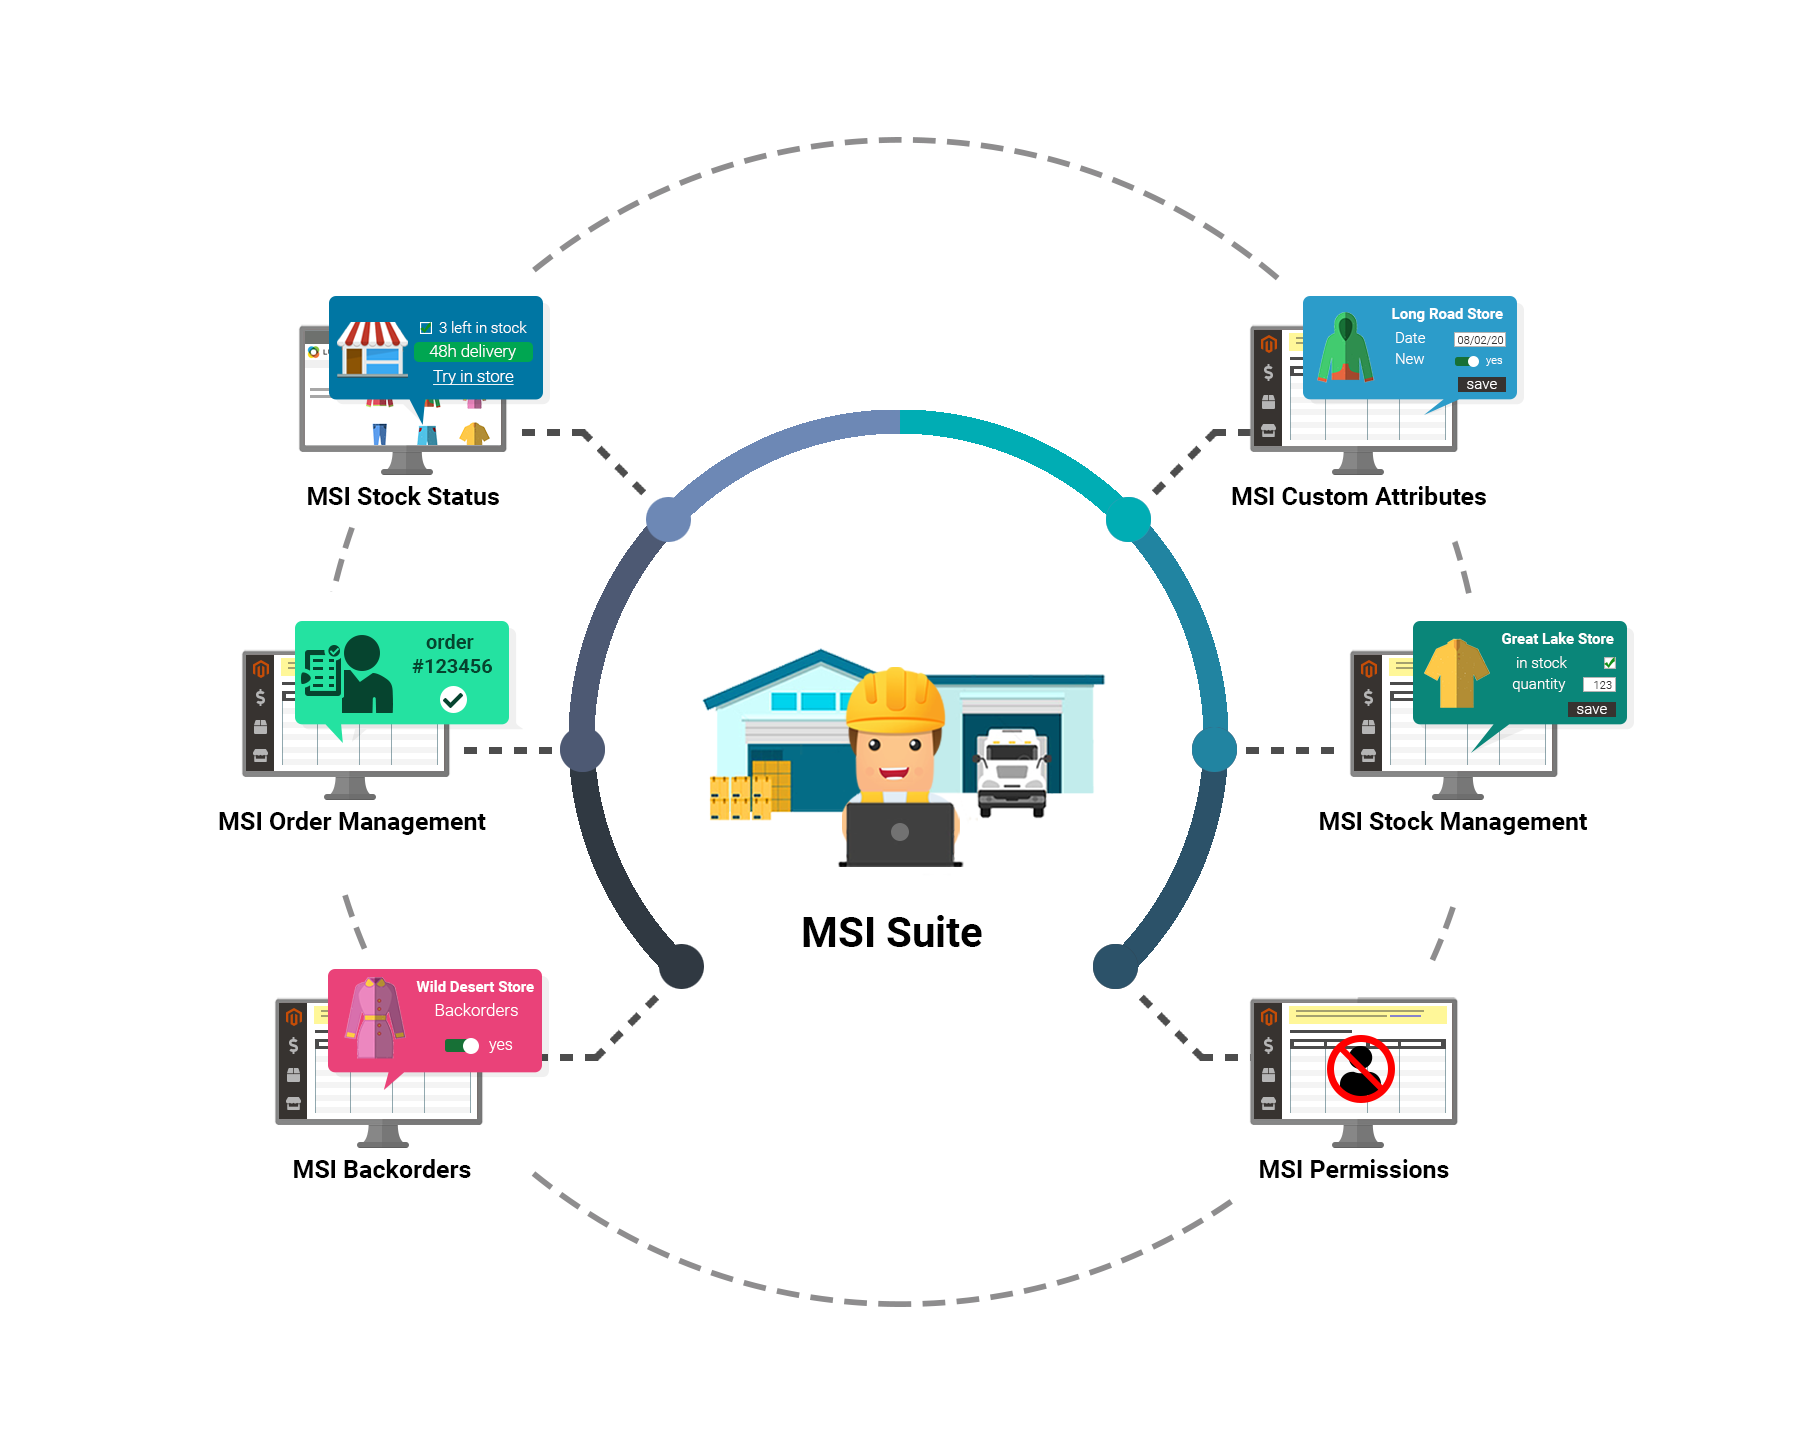
The MSI Suite includes several extensions. Each one responds to a problem and to a desire to improve Magento 2 default inventory management.
Thanks to these extensions that are completely plug and play, the MSI Suite easily adapts to your business model, whether you manage several warehouses, multi-stocks, dropshipping…
Perfect your inventory management and your selling process with the MSI Suite and enjoy:
- optimal order management: optimize and automate the orders assignation to the appropriate sources. Save time and avoid human errors in your Magento 2 back office with MSI Order Management.
- smoother and fine-tuned inventory management: gain considerable time while managing your inventory directly from the stocks grid and get a clear and accurate view of your products' availability thanks to the tree view with MSI Stock Management and MSI Backorders.
- team management under control: limit the access to your orders, products, and stock management for each source by assigning specific permissions to each user registered in your Magento 2 admin with MSI Permissions.
- more transparent information on product availability: provide your customers with more information on your products' availability, carriers, or delivery times via completely customizable stock status messages with MSI Stock Status and MSI Custom Attributes.
How to use the MSI Suite for Magento 2
The MSI Suite for Magento 2 is composed of 6 extensions that will allow you to fully complete and enhance Magento MSI module and bring more options to the default Magento 2.3 functionalities. It will help you to considerably optimize the MSI workflow and tools and to be a lot more productive.
The MSI Suite is composed of:
- MSI Stock Status
Display customized and elaborate stock status messages to better inform your customers about the availability of your products. - MSI Stock Management
Manage all your stocks inventory directly from the stock grid and get a clear and accurate view of your products' availability thanks to the tree view. - MSI Order Management
Optimize your order management and automate the orders' assignation to the appropriate sources by creating custom algorithms. - MSI Backorders
Easily switch from a global backorders management to management at the level of your sources and arrange backorders dates and quantities. - MSI Custom Attributes
Brighten up the assignation of your products to the sources with any kind of custom fields. - MSI Permissions
Manage the access to the orders, the products, and the stock management for each source and for each user registered in your Magento admin.
With the MSI Suite for Magento 2, any kind of scenario is possible. The module is easily configurable thanks to several settings options that correspond to the great majority of inventory management in real situations.
STEP 1: Manage your stocks
With the MSI Stock Management extension included with the MSI Suite, you will be able to manage your products' inventory directly from the concise stocks grid and also have a clear and precise view of your products' inventory in a given stock thanks to the tree view available from the products' grid.
Configure the Stock Tree view
Start with configuring the display of the stock tree view in:
StoresSettingsConfiguration MSI Stock Management Stock tree view
Manage the auto-load
You can manage how the stock tree view will appear in the product grid.
 If the auto-load is enabled, the tree view will be automatically displayed for all the products.
If disabled, you will need to click on each product individually to get the stock summary from the product grid.
Define the labels
Define the labels for the Tree view.
- the salable products
salable - the products mark as in stock
in stock - the products mark as out of stock
out of stock - the products allowing backorders
backorders allowed
Configure the Stock grid
Select the fields to edit
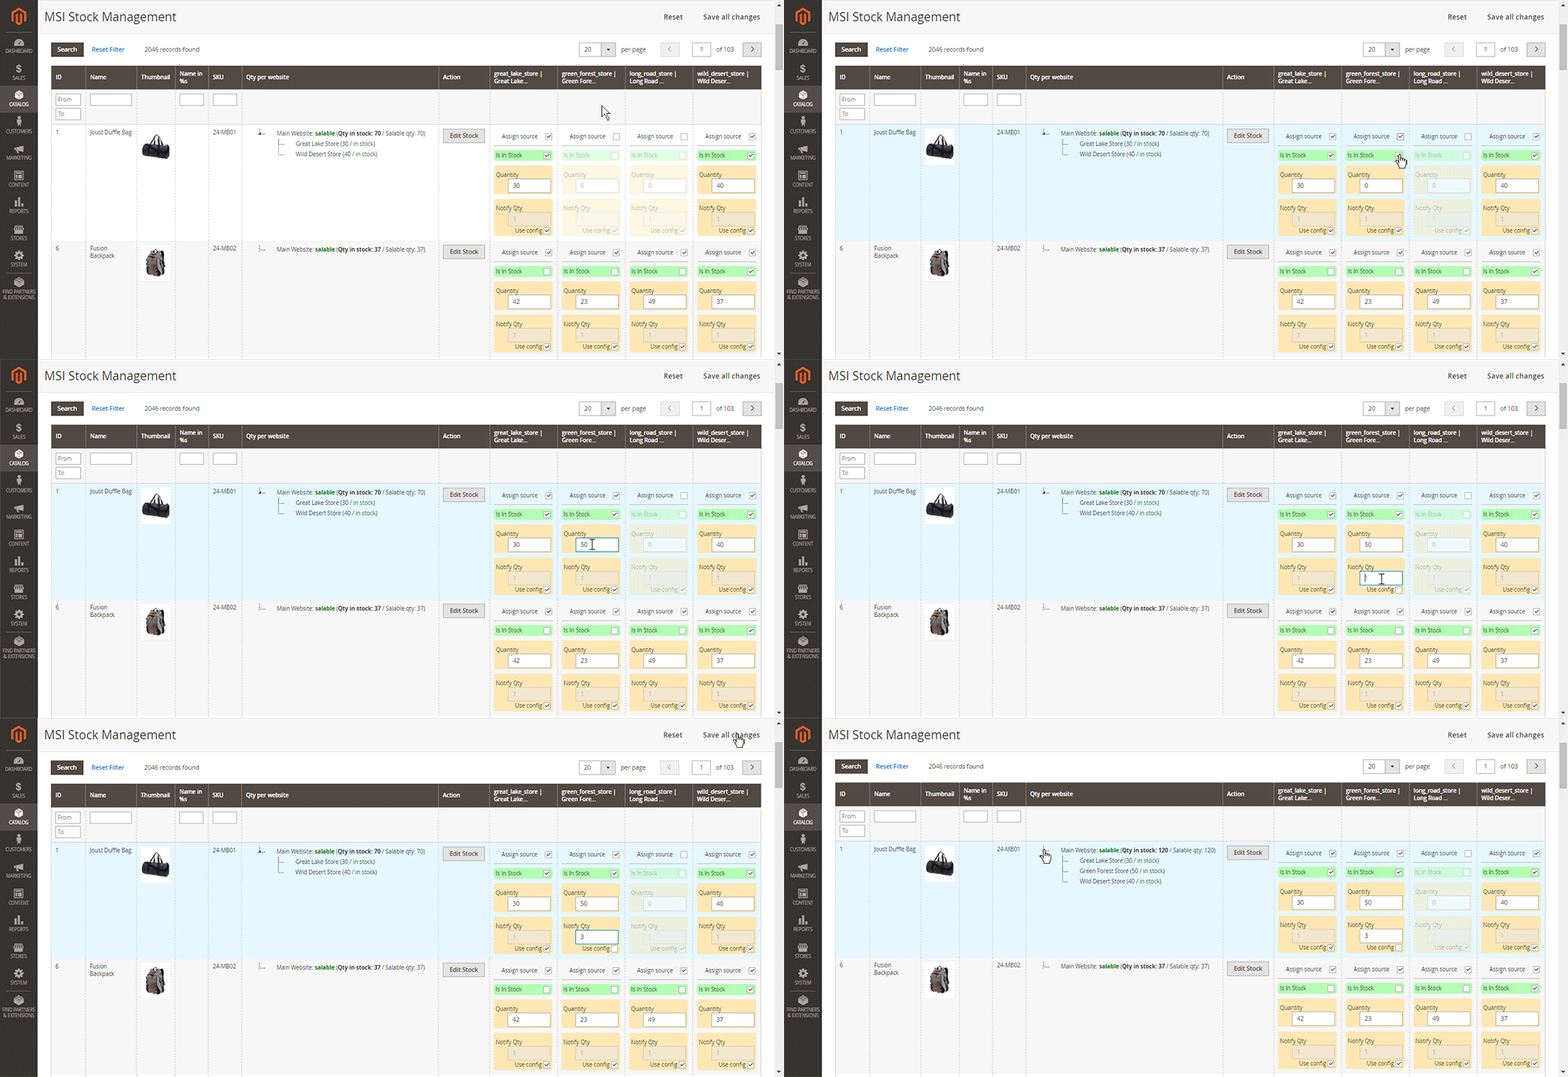
You have the possibility to select all the fields you would like to edit directly from the grid.
You can add the below fields:
- Is in Stock
- Quantity
- Low stock qty
- Backorders, Backordered Qty, Backordered date
Available with the MSI Backorders extension - Custom attributes
Available with the MSI Custom Attributes extension
Manage your stocks
The MSI Stock Management extension for Magento 2 allows you to easily and rapidly manage the inventory of your products catalog.
From the Tree View
With MSI Stock Management for Magento 2, you can check the stocks of each one of your products from:
CATALOGProducts
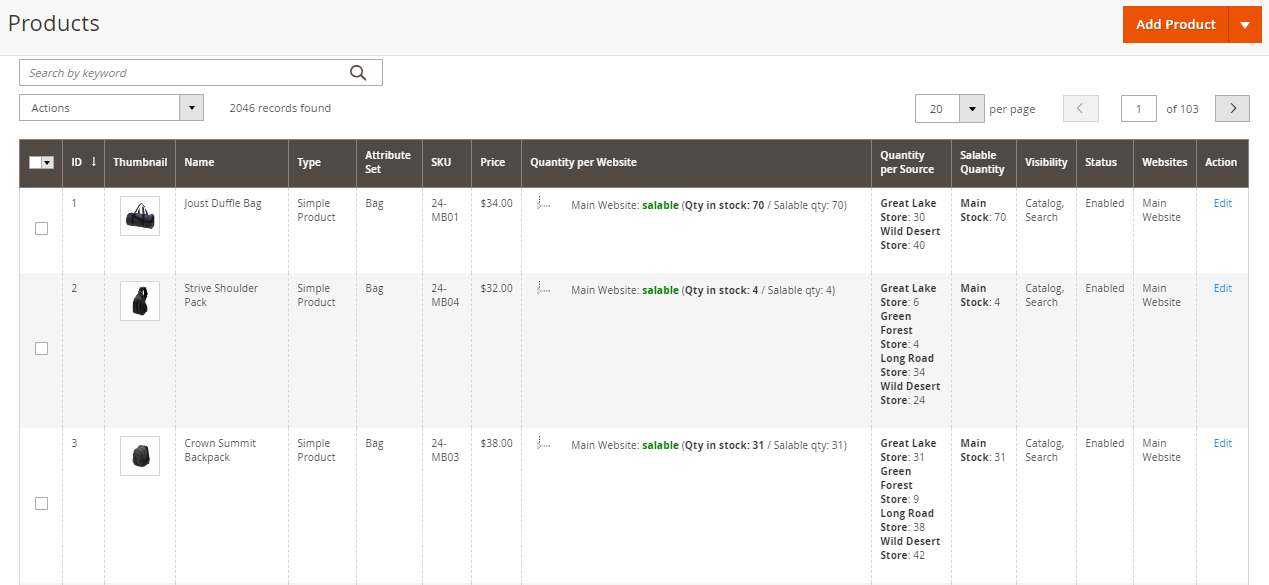
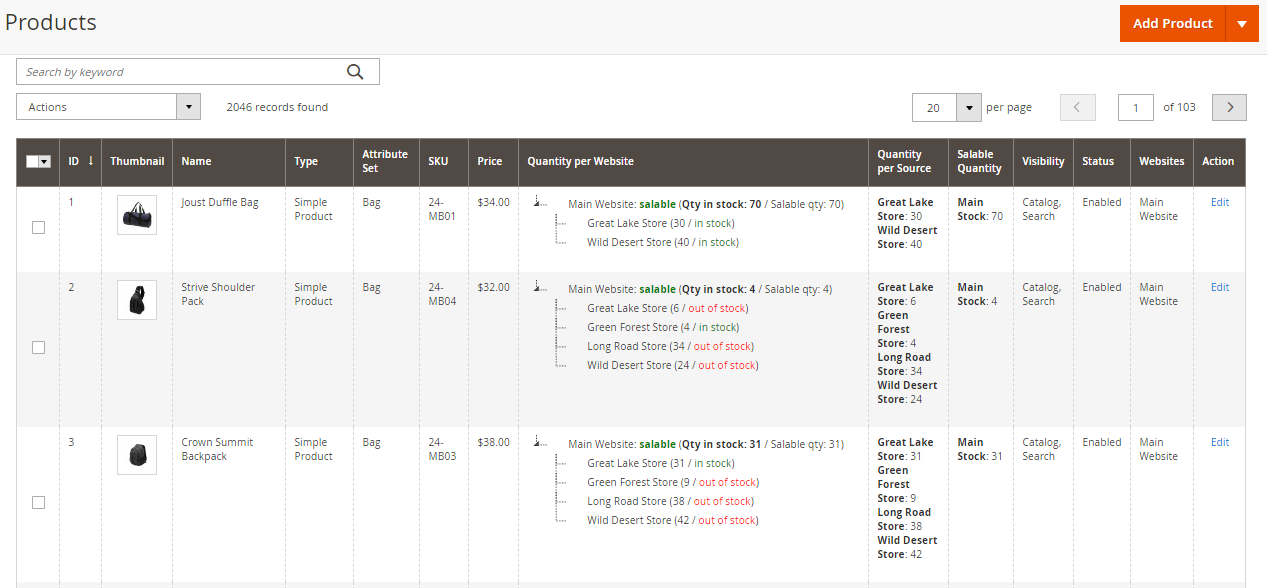
In the products grid, you should see a column named Quantity per Website.
In that column, you can click on the arrow next to Main website:...
A tree-view is displayed and shows the number of items and the stock status for each source.
Main Website: salable (Qty in stock: 37 / salable qty: 37)
--> Great Lake Store (42 / out of stock)
--> Green Forest Store (23 / out of stock)
--> Long Road Store (49 / out of stock)
--> Wild Desert Store (37 / in stock)
Note that the tree view is also available in:
CatalogStocks
From the stock grid
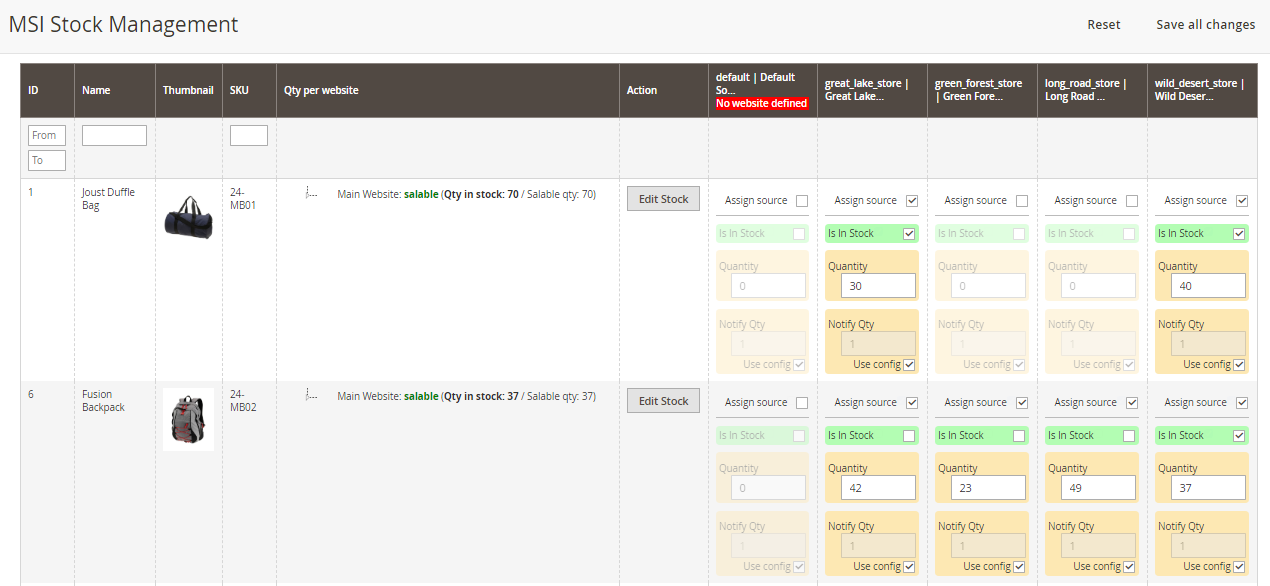
MSI Stock Management for Magento 2 allows you to save considerable time while managing your stocks directly from the stocks grid in:
CatalogStocks
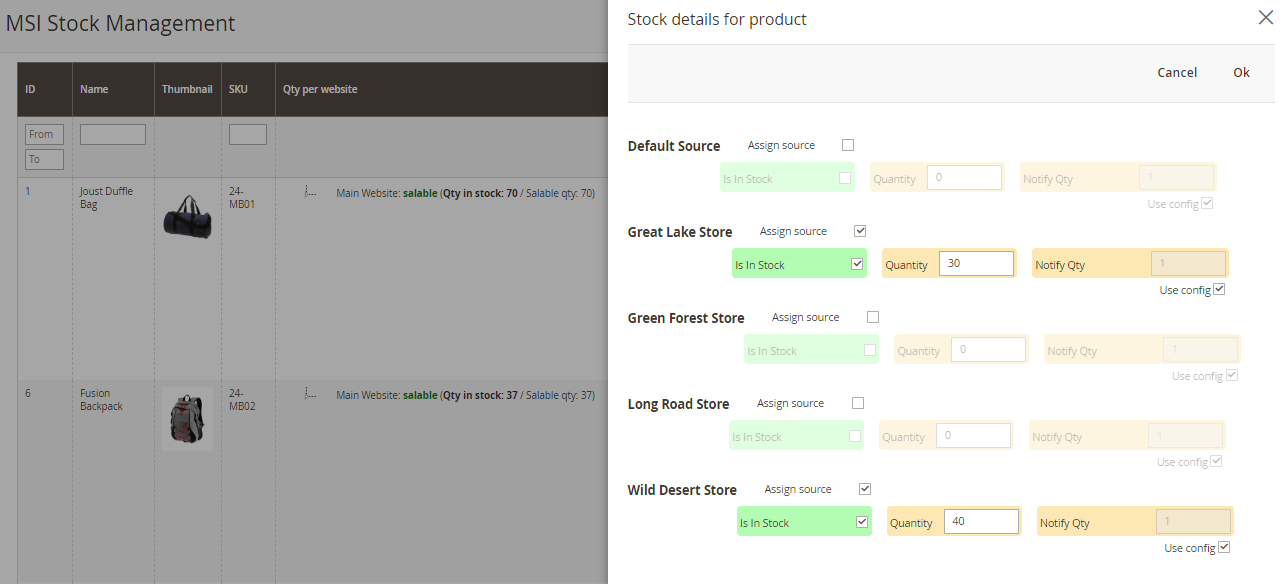
The stocks grid displays all the information about your products' inventory.
You have the possibility to:
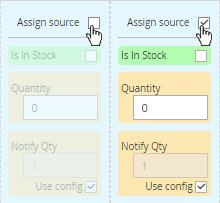
- Assign each source to the product
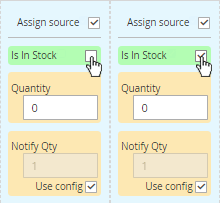
- Define the stock status for each source
- Define the number of items for each source
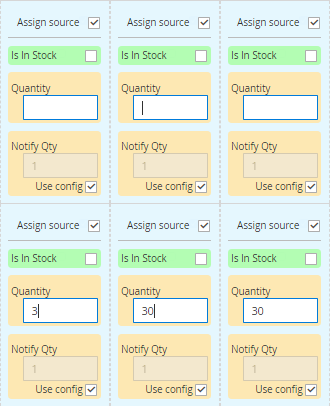
- Use default configuration or define the threshold to notify the quantity for each source

You can also filter by store view. For example, if you choose the Default Store View, you'll see only the source(s) linked to that store view.
From the popup
By clicking on Edit stock from the Action column, a pop-up should open to let you configure the stock details for the product.
Here again, you have the possibility to:
- Assign each source to the product
- Define the stock status for each source
- Define the number of items for each source
- Use default configuration or define the threshold to notify the quantity for each source
Manage your backorders
The MSI Backorders extension, also included with the MSI Suite, allows you to manage the backorders for the different sources through Magento 2 back-office.
Backorders are taken into account each time there is a check on the products' quantities, for example in the frontend product page, in the cart...
You can easily manage the backorders for a product in:
CatalogProducts
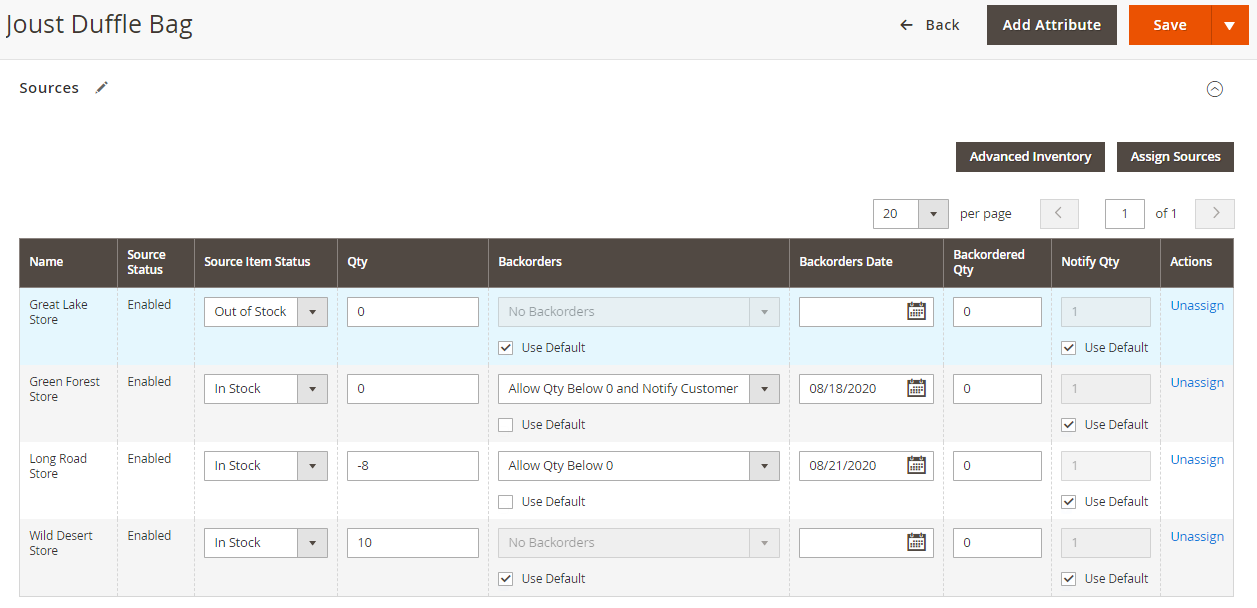
Select and Edit a product.
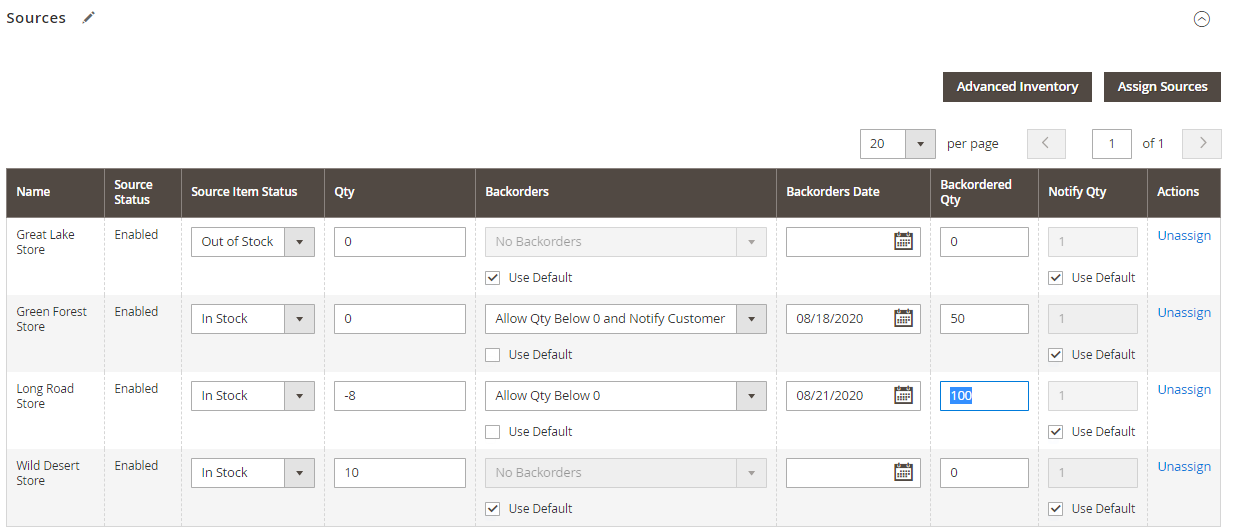
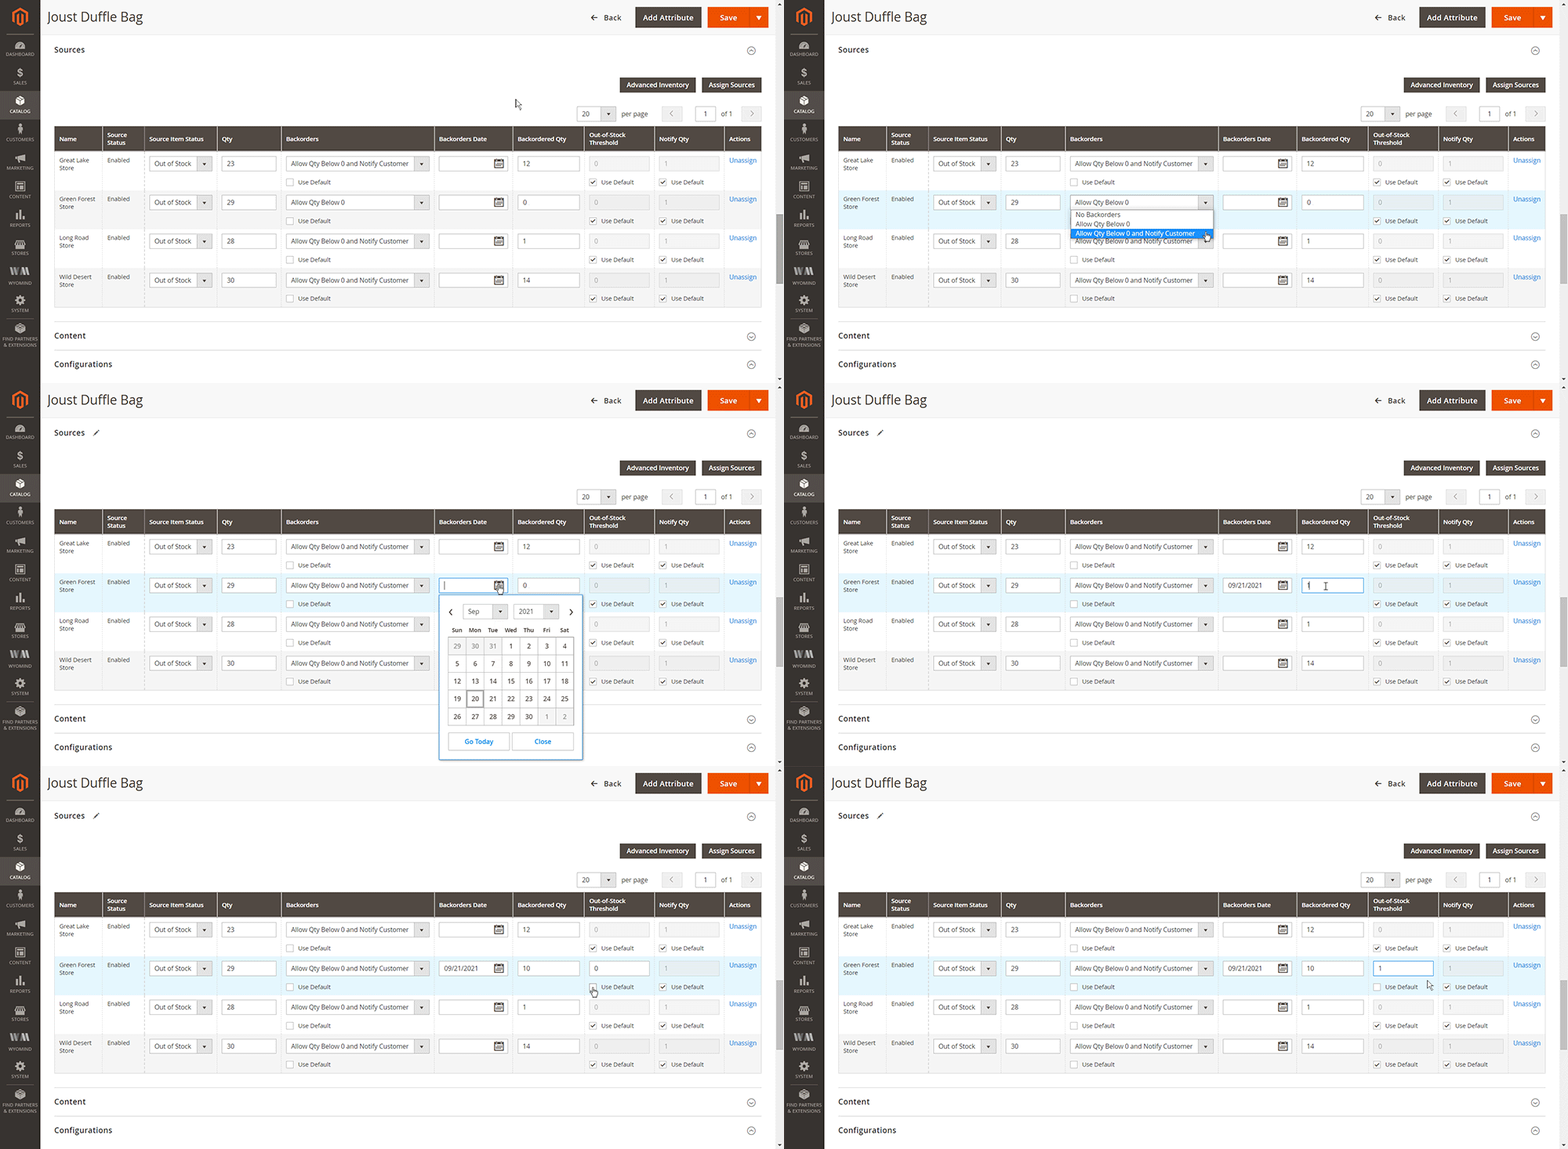
You will have the possibility to manage backorders directly in the Sources tab.
Backorders
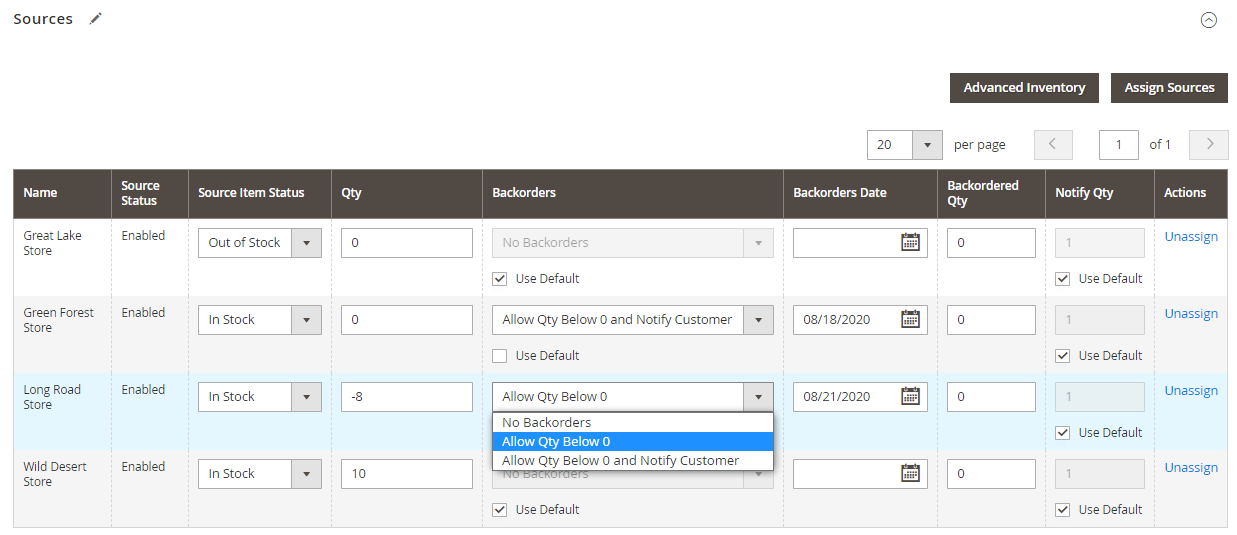
If you untick the Use Default box, you have the choice between 3 options:
- No backorders
When there's no stock, it's impossible to order the product. - Allow quantity below 0
Even if there is no stock, the product can be ordered. - Allow quantity below 0, and notify customer
Even if there is no stock, the product can be ordered and the customer will be able to see in the front-office that backorder is allowed for that product.
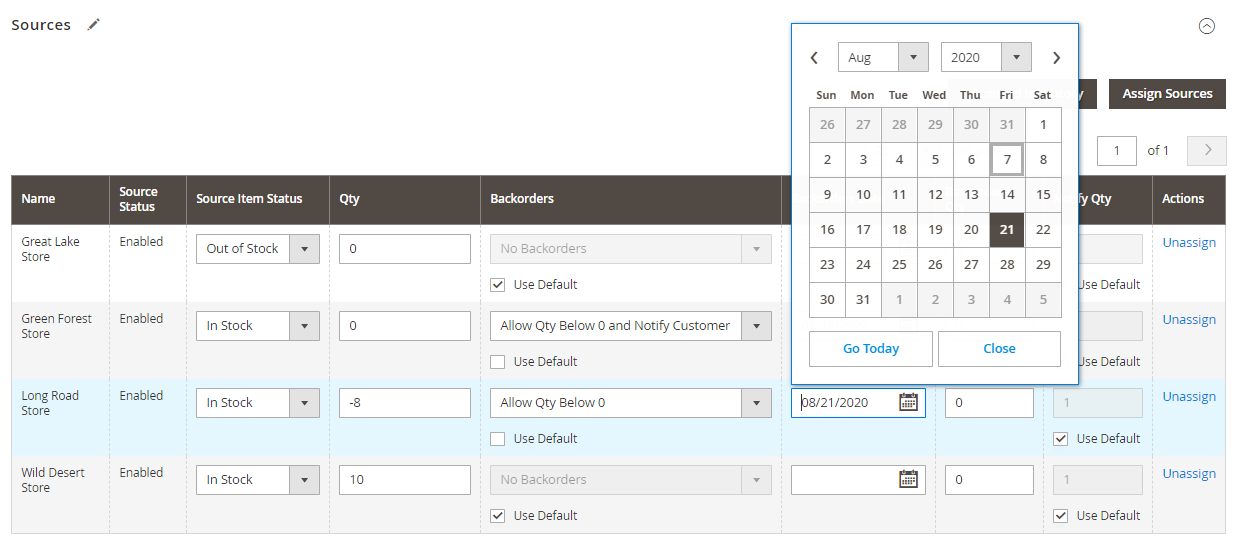
Backorders Date
Backordered qty
STEP 2: Create your custom attributes
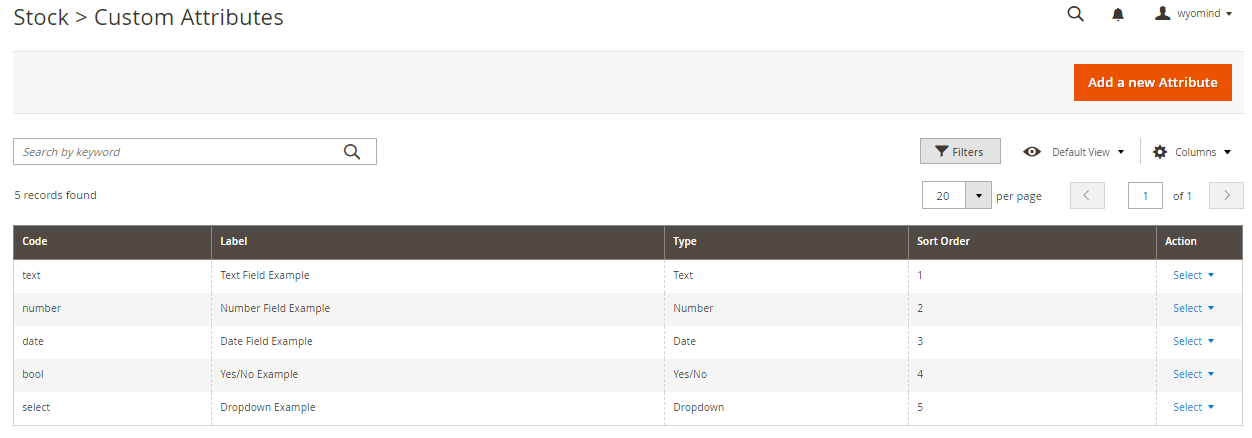
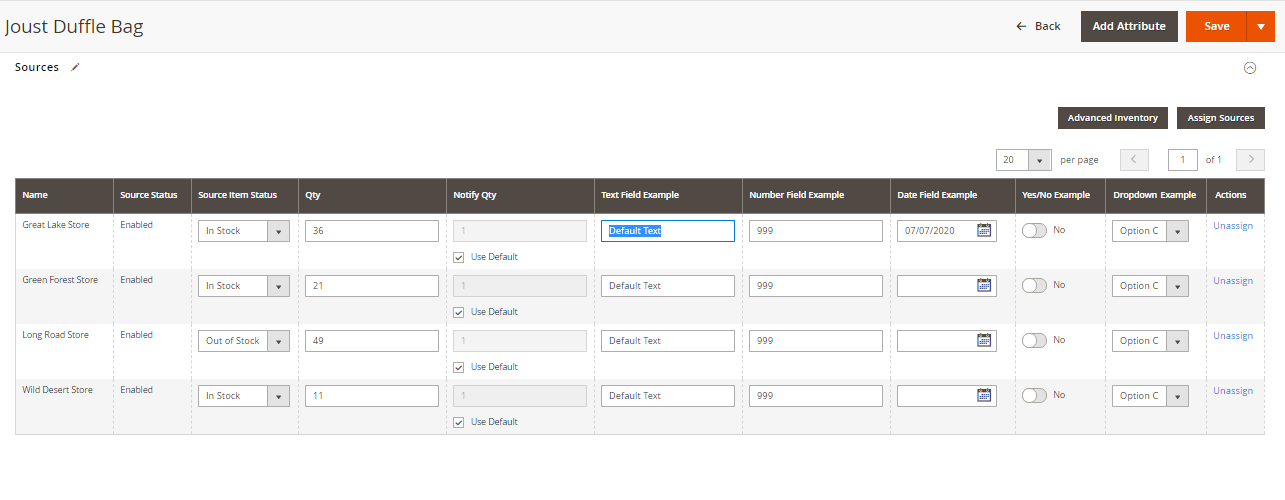
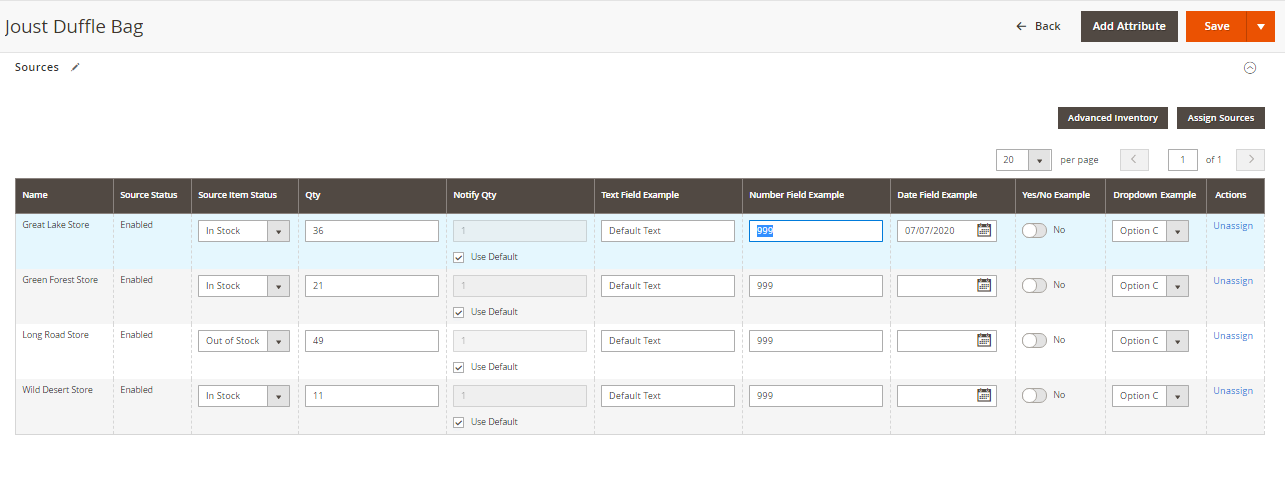
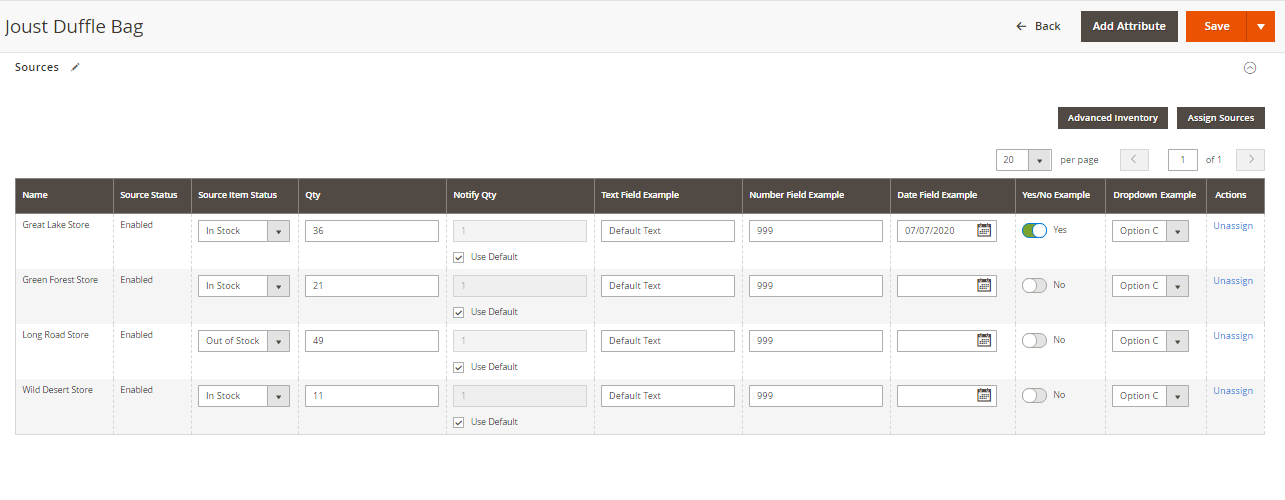
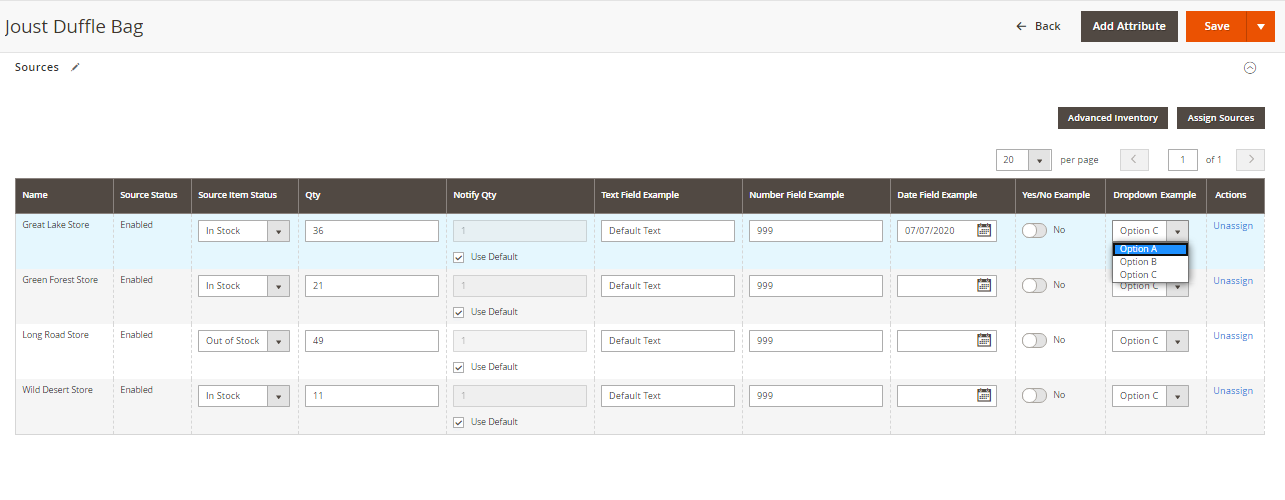
Using the MSI Custom Attributes extension included in the MSI Suite, you can add any kind of field and information in the source grid of your product pages:
StoresInventoryStock Attributes
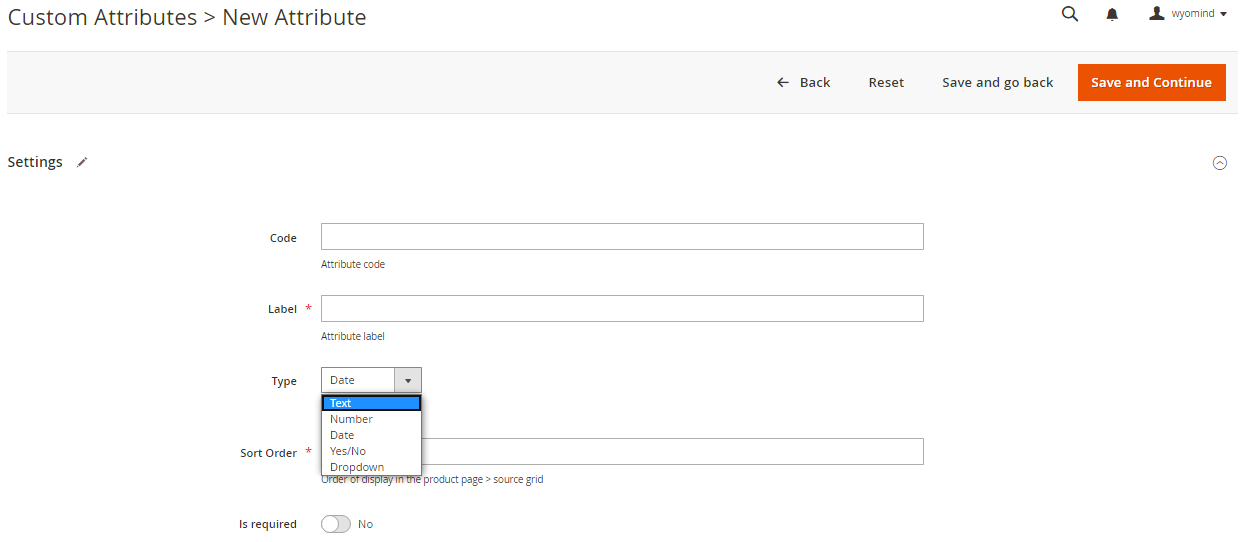
Configure the settings of the attribute
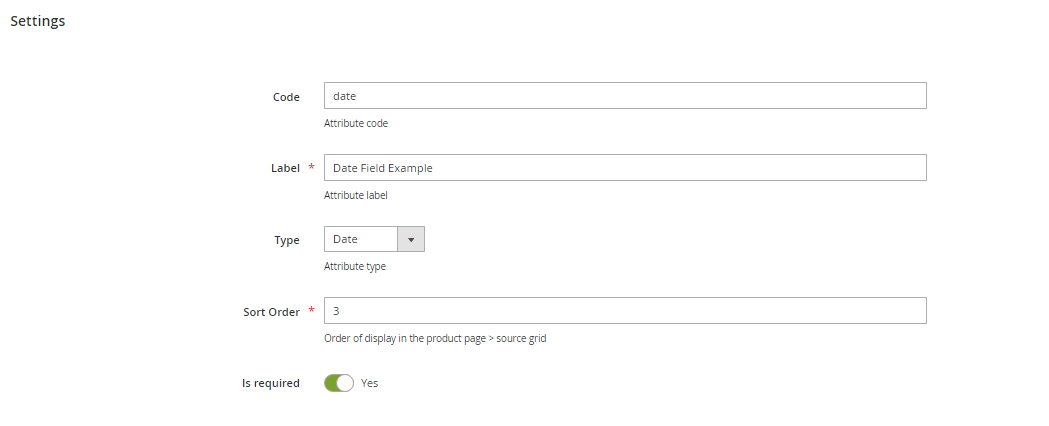
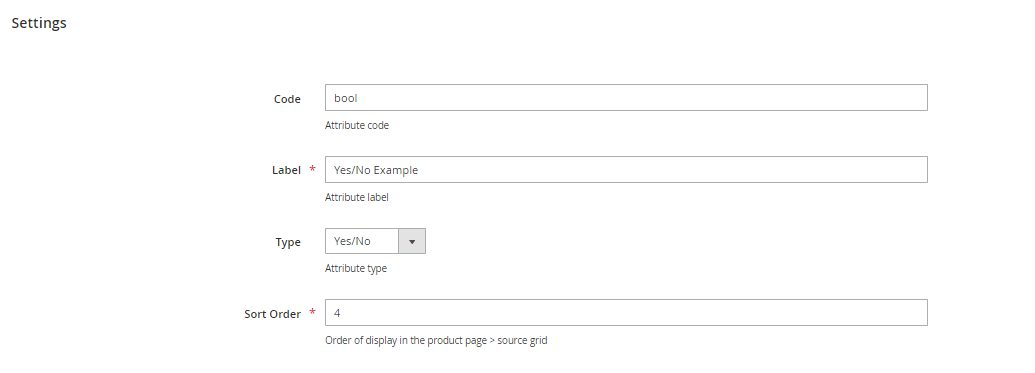
In the Settings section, you'll have to fill in:
- Code
Define an internal code for the attribute. - Label
The label for the attribute will appear in the sources assignation grid.
Location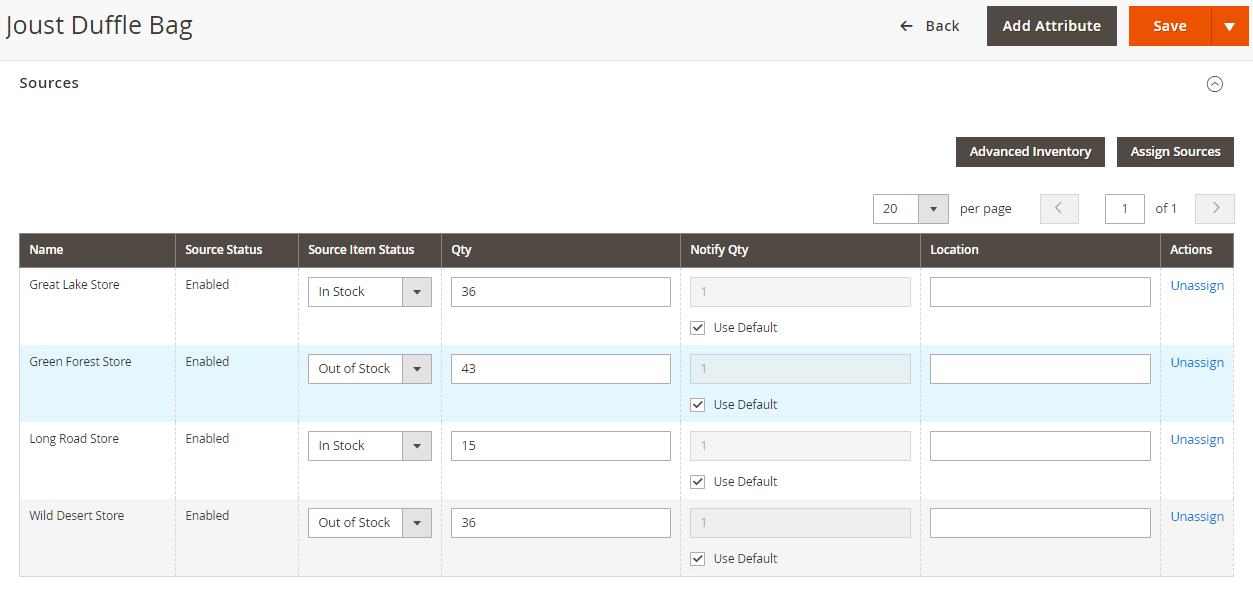
- Sort order
Define the order of display in the source grid of the product page.
You can create different types of attributes and you'll have to fill in more information depending on these types.
Text attribute
You can create text attributes.  You'll have to fill in a default value and define if the attribute is required or not.
Number attribute
You can create number attributes. 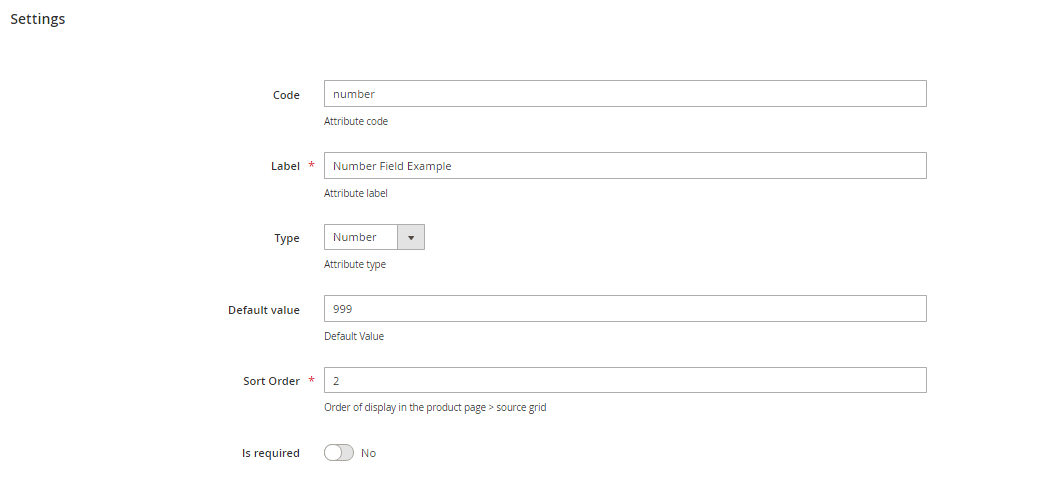 You must fill in a default value and define if the attribute is required or not.
Date attribute
Yes/No attribute
Dropdown attribute
If you want to create dropdown attributes, you have to add the different options available in the dropdown list.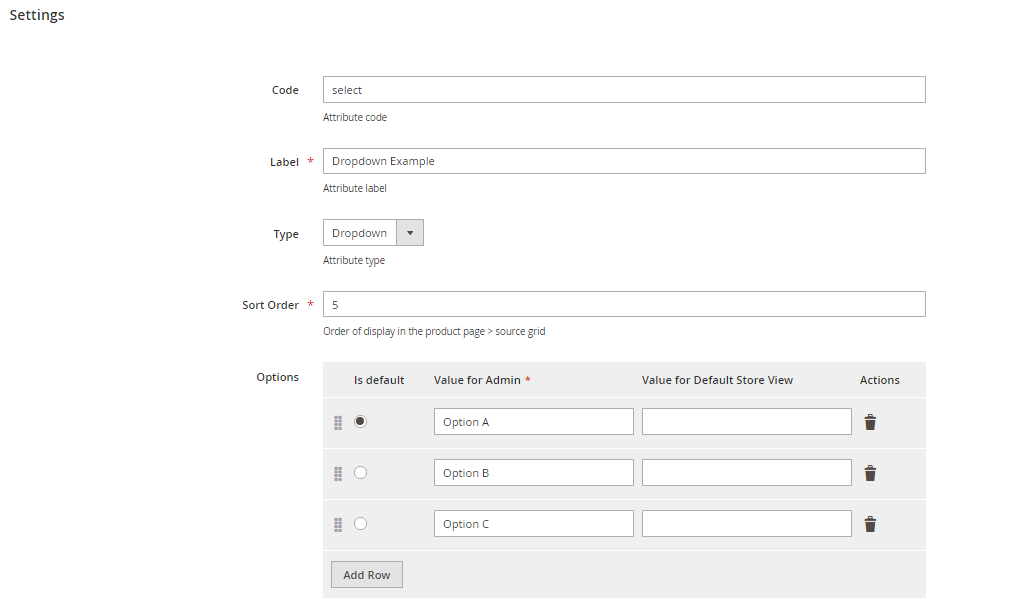
You must tick the default value and add the Value for Admin.
Note that you can drag and drop each option to modify the order.
STEP 3: Configure your front-end stock status messages and stock grid
From the MSI Suite, you can enjoy the MSI Stock Status extension that gives you the possibility to display a stock grid on your front-end product pages as well as stock status messages in different places.
You can start with configuring the front-end display of the MSI Stock Status extension from:
StoresSettingsConfiguration Wyomind MSI Stock Status
Stock status conditions
MSI Stock Status allows you to configure the stock status messages at different levels and according to your conditions.
From the Stock status conditions section, you will be able to:
- Define an additional condition by clicking on the Add a condition button.
- Delete a condition from the Action column.
Your conditions will be based on:
- Sources
Select one or more sources for that condition.
Select all sources to apply a global stock status message or create a condition for each source to display specific stock status messages. - Quantity
Define a range for the number of items for that condition.
Leaving empty will not apply any condition on the quantity. - Product attributes
You can select the product attributes to use for the stock status conditions.
They must be select attributes.
For example, if you have selected the color attribute, you will have the possibility to base your conditions on specific colors:

Then, define the Custom stock status message for that condition.
You can use any placeholders and/or fixed texts, as well as HTML, CSS, and PHP codes in the messages.
You can create messages for:
- In stock products
- Backorders
- Out of stock products
Custom in-stock messages
You can add a stock status message for in stock products.
For example:
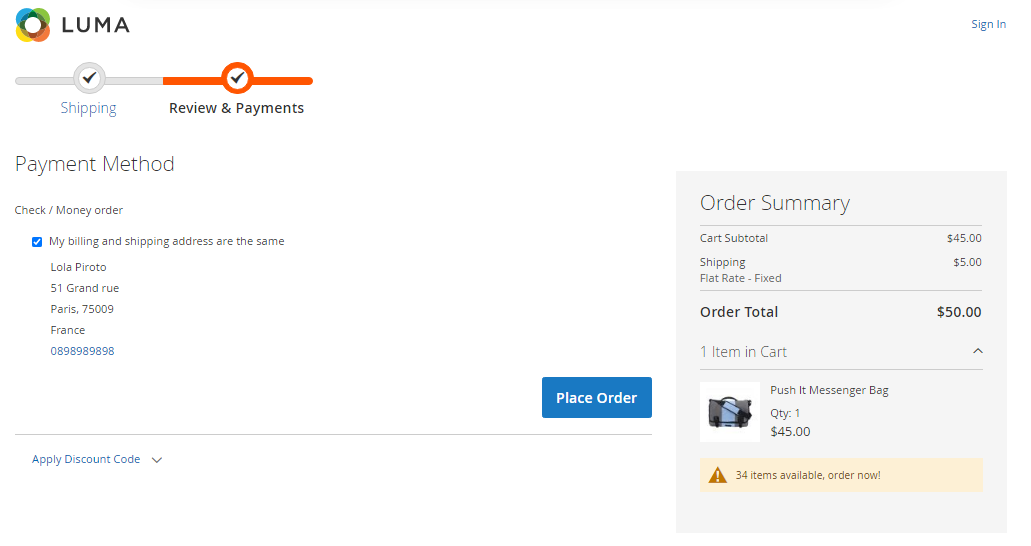
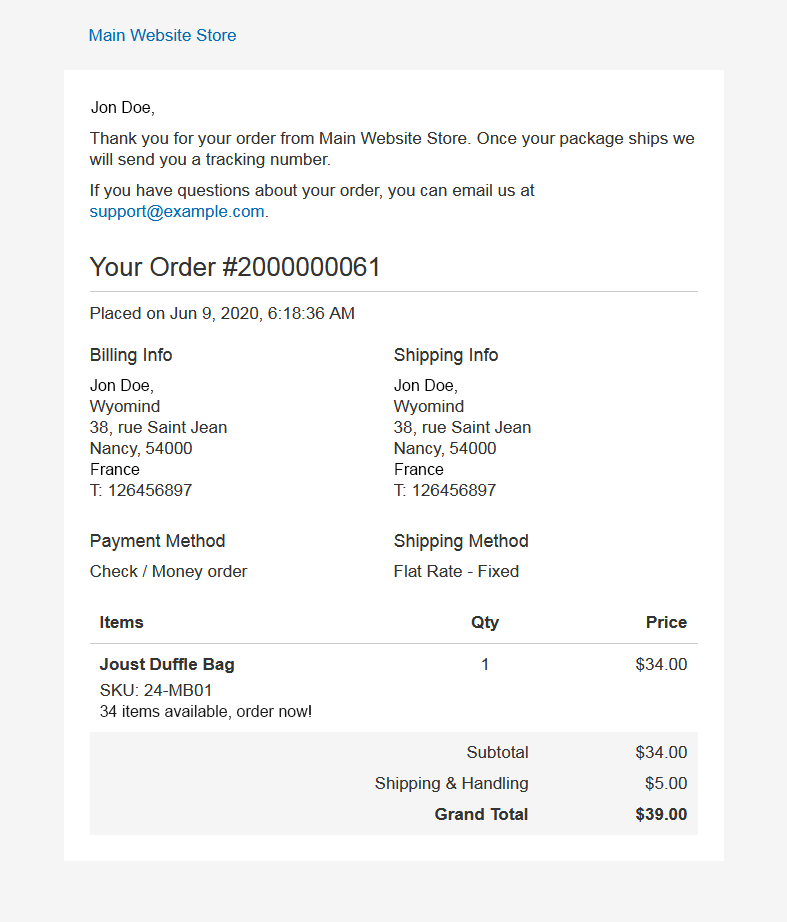
{{product.quantity}} items available, order now!Custom backorders messages
You have the possibility to add a message for backorderable products.
For example:
{{source.backordered_qty}} items on back order!Custom out of stock messages
You can also add a stock status message for out of stock products.
For example:
Sorry, {{product.name}} is out of stock now.Stock status display
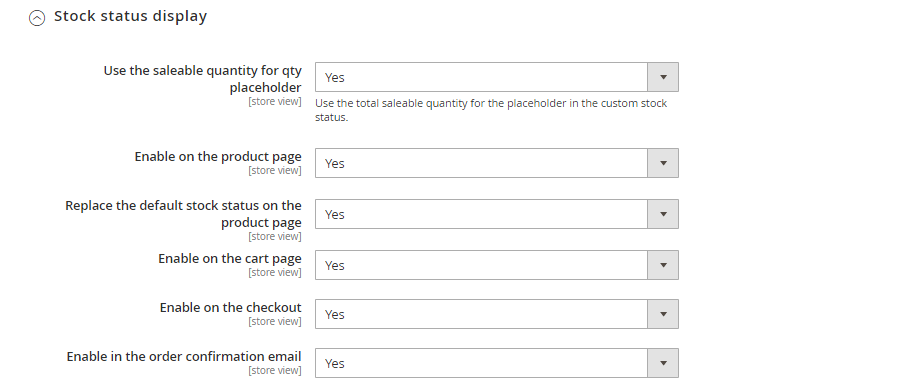
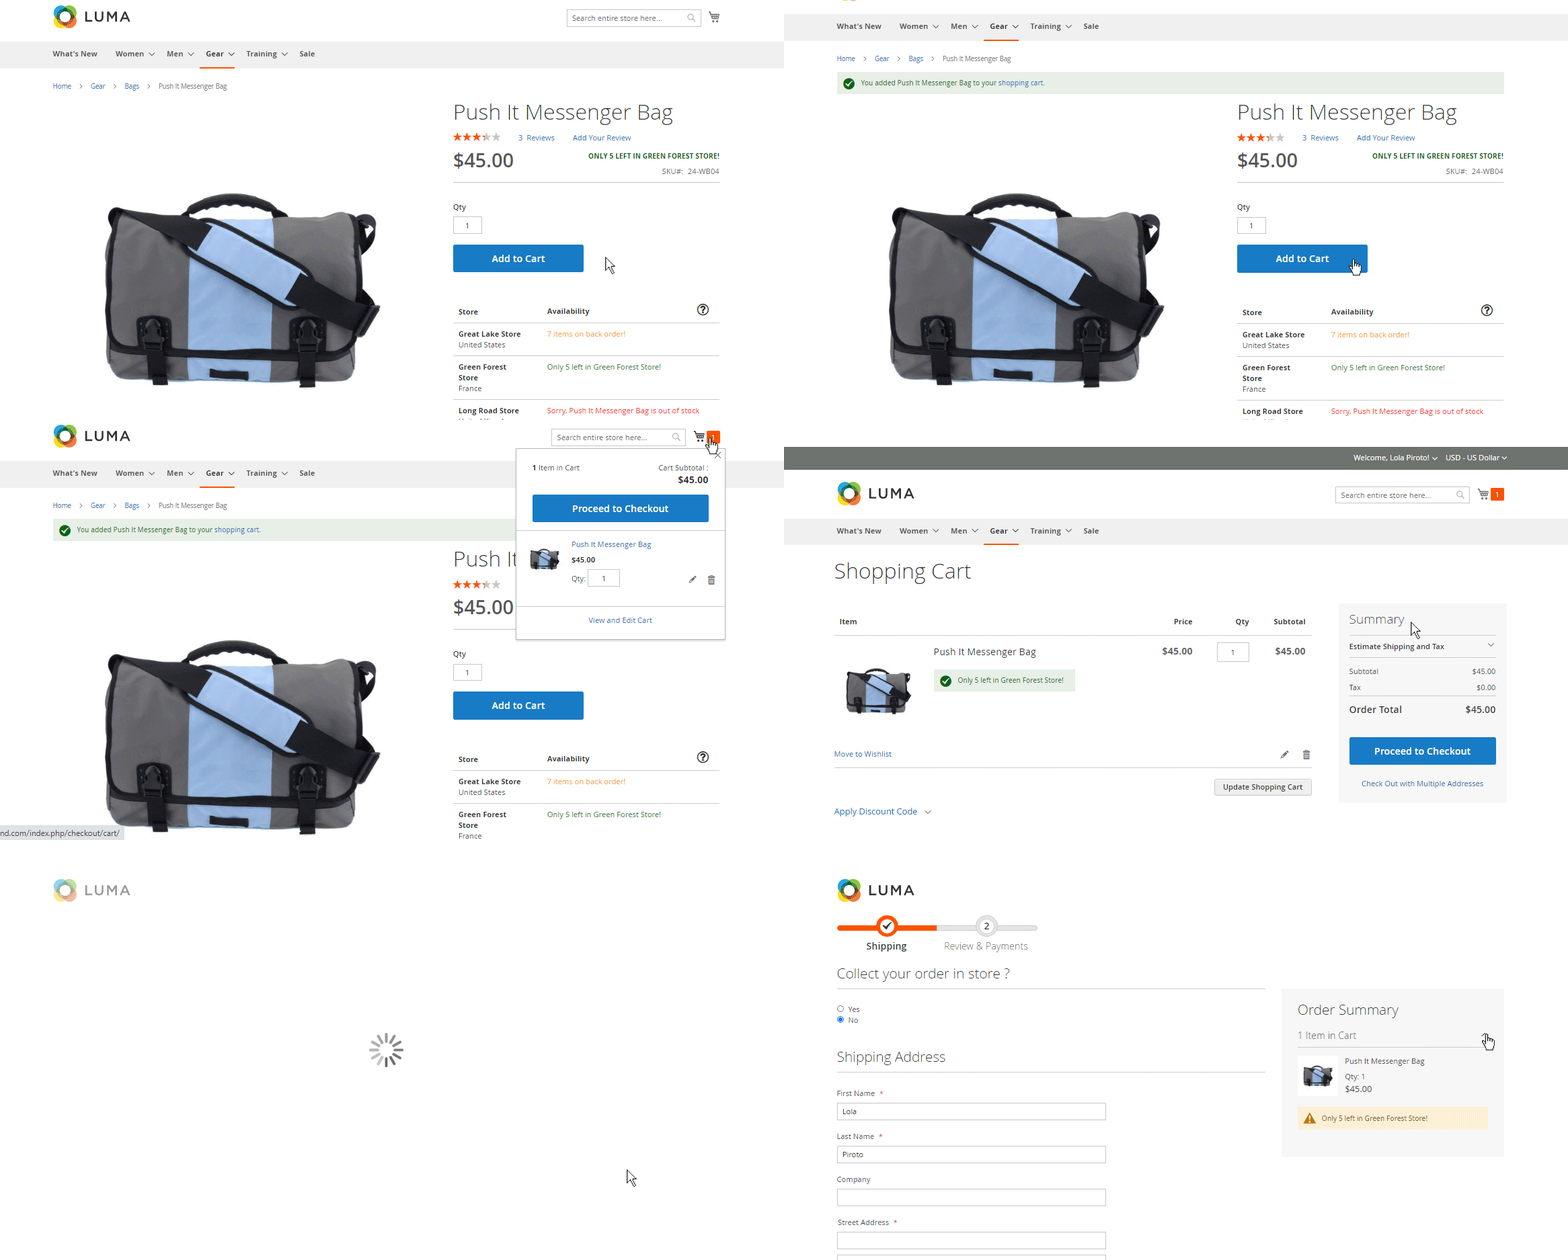
The stock status messages can be displayed in different places.
You can use the saleable quantity for the qty placeholder to display the total saleable quantity in the product, cart, checkout and email messages.
If that option is disabled, the quantity displayed for the qty placeholder will be the quantity of the first store where the product is available.
Choose where you want the stock status messages to appear. You have the possibility to enable or disable the display of the stock status messages:
- on the product page
- on the cart page
- on the checkout
- in the order confirmation email
Product page
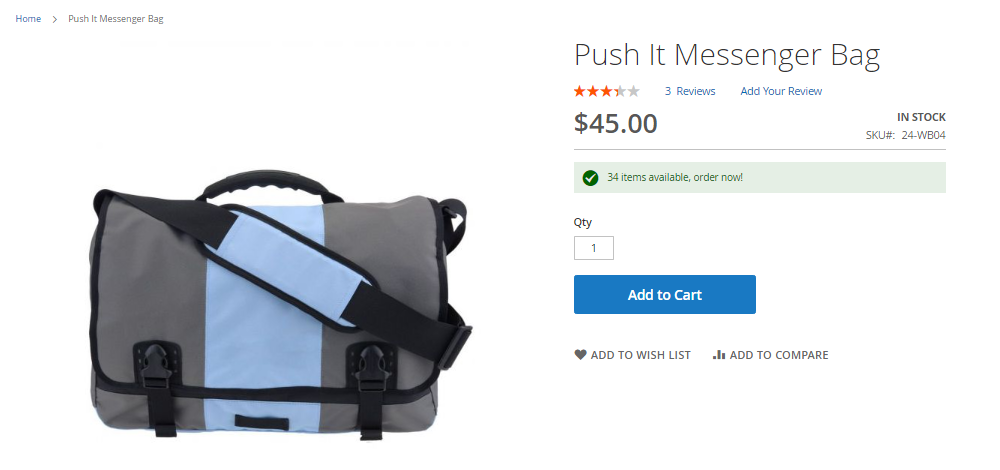
You'll also have the possibility to replace the default stock status on the product page.

Cart Page
Checkout
Order confirmation email
Stock grid display
MSI Stock Status allows you to add the stocks grid on the product page. You can easily enable the stock grid feature as below.
Stock grid template
Define how you want the stores to appear in the stock grid from the Store template field.
 You can add your own content to the store template using simple texts, placeholders as well as HTML, CSS, and PHP codes.
For example:
<b>{{source.name}}</b>
                <br>{{source.city}}, {{source.country}}</br>
 You can also define if you want to Show out of stock source or not.
Stock grid tooltip
You can also display a tooltip in the stock grid of the product page. 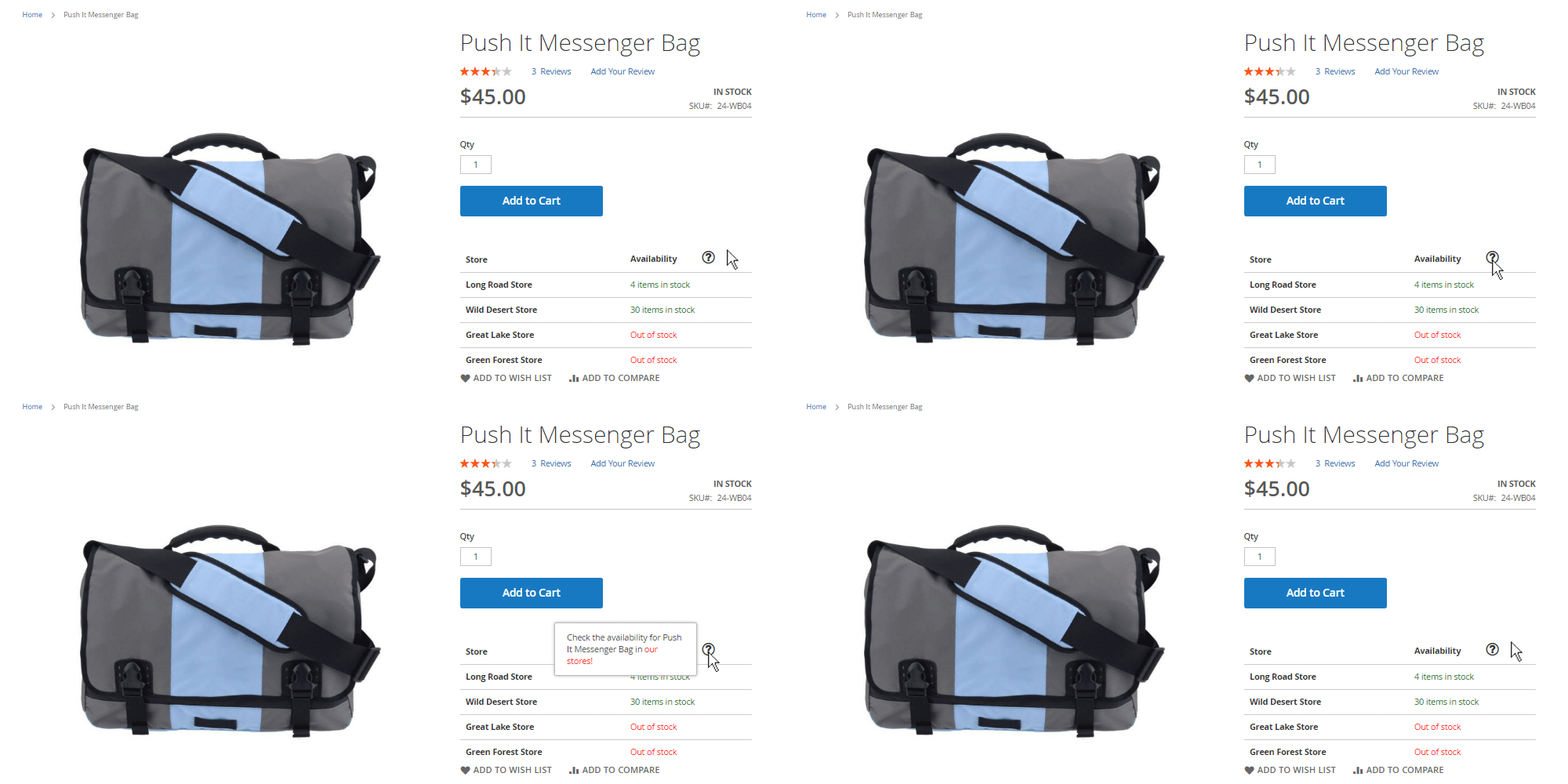
You'll have to configure:
- Content of the tooltip
Add your content in the tooltip using any placeholders and/or fixed texts, as well as HTML, CSS and PHP codes. For example:
Check the availability for {{product.name}} in <span style="color: red;">our stores!</span> - Size of the tooltip
Define the size of the tooltip in pixels.
By default, it is 200px. - Position of the tooltip
Define the position of the tooltip according to the mouse pointer.
By default, it is left.
STEP 4: Manage your orders
Use the MSI Order Management extension included in the MSI Suite to optimize your order management and automate the orders' assignation to the appropriate sources by creating custom algorithms.
Configure the extension from:
StoresSettingsConfiguration Wyomind MSI Order Management
Configure the order Pre-allocation and the shipment
Configure here, how you want the orders to be pre-allocated as well as the shipments.
Pre-allocation Process
Choose how you want the orders to be pre-allocated. You have 3 options:
- Default: The pre-allocation before the shipment is not available.
Note that while the license is not registered, the default option will be used. Check how to activate your license. - Manual: The pre-allocation must be done manually once the order has been placed.
- Automatic: The pre-allocation will be done automatically after the order has been placed and according to the algorithm you have selected in Source Selection Algorithm. The pre-allocation can also be modified manually.
Automatic Pre-allocation Source Selection Algorithm
When choosing the Automatic pre-allocation process, you must select a Source Selection Algorithm between:
- Distance Priority: the order will be pre-allocated to the closest source
- Source Priority: the order will be pre-allocated to the first source
- Your custom algorithms: the order will be pre-allocated to sources according to the rules of your algorithm.
See how to create your custom algorithms.
Enable pre-allocation log
 The log will be available after having run an algorithm from the pre-allocation grid.
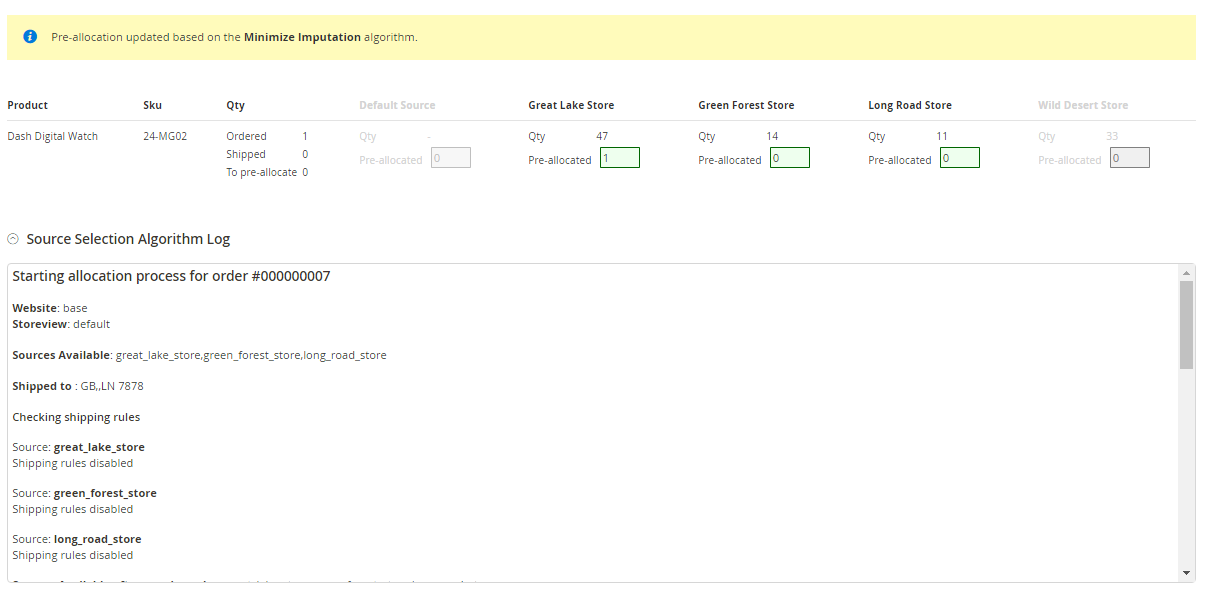
Pending pre-allocations notification in the back-end
 The following notification will be displayed in your back-office:
Allow pre-allocation to sources not linked to the website
 In the case where the product of the order is assigned to "Wild Desert Store" but the source is not assigned to the website, then you can still pre-allocate quantities to "Wild Desert Store".
Limit pre-allocation according to the delivery address
The shipping rules allow you to automatically pre-allocate orders placed on your website to one or more sources according to your customer's shipping address: code of the country and/or zip code and/or regional code. These rules allow you to define the geographical area that each one of your sources can cover.
For each source, you can enable the Pre-allocation by shipping rules. from the Order Management tab of the source edition page from:
StoresInventorY Sources
If enabled, the shipping rules will apply each time an algorithm is run.
You will be able to fill in the Shipping rules using the same syntax as the Owebia Shipping extension (with their agreement).
Pending shipments notification in the back-end
You have the possibility to enable the pending shipments notification in your back-office. This option will display a notification when orders are not fully shipped.
Receive notifications in your back-office when orders are not shipped.
The following notification will be displayed in your back-office:
Create your custom algorithms
You can create new algorithms in:
SalesCustom Algorithms
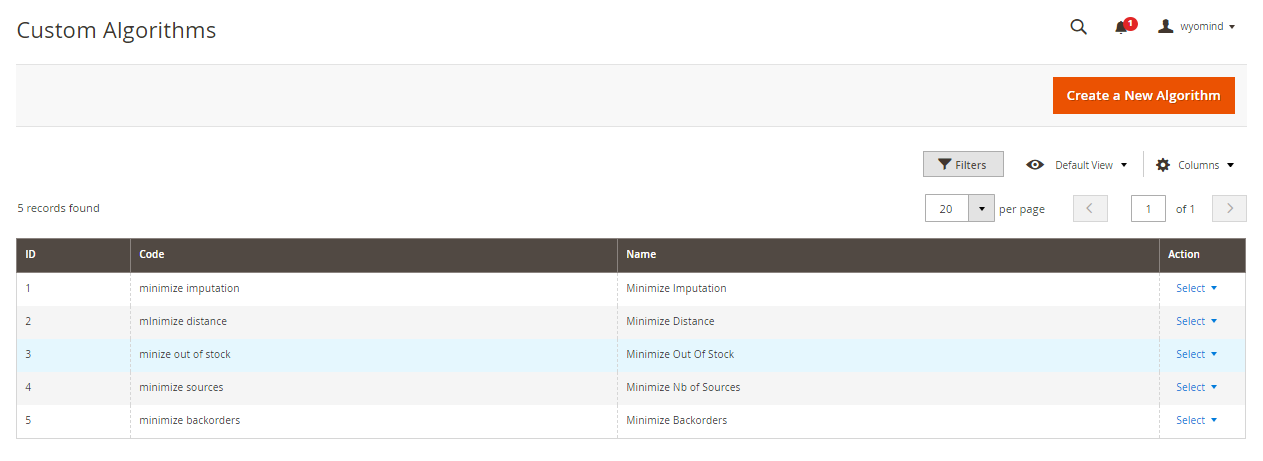 Click on Create a New Algorithm.
General
In the General tab, fill in the following fields.
- Code of the algorithm. It is internal.
Mini-backorders - Name of the algorithm.
Minimize backorders - Description of the algorithm.
This algorithm will minimize backorders.
Rules
You have the possibility to add rules to your algorithms.
When there are several rules, they are prioritized in the same order as they are configured in the algorithm.
So sources will be ordered according to the first rule, then if sources have the same order, they will be ordered according to the second rule...
From the final sources found, the pre-allocation will be minimized according to the maximum number of sources to use.
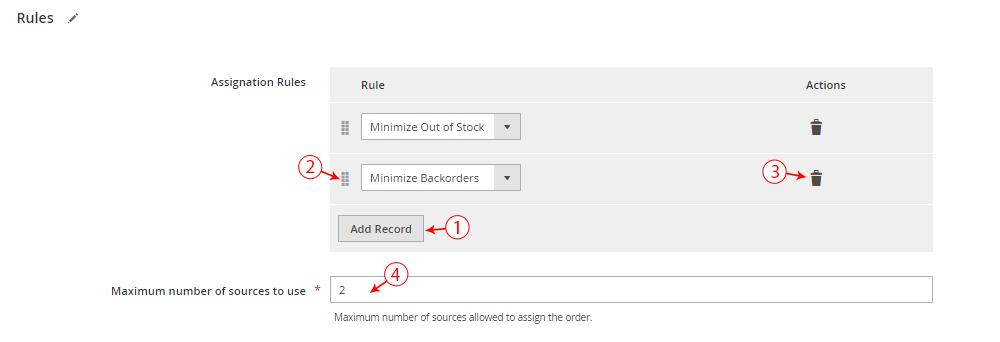
In the Rules tab, you can:
- Add as many pre-allocation rules as you need for your algorithm by clicking on Add record.
- Use the drag and drop option to order your rules.
- Click on the bin icon to delete a rule from the Actions column.
- Define the maximum number of sources to use and that will be allowed to pre-allocated the order.
Any custom algorithm tries to minimize the number of sources used. If the algorithm does not find a solution with a number of sources less than or equal to the field, the pre-allocation is not possible
2
Algorithm rules
You have the possibility to base your algorithm according to the following rules:
- Minimize Backorders
This rule will favor pre-allocations to sources where there is stock for the products. - Minimize Distance
This rule will favor pre-allocations to the closest sources. - Minimize Imputation
This rule will favor pre-allocations to sources that have a lot of stocks. - Minimize Out Of Stock
This rule will favor pre-allocations that will not cause a stock shortage.
Manage your pre-allocations
You can check and edit your orders' pre-allocations from:
SalESOrders
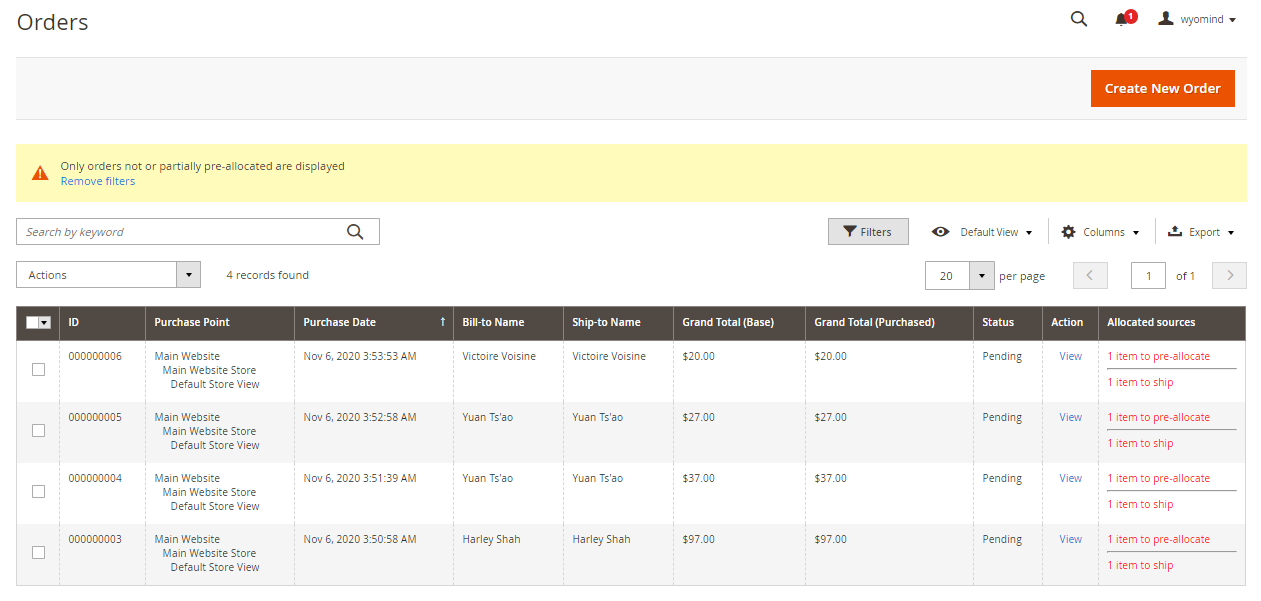
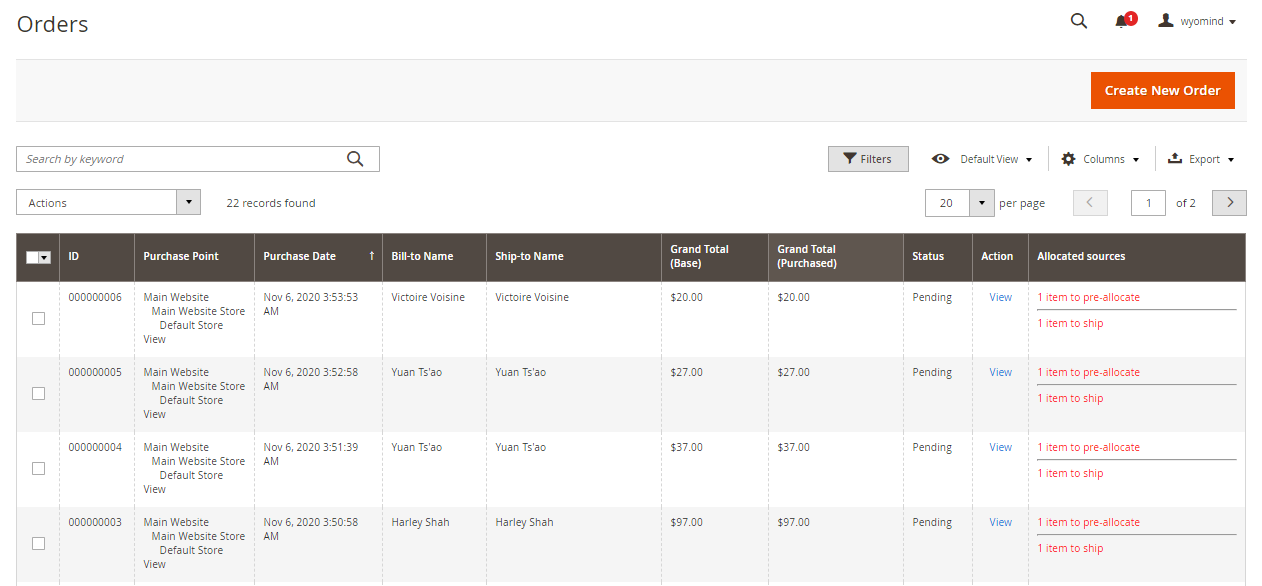 In the orders grid, you'll be able to see different statuses from the Allocated sources column.
These statuses concern the pre-allocation or the shipment of the orders.
Pre-allocation statuses
The pre-allocation status appears first, above the shipment status.
You can have:
- X item to pre-allocate
X product must be pre-allocated manually to a source. - X item(s) is partially pre-allocated
There are still products from the order to pre-allocate. - Pre-allocation Sources: Name of the store
The order is pre-allocated to the source.
These are the sources used for the automatic or manual pre-allocations. - No pre-allocation required
For orders placed before the module installation and for orders that don't need to be pre-allocated (for example, products with no stock management).
Shipment statuses
The status concerning the shipments appears below the pre-allocation status.
You can have:
- X item(s) to ship
X product(s) must be shipped manually. - X item(s) is partially shipped
There are still products from the order to ship. - Allocated Sources: Name of the source
The order is allocated to the source.
These are the sources used for the shipments. - No item to ship
When products cannot be shipped (virtual, downloadable, ....).
Automatic pre-allocation
MSI Order Management for Magento 2 allows you to automatically pre-allocate sources during the order validation.
For that, you must define the Pre-allocation process on Automatic from:
StoresSettingsConfiguration Wyomind MSI Order Management
 The orders will be pre-allocated to sources according to the pre-allocation algorithm you have chosen:
- Distance Priority: the order will be pre-allocated to the closest source
- Source Priority: the order will be pre-allocated to the first source
- Your custom algorithms: the order will be pre-allocated to sources according to the rules of your algorithm.
See how to create your custom algorithms.
If you have enabled the Pending pre-allocations notification in the back-end, the following notification will be displayed when the automatic process cannot find a solution for the pre-allocation.
![]() Click on Manage these orders to open the orders grid displaying only the orders with pending pre-allocations.
Click on Manage these orders to open the orders grid displaying only the orders with pending pre-allocations.
Manual pre-allocation
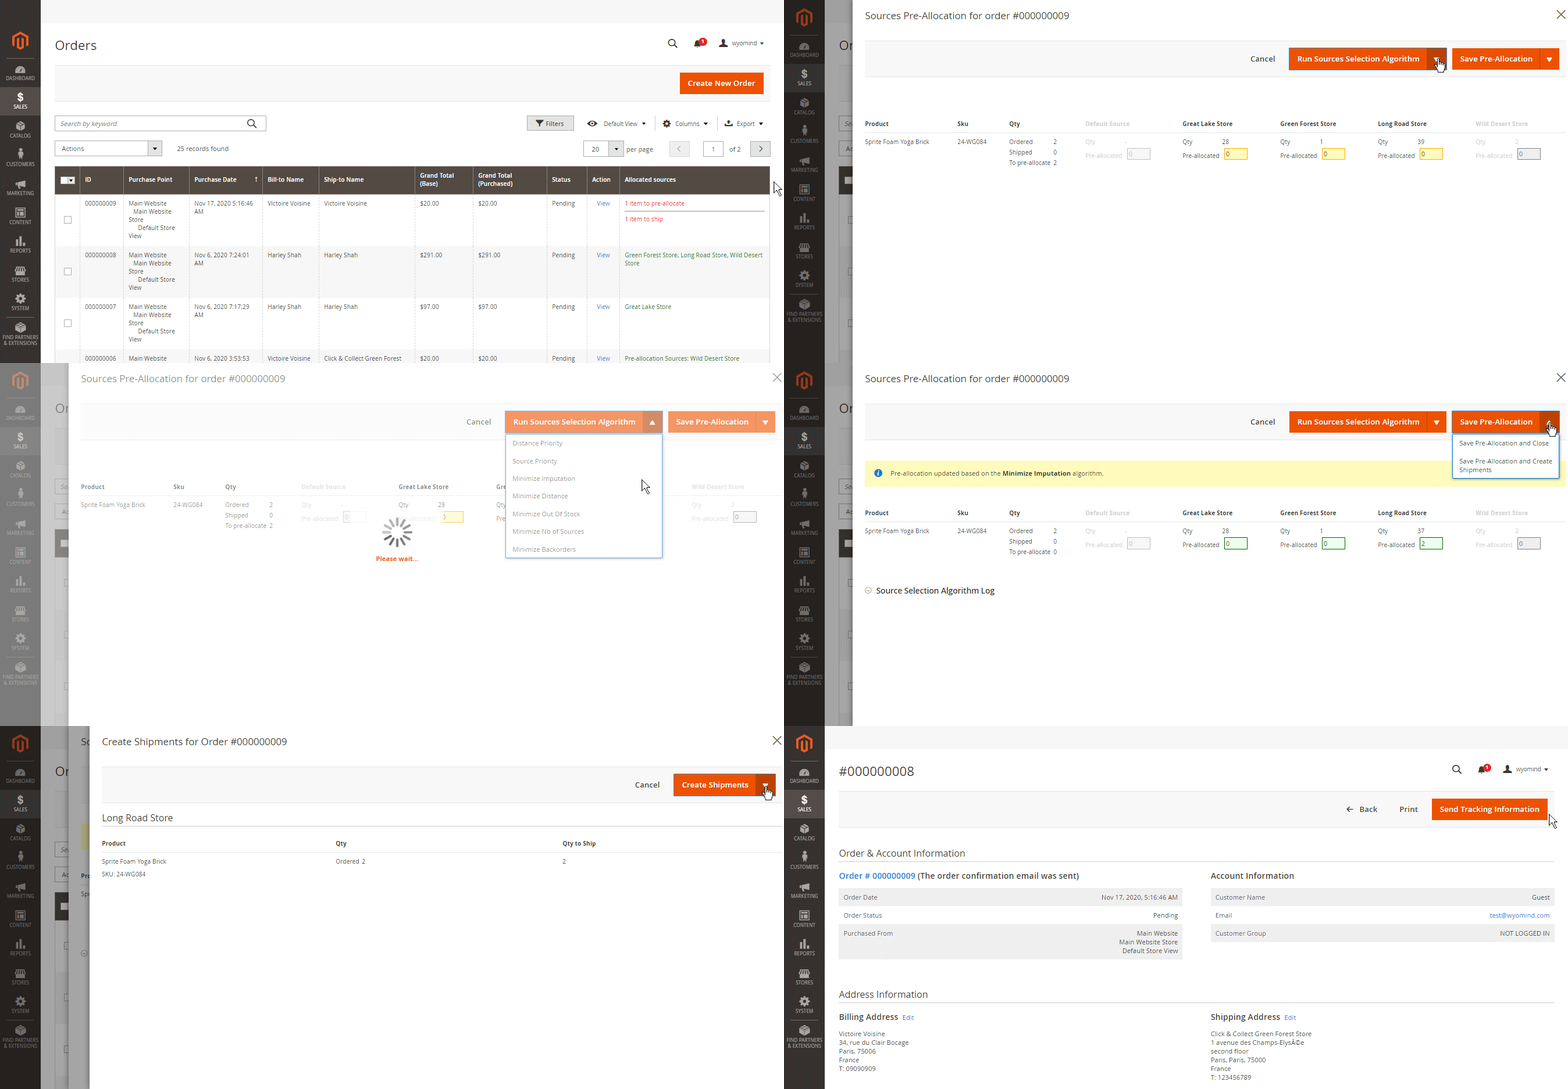
The extension allows you to edit the orders pre-allocations and to run the algorithms manually from the orders grid and pages.
You will be able to run default and custom algorithms via the Run Sources Selection Algorithm dropdown, and you will also be able to edit each field manually.
- editable: you can assign quantities to the source.
If the source is editable and displayed in grey, it means that the product is linked to the source but this one is not linked to the stock.
See how to enable pre-allocation to sources not linked to the website. - disabled: the product is not linked to the source (although the source belongs to the stock).
You can pre-allocate orders to sources manually from the Sources pre-allocation section of the orders page or from the orders grid popup directly in:
SalesOrders
Click on X item(s) to pre-allocate from the Allocated sources column.
A popup should open and display the sources' pre-allocation for the order.
.
Select the algorithm from the Run source selection algorithm dropdown.
 A notification should be displayed to confirm the pre-allocation.
Create your shipments
The extension allows you to create shipments in a few clicks only in:
SalesOrders
If you have enabled the Pending shipments notification in the back-end, the following notification will be displayed in your back-office.
![]() Click on Manage these orders to open the orders grid displaying only the orders with pending shipments.
Click on Manage these orders to open the orders grid displaying only the orders with pending shipments.
You can create the shipments from the Sources pre-allocation section of the orders page directly or from the orders grid popup directly in:
SalesOrders
Click on X item(s) to ship from the Allocated sources column.
A popup should open and display the stock pre-allocation for the order.
From the Save pre-allocation dropdown, choose Save Pre-Allocation and Create Shipments.
 Another popup should open and sum up the shipment for the order.
Click on Create Shipments or Create and Open the Shipments.
Once the shipment is created, a notification will be displayed:
![]()
If you have selected Create and Open the Shipments, this will open each shipment in a new window.
MSI Permissions for Magento 2 allows you to manage permissions of the sources for each one of the users registered in your Magento admin.
The extension gives you the possibility to restrict access to the sources for store managers. Thanks to the MSI Permissions extension, you will be able to restrict the access to:
- the product pages: admin users will be able to change the quantities for the products assigned to the sources they manage.
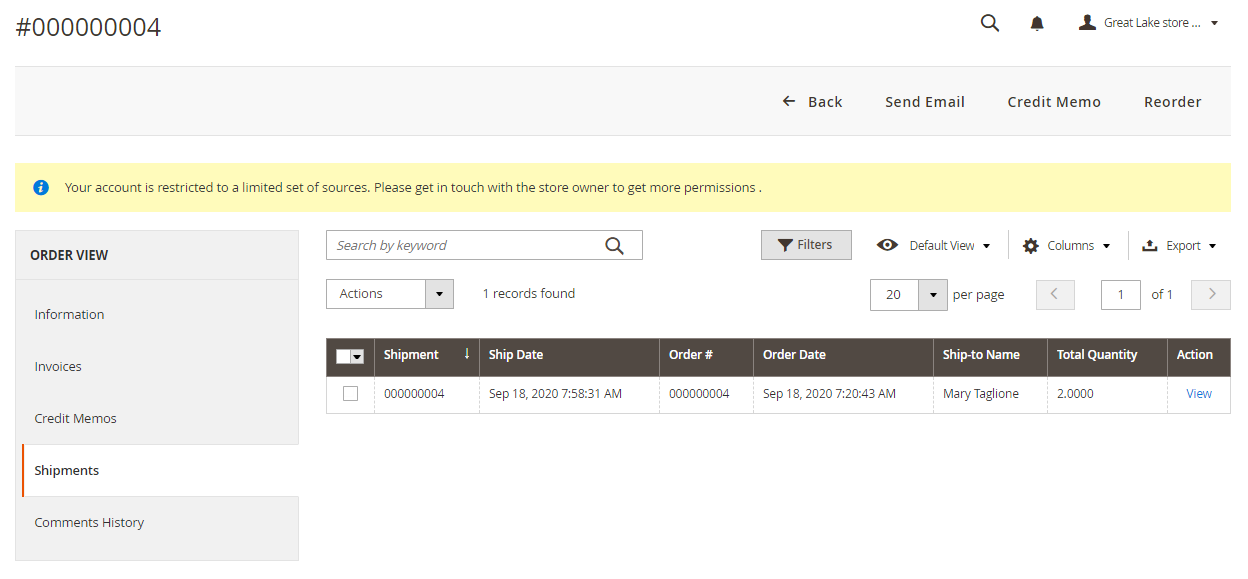
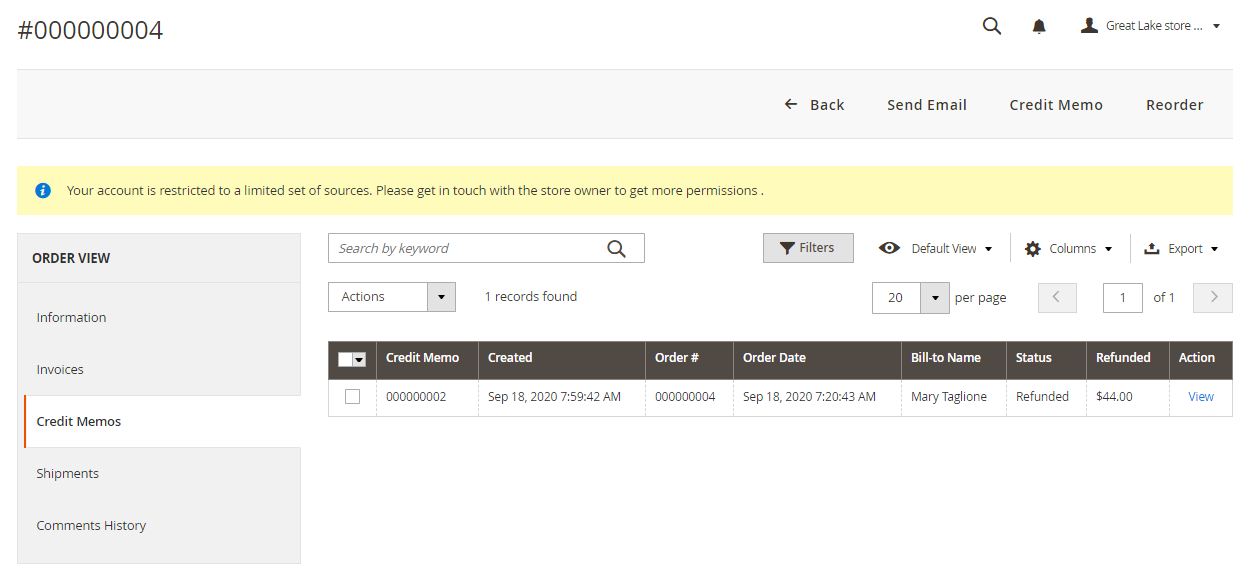
- the orders: store managers will have access to the invoices, the shipments, and the credit memos of the orders assigned to the sources they are in charge of and/or orders not assigned to any source yet.
- the sources: users will only be able to manage the sources they are linked with.
MSI Permissions is also compatible with other modules from the MSI Suite giving you endless possibilities for managing your sources.
STEP 5: Manage permissions
MSI Permissions for Magento 2 allows you to manage permissions of the sources for each one of the users registered in your Magento admin.
The extension gives you the possibility to restrict access to the sources for store managers. Thanks to the MSI Permissions extension, you will be able to restrict the access to:
- the product pages: admin users will be able to change the quantities for the products assigned to the sources they manage.
- the orders: store managers will have access to the invoices, the shipments, and the credit memos of the orders assigned to the sources they are in charge of and/or orders not assigned to any source yet.
- the sources: users will only be able to manage the sources they are linked with.
Assign permissions
With MSI Permissions for Magento 2, you have the possibility to assign different rights to each admin user.
Note that the extension does not replace the general Magento permissions system but brings additional restrictions to it.
Combining both systems can help you to create any possible configuration.
You can easily assign permissions to users from:
StoresInventorySources PermissionS
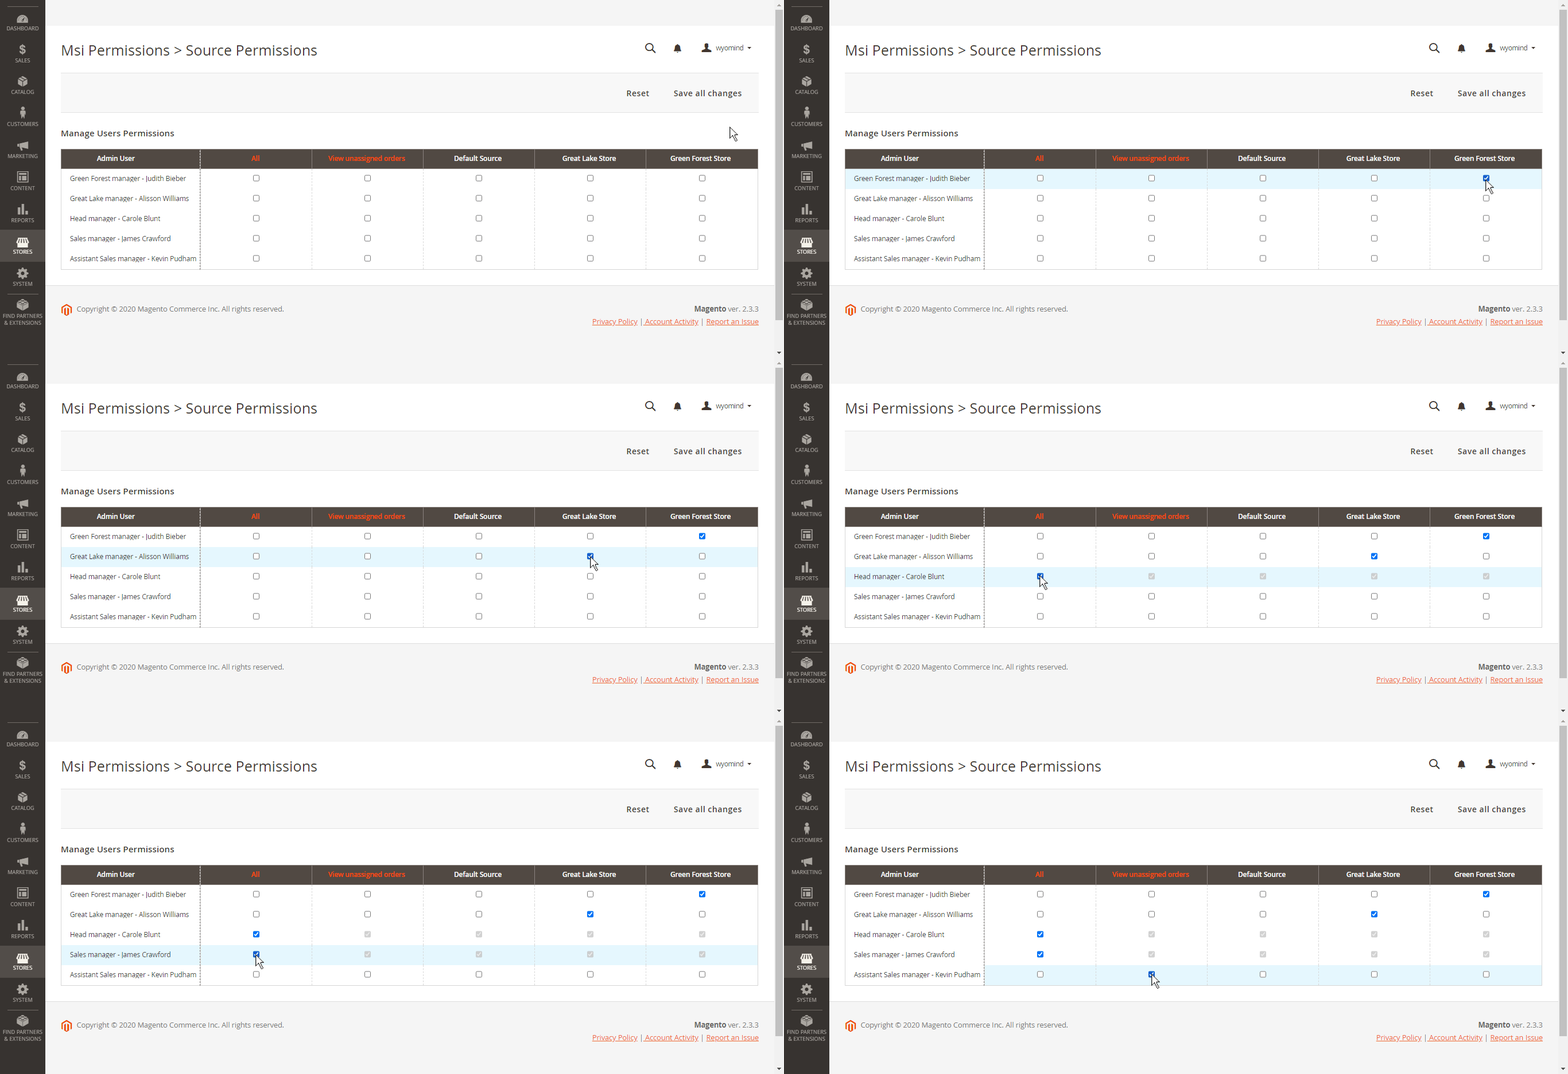
Permissions grid
Assign permissions to each store manager so that they can all manage the products, the stocks, the orders assigned to the source(s) they’re in charge of.
For that, tick the appropriate boxes for each admin user.
- All
Store owners will be able to manage the products, stocks, and orders for all the sources. - View unassigned orders
Store owners will be able to manage all the orders that haven’t been assigned to a source yet. - Sources
Store owners will be able to manage the products, stocks, and orders for the selected source(s).
If Sarah Johnson logs into Magento 2 back-office, she'll only be able to have access and manage the products, the stocks, the orders assigned to the source(s) she manages:
Great Lake Store
Permissions restrictions
The permissions assigned to the admin users will restrict access to:
- the products
- the orders
- the sources
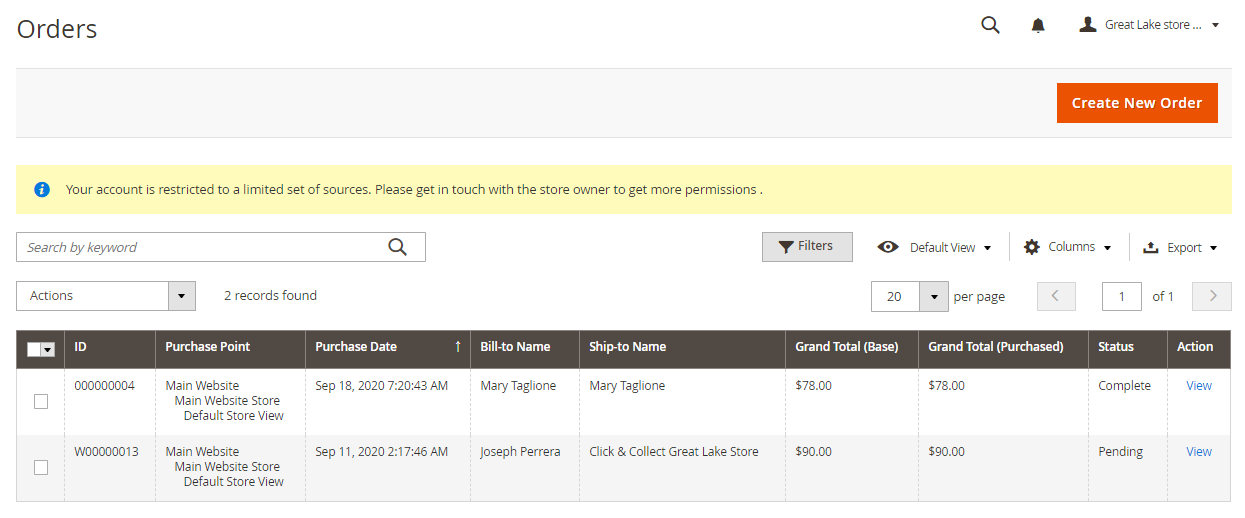
The grids will filter the products, the orders, and the sources according to the permissions of each user.
You can notify users about permission restrictions from:
StoresSettingsConfiguration Wyomind MSi PermissionsPreference
If enabled, the below notification will be displayed in their Magento back-office.
![]()
Users will be notified about permission restrictions in:
- the products grid and pages from:
CatalogProducts - the orders grid and pages from:
SalesOperationsOrders - the sources pages from:
StoresInventorySources
Products
Admin users will only be able to see and edit the products that are assigned to the source(s) they have permissions for, from:
CatalogProducts
For these products, they'll be able to edit the below stock information for their sources only:
- the source item status
- the quantity
- the low stock notification threshold
Orders
When orders are assigned to specific sources, the admin users managing these sources will have access to the order pages.
They will also have access to:
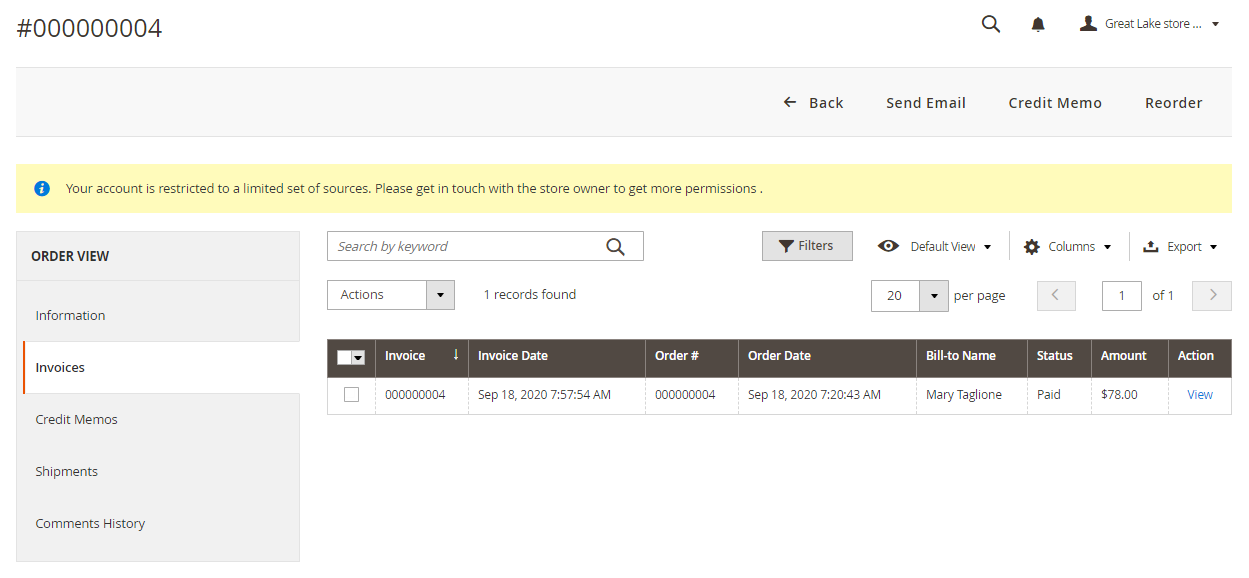
- the invoices
Admin users will be able to create an invoice only if the order is assigned to the source they're managing. - the shipments
Admin users can send the shipments for an order if it is assigned to the source they're managing.
- the credit memos
Admin users can also create credit memos for an order if it is assigned to the source they're managing.


 Magento 2
























 This set of plugins improves our order and delivery management system.... we improve the workflow and improve the stock management, as well as your sales process. we are very happy with the acquisition. Some processes still need to be improved....
 Cette suite de plugin améliore le système de stock de Magento2 sans modifier les tables de la base de donnée. Ce qui permet une compatibilité parfaite avec d'autres modules. De plus, le support est excellent. Toujours des réponses très rapide ! Merci