Advanced Inventory extension for Magento
Multi-stock management suite for Magento
Advanced Inventory is an extension for Magento that allows you to manage stocks for different points of sale or warehouses through Magento's backend.
Each order placed through your website can be automatically or manually assigned to one or more warehouse/POS. Then you can follow in real-time the stock level for each point of sale, the orders' assignations, and anticipate if re-stocking is needed.
With Advanced Inventory, all kinds of scenarios are possible. The module is easily configurable thanks to several setting options that correspond to the great majority of inventory management in real situations.
Advanced Inventory is composed of a suite of performing tools for multi-stock management:
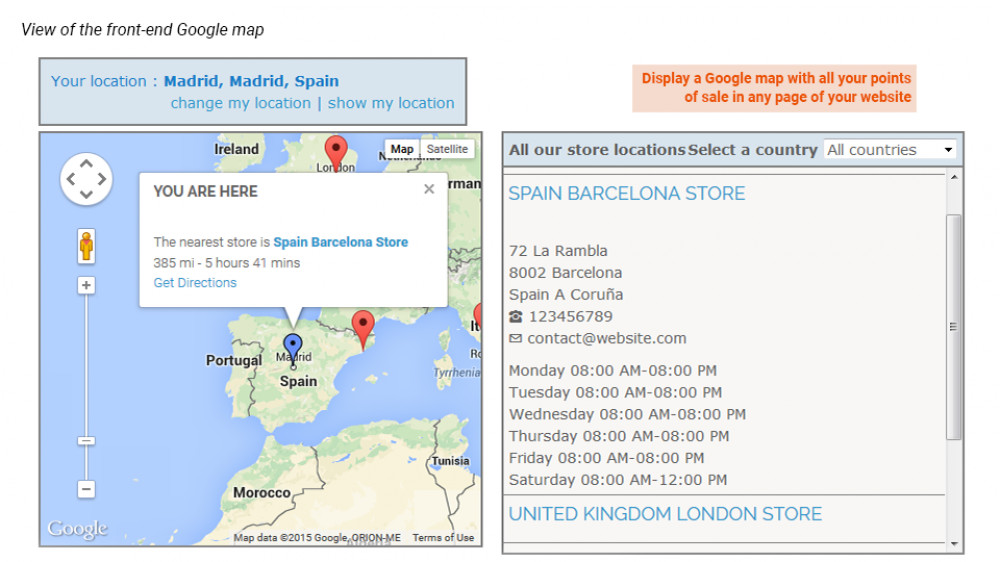
- Point of Sale allows you to display in your Magento's frontend a Google Map in order to help your customers find the closest point of sale.
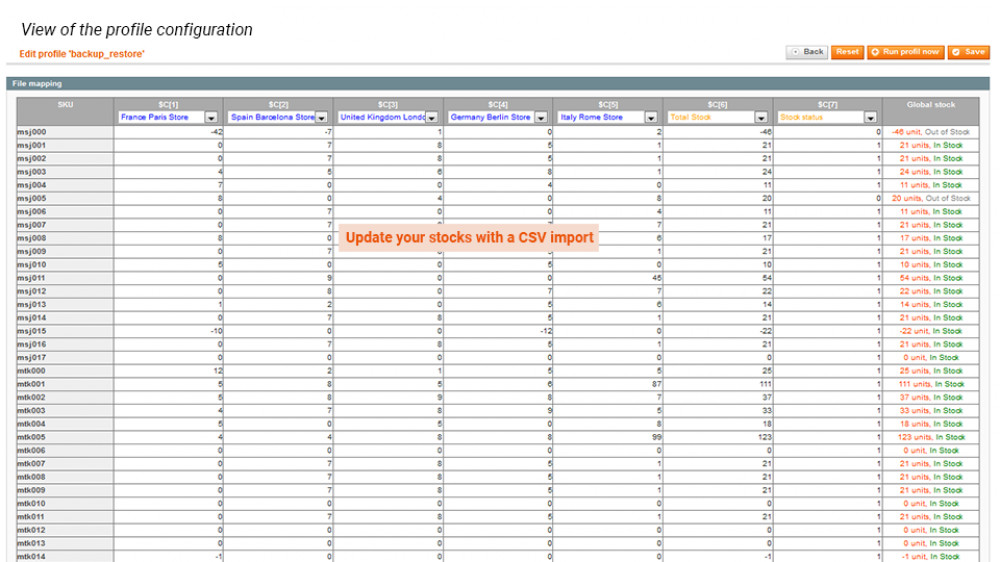
- Mass Stock Update updates all your stocks in Magento in one go via a CSV file.
Use Advanced Inventory for Magento in 6 steps
STEP 1: Configure Advanced Inventory in a general way
First of all you need to configure your extension in a general way and according to your needs in:
SystemConfigurationWyomindAdvanced Inventory
Preferences
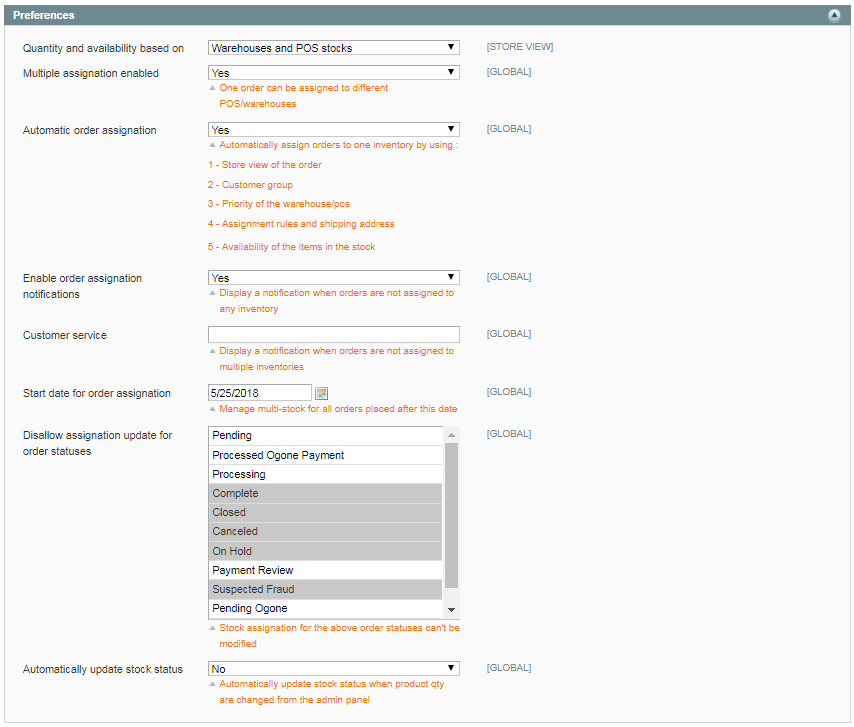
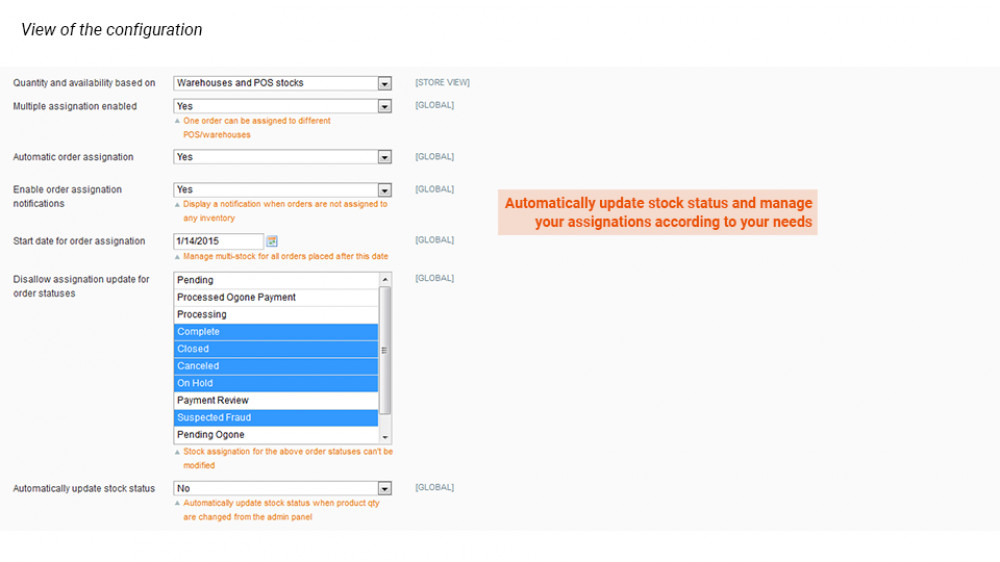
In the Preferences tab, start by choosing if you want the quantity and the availability to be based on Warehouses and POS stocks or on Global quantity.
- Multiple or single assignation
Advanced Inventory allows you to assign orders to many points of sale. For that, you need to enable the Multiple assignations. - Automatic or manual assignation
You also have the possibility to activate the automatic assignation so that your orders can be automatically assigned to one or more points of sale according to several things such as the store view of the order, the customer group, the priority of the point of sale, the assignment rules and shipping address, the availability of the items in the stock. - Order assignation notification
If you enable order assignation notifications, you should get a message at the top of your admin saying some orders need your attention such as below:
You can display a notification for the Customer Service when orders are not assigned to multiple inventories. You also have the possibility to edit the start date for order assignation. You will then be able to manage multi-stock for all orders placed after that date. - Order status and assignation update
With Advanced Inventory, you have the possibility to disable the assignation update for order statuses such as Complete or Canceled orders. Then it won't be possible to modify stock assignation for orders with these statuses.
You can also enable an option to automatically update stock status when product quantities are changed from the admin panel.
System
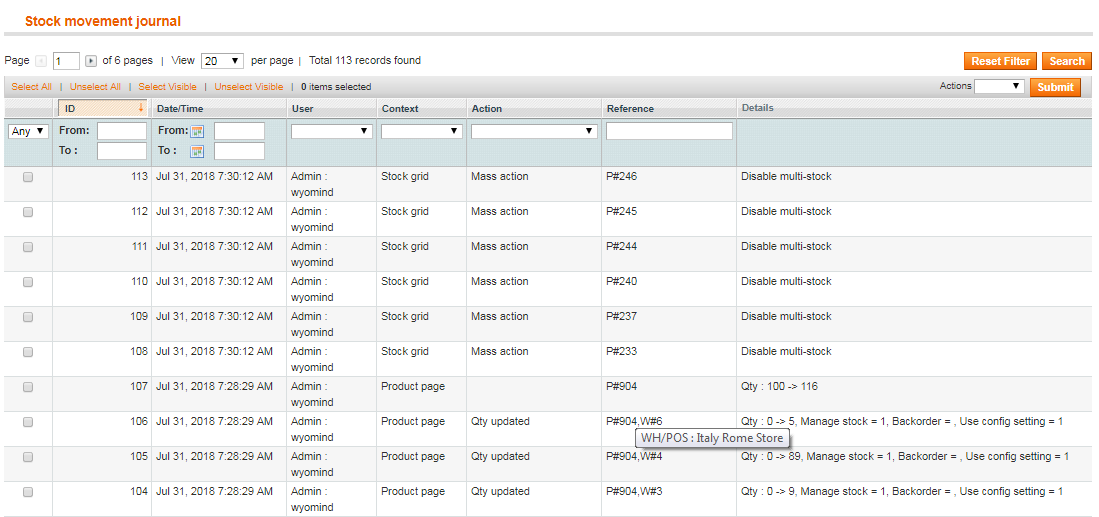
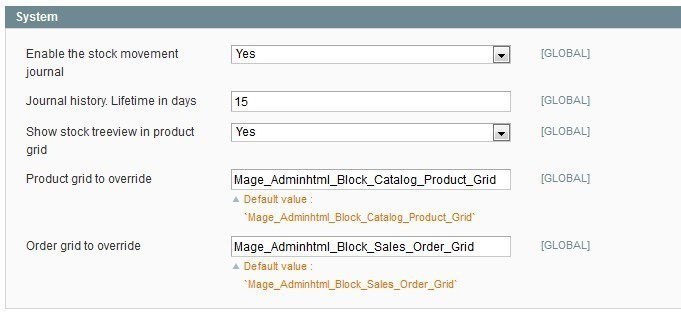
In the System tab, you can also enable the Stock movement journal.
- Stock movement journal
This tool is useful to see if your stock changes have been taken into account. To check your stock modifications, go to:
SalesPOS / WarehousesStock movement journal
At the same time, you can define how many days you want to include in the Journal history. - Product and order grid enhancements
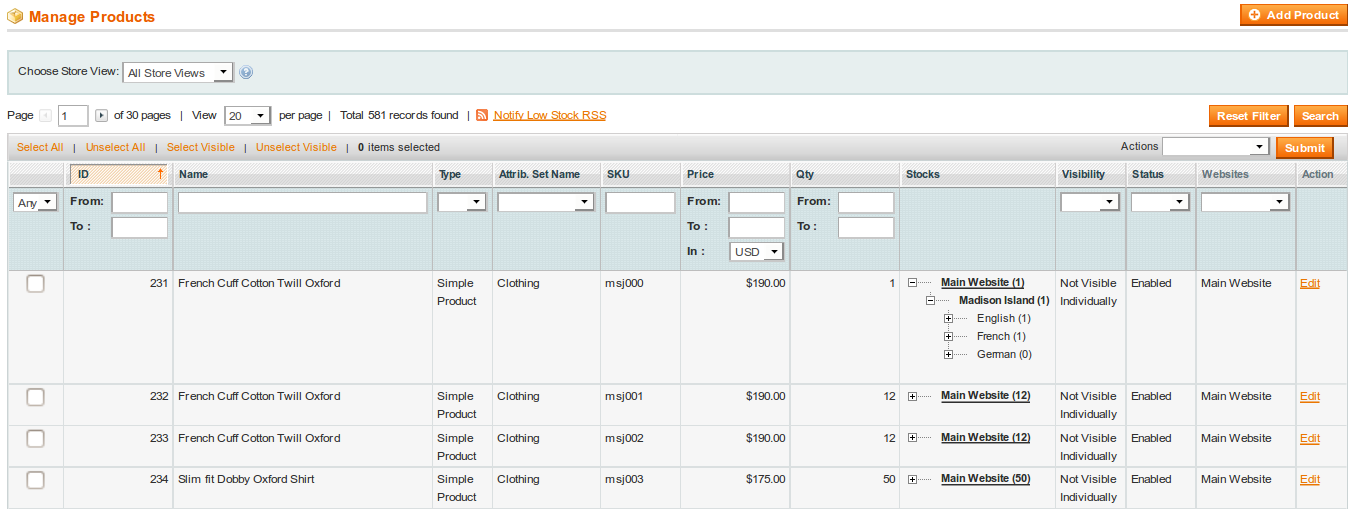
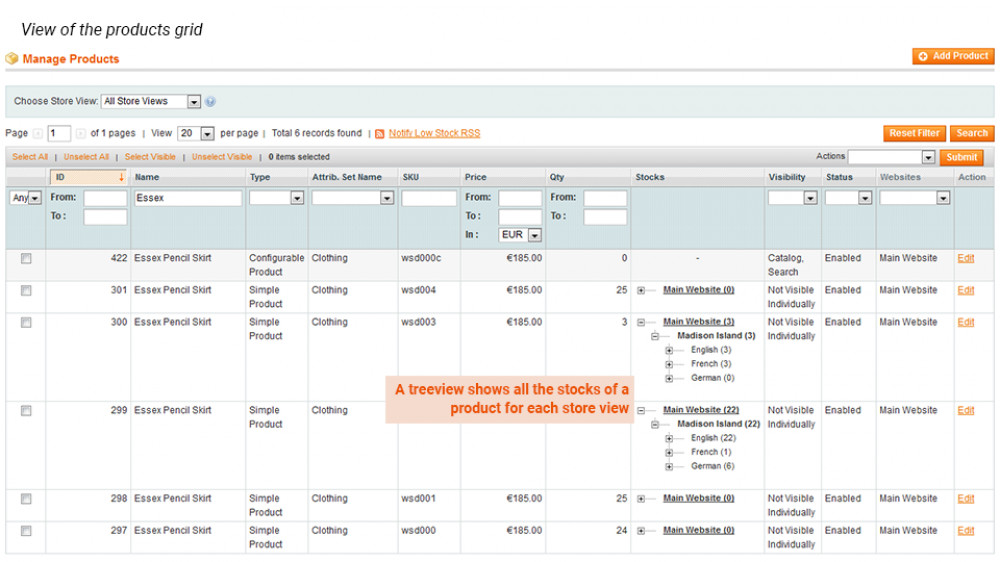
Advanced Inventory allows you to see your stocks directly in the product grid. For that, define Show stock tree-view in product grid on YES. You should see a new column called Stocks if you go to:
CatalogManage products
STEP 2: Manage your points of sale
Now, you need to create your points of sale. For this, go to:
SalesPOS/ WarehousesManage POS / Warehouses
When creating your warehouse/point of sale, you must fill in a certain number of fields.
General Information
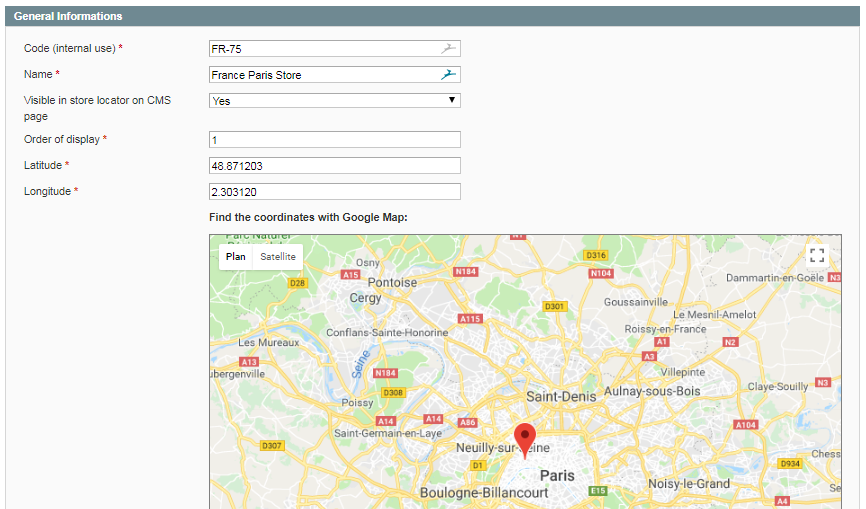
In the General Information tab, you have to define a code for your warehouse/point of sale. Choose to make it visible in the store locator (CMS page). Give it an order of display as well as a latitude and a longitude using Google Maps.
Address & Hours
In the Address & Hours tab, define the address of the warehouse/point of sale. Give a phone number and an email. Add an image and specify the opening hours as well as the lunch hours. Note that if you have filled in the email field, a copy of the email sent to the customer will also be sent to the store when the order is assigned to a point of sale/warehouse.
Store Views Selection
Advanced Inventory is an extension for Magento that allows you to manage all kinds of scenarios. Indeed, you can link a warehouse/point of sale to one or more store views, or to one or more customer groups.
In the Store Views Selection tab, define for which store view(s) you want this warehouse/point of sale to be available. You can also make your warehouse/point of sale available for all store views.
Customer Group Selection
In the Customer Group Selection tab, select the group(s) of customers that will be able to see that warehouse/point of sale. Here again, you can do what you want and decide to make that warehouse/point of sale available for retailers only or for all customer groups.
Inventory Setting
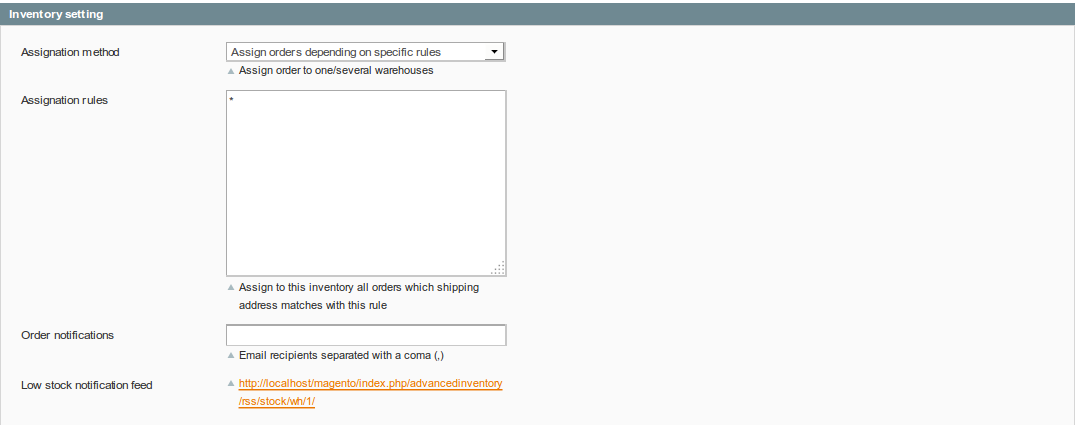
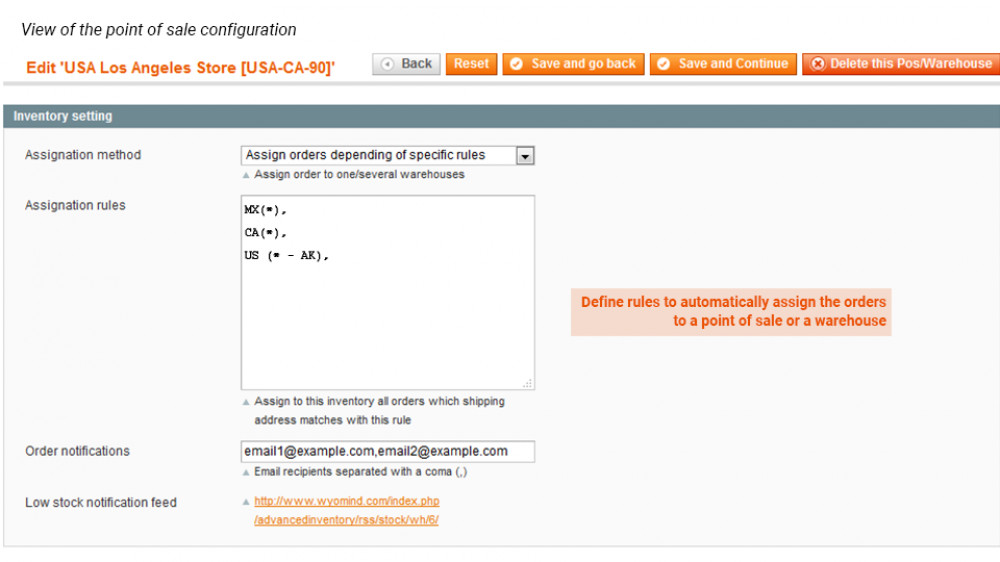
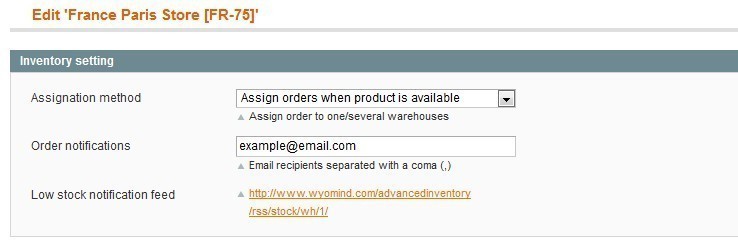
In the Inventory setting tab, define a specific configuration for the pos/warehouse.
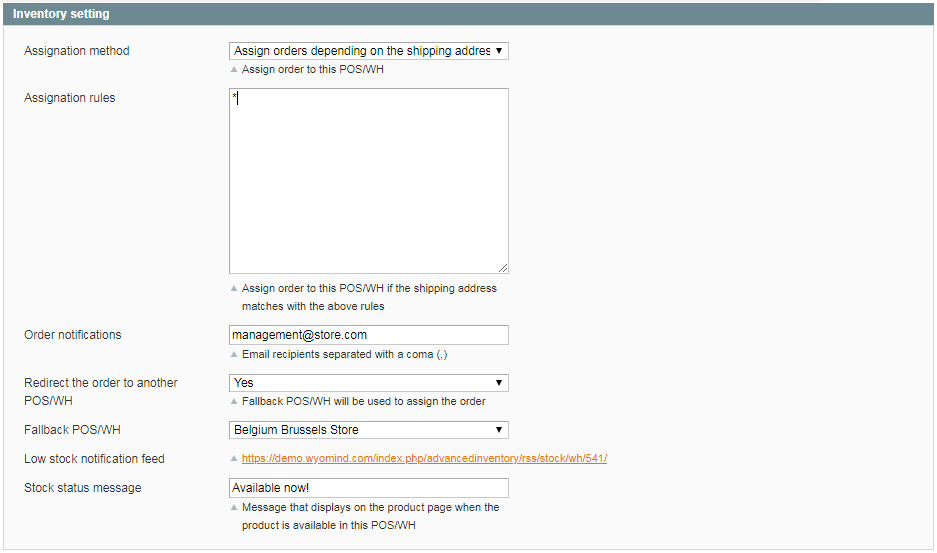
- Assignation method
You have the choice between several methods:
Do not assign any order
Assign orders when product is available
Assign orders depending on the shipping address: Then, fill in the Assignation rule to assign the orders to that particular point of sale (Check how to manage assignation rules). - Order notifications
When orders are assigned, you can also notify by email the recipients, that is to say, the manager(s) of the point of sale. For that, enter the different emails separated with a comma. - Redirect the order to another POS/WH
When you decide to assign the orders, you have the possibility to redirect the order to a Fallback POS/WH. When this option is set on YES, you can choose the Fallback POS/WH. This is useful when a store is closed for example. - Low stock notification feed
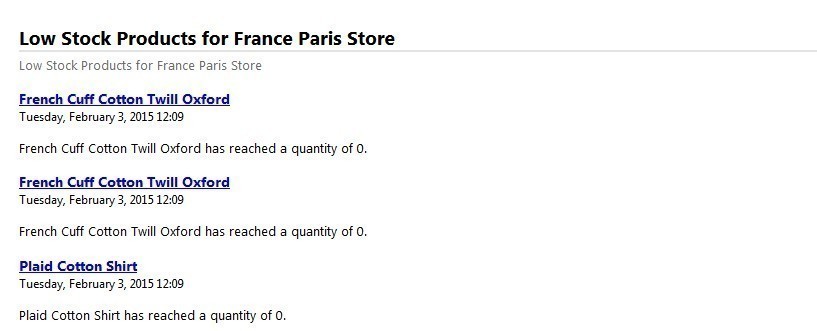
You also get the link of a feed including low stock products for that particular POS. - Stock status message
Display a stock status message in the product page when the product is available in this stock.
Available now!
In the Default settings for products subtab, you'll also be able to define the default product settings for this stock.
You'll have the possibility to use the configuration settings for the backorder. If you don't, you'll have to define your own option for the backorder status between:
- No backorders
- Allow quantity below 0
- Allow quantity below 0 and notify customer
Finally, you'll be able to press the button to update all multi stock products with these settings.
Orders
STEP 3: Manage Sales
Before anything, you must know that an order will be assigned to a pos or a warehouse according to the settings of those stores:
- the store view: if the customer is on the French, English, or German view of your Magento store for example.
- the customers group: if it is about a retailer, wholesaler, or a simple customer and according to your settings for the point of sale.
- the priority: if the warehouse has priority to another one.
- the availability of products: if a product is not available in the warehouse and must be sent from another one.
- the assignation rules: if for example, you have decided that the warehouse in New York had to deliver to all USA except to California.
Use the assignation table
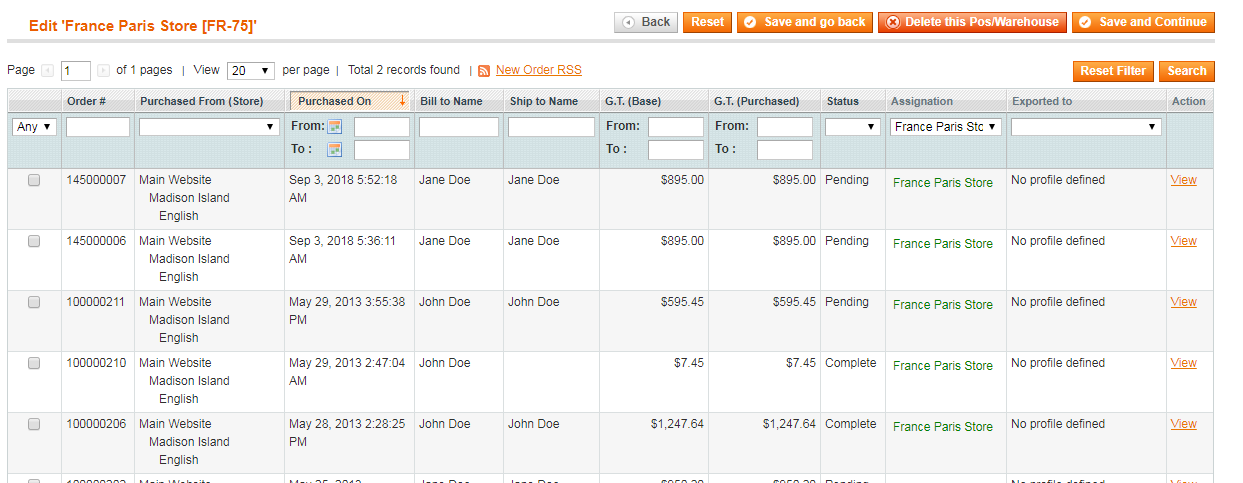
You should see a column named Assignation in:
SalesOrders
A notification is displayed in the box. It can be:
- Green = the order is assigned to one or more pos.
- Grey = the order doesn't need to be assigned (because of its status or the start date for order assignation).
- Red = the order is not assigned because some products must be assigned manually to a store.
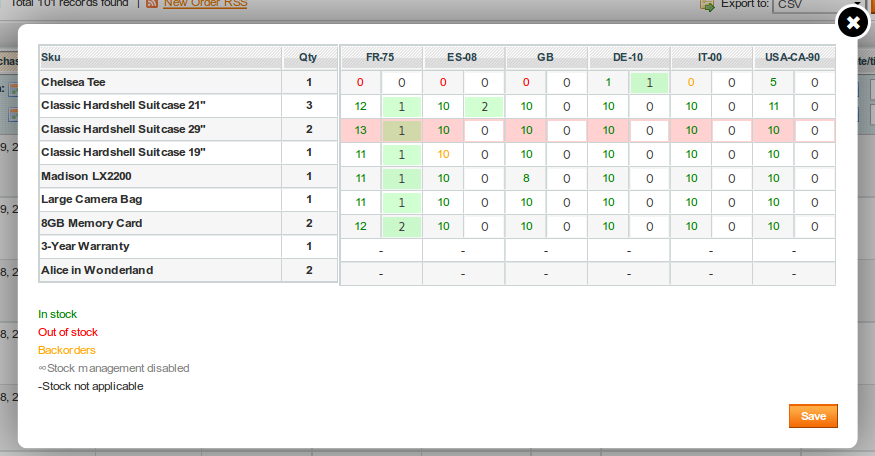
If you click on a green or a red notification, for example, a popup window opens and displays an assignation table.
That table will show to which point(s) of sale each item is assigned and in which quantity (you can find the same table when viewing an order).
At any time you can edit this table if the assignations don't suit you.
In the example above, you can see how many items must be assigned in the Qty column. On line 3, two items must be assigned. The line is in red because one item still must be assigned.
Whenever you want, you can change the order's assignation by yourself by assigning items to different points of sale by clicking on the assignation table from the Assignation column available in:
SalesOrders
Some colors and symbols will help you to understand how the assignation table works:
- Numbers in Green: means that the pos has stock
- Numbers in Red: means that there is no stock and no backorders is allowed
- Numbers in Orange: means that backorders are allowed
- Stock not applicable is when multi-stock is disabled
- Stock management disabled is when you don't manage stock for a product at all
Use the assignation rules
The assignation rules allow you to automatically assign orders placed on your website to one or more points of sale.
These rules are based on your customer's shipping address: code of the country and/or zip code and/or regional code.
Assignation rules allow you to define the geographical area that each one of your points of sale can cover.
To create assignation rules, choose a point of sale and click on Edit from:
SalesPOS / WarehousesManage POS / Warehouses
In the Inventory settings tab, choose the option Assign orders depending on specific rules. If you can't see that tab, you probably need to enable the Automatic order assignation in:
SystemConfigWyomindAdvanced Inventory
There you can write your own assignation rules using the same syntax as Owebia Shipping extension (with their agreement).
- "*": By default, worldwide
- " ": If the Assignation Rules field is empty, the point of sale won't assign orders.
Here are some examples you can use with Advanced Inventory:
- FR(*): All France
- FR(75*): All French zip codes starting with 75
- DE(7*): All German zip codes starting with 7 (Bade-Wurtemberg)
- US(CA): California / United-States
- FR,DE,CH,ES,IT: France, Germany, Switzerland, Spain, and Italy
- * - (DE, FR(2A,2B)): Worldwide except Germany and Corsica in France
For flexible assignation rules, it is also possible to use regular expressions:
- FR(/^75[0-9]+$/): Paris (All French zip codes starting with 75 followed by numbers from 0 to 9, in other words, Paris)
STEP 4: Manage Products
Advanced Inventory allows you to manage the stocks for each one of your products and on different levels.
Enable multi-stock
Before being able to use Advanced Inventory, you need to enable the multi-stocks option. There are several ways of doing it.
- From:
CatalogManage stocks
Select the products you want or a product in particular, and from the Actions dropdown, select Enable multi-stock. Click on Submit and then don't forget to Save all changes.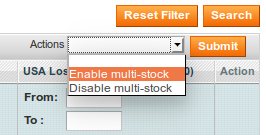
- From:
CatalogManage products
Edit a product. In the Inventory tab and Stocks subtab, you can decide to Enable multi-stock.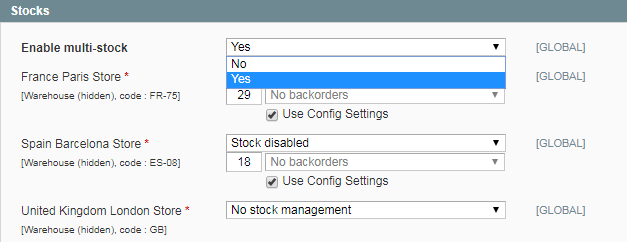
Use the tree-view
You should see a column named Stocks, where a tree-view shows the total of items for each store view, in:
CatalogManage products
Example:
Each point of sale is linked to one or more store views:
- FR pos: English and French Store views
- DE pos: English and German Store views
- US pos: English store view
For a product available in 3 points of sale:
- FR pos: 5 items,
- DE pos: 2 items,
- US pos: 4 items
You will get the following tree view:
Main websites
Madison Island
English SV (11)
FR pos (5)
DE pos (2)
US pos (4)
French SV (9)
FR pos (5)
US pos (4)
German SV (6)
DE pos (2)
US pos (4)
You can also filter the results according to a store view. For example, if you choose the German store view, you will only get the product stocks of the points of sale linked to that store view.
For the same example as above, you should get:
German SV (6)
DE pos (2)
US pos (4)
STEP 5: Manage Stocks
Advanced Inventory allows you to manage stocks.
The Stock movement journal tool will help you to see if all your changes have been taken into account. This includes changes made by any user, customer, or via the external api.
You should find a list of all the actions you've done in:
SalesPOS / WarehousesStock movement journal
There are 4 ways to edit stocks:
- from the grid:
CatalogManage Stocks - from the backend product page:
CatalogManage Products - with Mass Stock Update (Check how to use the Mass Stock Update extension):
SystemImport/ExportMass Stock Update
- with the API (web developers only)
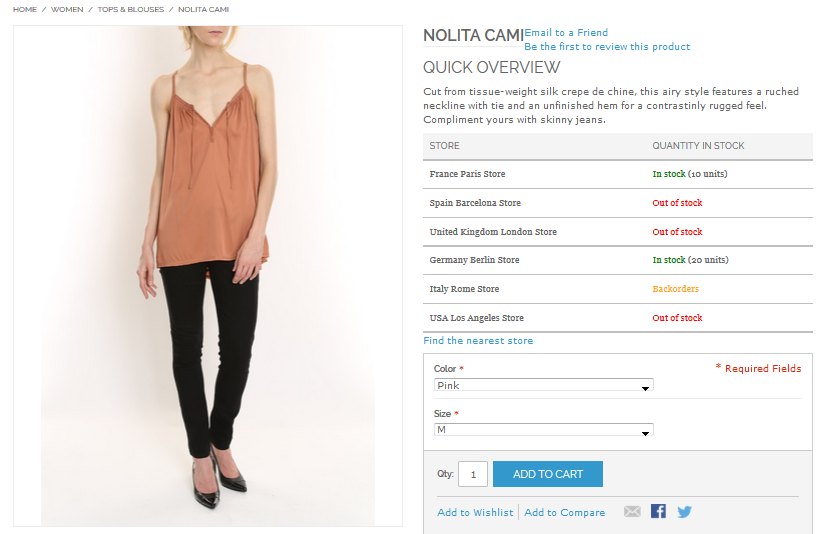
Stocks for each point of sale are visible on the product page directly. The points of sale displayed will depend on the store views linked to the pos and on the store view that the customer has selected. If you don't see the product stocks for each point of sale, have a look at our FAQ.
Manage your stocks from the backend product page
You can manage your stocks for each point of sale at the product level. To have access to the backend product page, choose a product from:
CatalogManage PRODUCTS
Clicking on Edit will give you the possibility to manage local stocks directly in the product Inventory tab and Stocks subtab.
To manage your stocks, define Enable multi-stock on YES.
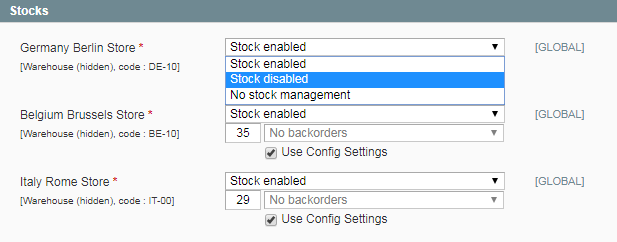
Now you can manage your stocks for each point of sale. For each POS/WH, you have the possibility to:
- Enable stock: manage the stocks for that POS/WH.
- Disable stock: the POS/WH won't be taken into account. Useful when some products are not available in all your POS/WH. On the frontend product page, this will be displayed as Out of Stock.
- No stock management: unlimited stock, no quantity is managed for the product.
When stock management is enabled, you can define the product stock for each point of sale. You have also the possibility not to use default settings. If you untick that box, you have the choice between 3 options:
- No backorders: when there's no stock, it's impossible to order the product.
- Allow quantity below 0: even if there is no stock, the product can be ordered.
- Allow quantity below 0, and notify customer: even if there is no stock, the product can be ordered and the customer will be able to see in the frontend that backorder is allowed for that product.
 You can also filter by store view.
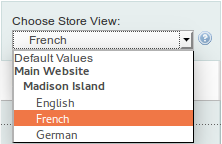
For example, if you choose the French store view, you'll see only the point(s) of sale linked to that store view and the product quantity of the French store view.
Manage your stocks from the grid
Advanced Inventory allows you to manage your stocks from the product grid in:
CatalogManage Stocks
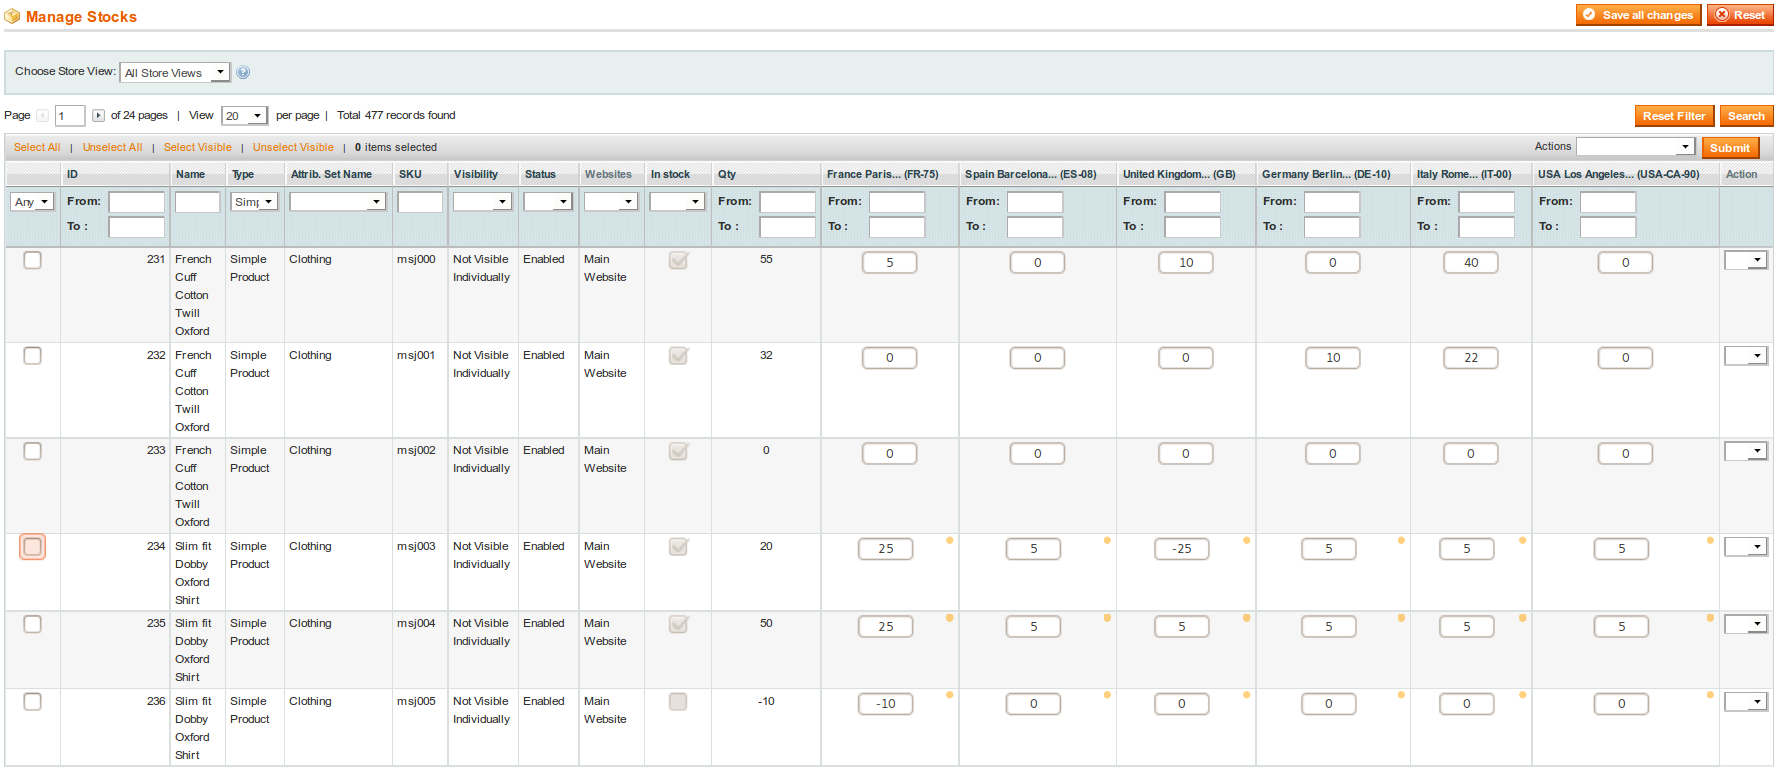
The product grid display for each product the quantity available.
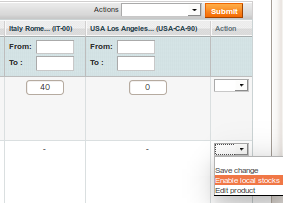
You can enable or disable stocks by clicking on the arrow on the right of the grid. If you choose Disable multi-stocks, you won't be able to manage your products stocks.
If you decide to enable multi-stocks, you can enter directly in the grid the number of products in each point of sale. The quantity is then adjusted according to the number of items in each point of sale.
The orange circle next to a point of sale quantity means that backorders are allowed, so you can type -10, it will be deducted from the total quantity as you can see on the last line of the below example.
You can also filter by store view. For example, if you choose the French store view, you'll see only the point(s) of sale linked to that store view and the product quantity of the French store view.
Manage your stocks through the API
You may use a Web app or a software to manage your stocks. In order to make the link between that tool and your Magento, Advanced Inventory allows you to use the API to manage your stocks.
You should get an example file in your Magento root directory, in the Tools/api directory. It's called Advancedinventory-apicall.php.example.
There are 5 methods:
- setMultistock: to enable multi-stocks for products
- getWh: to get all the available pos/warehouses
- getData: to retrieve data (ex: the stock of a product in a particular pos/warehouse)
- setData: to update data (ex: update stocks of a product in a particular pos/warehouse)
- writejournal: To add a line in the stock movement journal
STEP 6: Manage permissions
Advanced Inventory allows you to assign permissions to the different admin users in:
SalesPOS/WarehousesManage users permissions
Let's imagine you have 6 points of sale managed by 3 store owners:
- The first store owner manages FR and US points of sale.
- The second store owner manages SP and UK points of sale.
- The third store owner manages IT and DE points of sale.
Then you can assign permissions to them so that they can manage their own points of sale such as on the below example.
Now, when a store manager will log in (for example the third one), he'll be able to see, manage and change the number of items assigned to the points of sale he manages (IT and DE) among the orders placed by the customers.


 Magento 1





























 Extension works as expected.
 We needed a module to implement a multiple stock scenario in our client's Magento 2.2 site and this extension perfectly met our needs.
 We used this extension for one of our clients and they're happy with this extension's features it's also supported with the one-step checkout extensions. The extension also provides good support. Their user experience is good but you can also further customize it as per your brand needs.
 I have many of Wyomind's Magento 2 extensions. Advanced Inventory helps me to auto assign orders to our warehouse or POS making it easy to ship available product. It helps in our Omni Channel efforts.
 It is a little difficult to get backorder working by store but it is better than what magento has implement
 We have purchased multiple wyomind plugins over time. They are competent and responsive. I have had good luck with all of their plugins.
 This extension help us to manage multiple stock inventory and is the best option we have found.
 This extension has proven invaluable to us. We really appreciate the flexibility to create different warehouses and link them to individual store views and customer groups, as well as the Point of Sale functionality. Everything working very well, and the Wyomind support team was quick to respond and helped iron out some of the wrinkles early on in our project.
 This was not an easy product to integrate and required a lot of customizations to work with our site.
 This extension provides good functionality that compares to the MSI on Magento 2. Very good documentation and good customer support makes this the best choice.
 We have used this extension and fine very good if you have multiple store locations managing stock for your website.
 Advanced inventory is easy to install as well as friendly to use, and it does support API interface which allows you to have integration, it helped us to solve our stocking issues. Support is responsive and helps as much as possible for us to accomplish our goal. Recommended product to go for.
 Advanced inventory is a great extension and allows us to work with stock in multiple locations without any trouble. Once installed it is very straightforward to setup your locations and allow good logistical orderflow to make sure all orders get reach the right contact and get processed correctly.
 Our business has 4 local stores, and I was looking for a way to enable store pickup with inventory management of each store. This extension does it all from A-Z. It will allow you to assign the correct quantity for each store (not just a single stock of all stores combined) + it allows customers who shop online to see and select the preferred store pick of each item (based on stock availability) strongly recommend
 Great Extension for multiple inventory. if you have multiple website and multiple inventory. this great one for use.
 Powerful extension but not enough support provided
 Great extention for handling inventory, easy to use and great Support. Recommended extension you inventory, working properly on Magento 2.1.7
 Excellent Support and Great extension for inventory management. Working Perfectly with latest Magento 2.2.5. Recommend!!
 We are using the module for more than one year and is it improving a lot our stock management. The support is really fast and helpful! We needed help many times and they were really fast to help us.
 Advanced Inventory and Mass Stock update meets our requirements. It is working really well. Their support is really superb! Recommend.
 Magento lacks of true WMS and inventory management. If you need to split stock for 2 stores or you need to combine stock from 3rd party warehouse (dropshipper), the is great extension. POS/Warehouses are easy configurable. Stock management is fast and it support backorders even on warehouse or product level. I checked other extension vendors, but this one from Wyomind works great if you need good solution and you dont want to end paying for subscriptions for 3rd party Saas tools. I use is in my store where I import dropshipper prices and stocks. Wyomind extension does the job!
 Found this module very easy to incorporate. Support is excellent, any queries were handled quickly, professionally and clearly. Enables us to hold the stock over multiple sources and keep tabs on where we need to order sooner rather than later.
 Denne modulen har hjulpet oss med å sette opp en multi-store inventar og har gjort alt vi trengte det å gjøre! Understøtting er fantastisk, og den modulen er godt skrevet. Hvis du trenger et komplekst oppsett for magento produktbeholdning, så er dette veien å gå. Vi har koblet denne modulen med masse lager oppdatering, salgssted og pickup @ Store modul for å gi en perfekt løsning for våre e-handel nettsteder. Utvidelsen leveres med henting på butikk, masse lageroppdatering og andre moduler. og å være ærlig i å bruke dem alle, inkludert de gratis du kan velge når du laster ned - f.eks. watchlog. Støtteteamet har vært veldig responsivt før salg, under integrering og også i å høre om foreslåtte endringer i funksjonalitet.
 Due to the lack of native Magento 2 features in order to handle multi-stock at the store level, this extension allows us to have the possibility to set stock qty for each of our stores. The Pickup@Store is also a great feature for checkout. The MassStockUpdate is also a very nice addon to manage ERP integration. However, this extension has some performance limits when you have too much POS or products. 29 POS and 13k products in my case. But the support team was here to find a solution for us and they are very reactive! This is the most important when you buy an extension. They are open-minded. To sum up, very nice team and extension, but in my case the performance issues blocked me.
 This module has helped us setup a multi-store inventory and has done everything we needed it to do! Support is great and the module is well written. If you need a complex setup for magento product inventory then this is the way to go. We have coupled this module with mass stock update, point of sale, and pickup@Store module to provide a perfect solution for our e-commerce websites.
 Flexible and easy integration!!! Overall a nice extension with flexible and highly professional code. Code re-usability could have been made simpler with a better code structure. Have used many online website in the past Still rating it 5 star as code structure is an individual choice.
 Very good extension, I've customized it to automatically grab an inventory file and update the inventory for about 50 different locations, the only drawback is that there's a limit to how many locations you can have and it's based on a MySQL join limit of 61 if I understand it correctly.
--- Wyomind note: The MySQL join limit can be overridden by enabling the option, that will use an index table rather than a the default MySQL query ---
 Advanced Inventory is an amazing piece of module saving us development time and money. Definitely will recommend it for multi-wareshousing solution.
 It's a very useful tool that allows our system to work
 Excellent product to have for a Magento website.
 This Extension relieves stress since it allows to monitor all my stocks with ease even while also trading and sharing stock with my webshop and Amazon.
 Advanced Inventory, Point Of Sale, Mass Stock Update, Pickup@Store are great and very useful extensions for Magento! Quick and concrete support!
 All the programs are well coded and tested well. When you need support they respond quickly and are efficient with finding the root of your problem and making sure it is solved. Make sure you go through the user guide so you can make sure you understand HOW it is supposed to work before you believe there is a problem. Most issues are the way you set up your settings.
 Wyoming AdvancedInventory is the best extension to manage multi-warehouse. Developed using Magento Best Practices, you can easily customize the extension to match to your needs!
 We can't imagine how we would be using our multi warehouses without Wyomind AdvancedInventory. Everything is working as we expected. We had few questions while configuring the app, and the support was very professional and quick. Thanks.
 Wyomind AdvancedInventory was the best solution for our website because we really need multistore stock functionallity and storepickup. Thanks!
 I've used this extension for a few months now and stock taking is much faster. I can change stocks directly from the list of products. Just make sure you're using the latest version.
 Les modules sont suivis et régulièrement mis à jour. Pierre répond rapidement et de façon détaillée. La programmation est propre et aux standards Magento. J'ai essayer pas mal de modules et je trouve que c'est le conçu pour gérer différents stocks. Je recommande.
 We bought this module and praised him very much. It helps us to keep inventory consistent across all departments. In addition, we have developed new tools that use the module. If you have an extensive network of shops, this module is definitely for you.
 The module helps us to enable multiple inventories easily! We love all the functions they delivery. Hopefully, it could add split order for different warehouse feature
 We have found that this module perfectly extends the base inventory functionality allowing us to support multiple warehouse and 3PL shippers. The module has worked seamlessly and the support from Wyomind has been outstanding. Would recommend this module and provider to others (we use this as a go to inventory module)
 Perfect module!