Watchlog PRO - Security enhancement
While the free extension Watchlog lists the IPs that try to access your Magento back office, Watchlog PRO will also help you to stop these intrusion attempts.
Watchlog PRO is a more complete version that offers more options than Watchlog.
|
Watchlog |
Watchlog Pro |
|
|
Connection attempts charts Check the daily and monthly login attempts charts. |
||
|
Connection attempts tables Get detailed and summarized tables of the login attempts data. |
||
|
Connection attempts history Define the history lifetime and receive periodical reports. |
||
|
Blacklist and Whitelist Create a whitelist and a blacklist of IPs, allow access to whitelisted IPs only. |
||
|
Automatically or Manually block IPs Block IPs after X login attempts, block the blacklisted IPs for X minutes. |
Possible large scale brute force attack on Magento!
Thousands of Magento websites are certainly concerned by this very large brute force attack which aim is clearly to force access to Magento back offices.
The principle of that kind of attack is simple: robots try to log into your back office using multiple login/password combinations until they find the correct credentials.
Once these credentials are identified, your Magento website becomes easy prey for hacking: exploitation of your database, diversion of your payments, hacking, unfair competition...
How did we notice this attack?
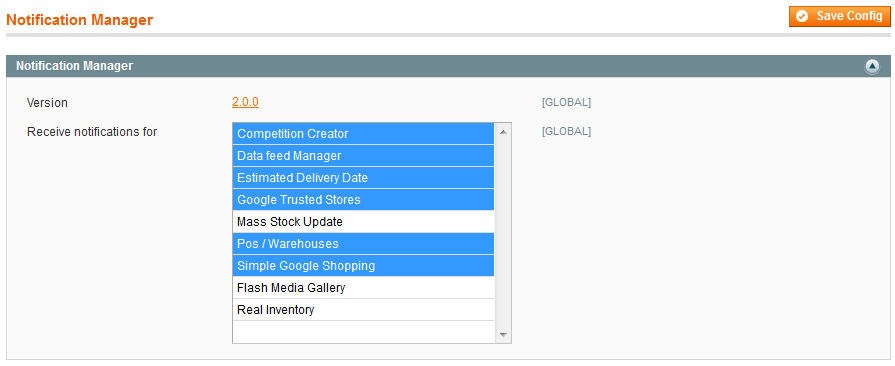
At Wyomind, our paid software is delivered with a module named Notification Manager. It keeps you informed about the new updates of our extensions.
This extension is available from your back office in:
SystemConfigurationWyomindNotification Manager
It lets you choose which extension you wish to receive notifications.
In order to feed custom notifications to your back office, this extension retrieves our RSS feed (https://www.wyomind.com/rss.xml) just like Magento RSS feed (https://magento.com/blog/feed) each time someone or any robot tries to log into your back office.
If you want more information on how RSS feeds and notifications work within Magento, you can read the very complete article of Nick Jones (Magento Certified Specialist).
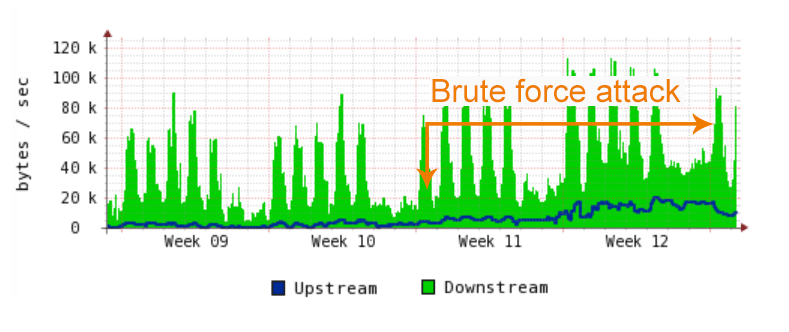
This implementation choice has underlined some considerable peaks of requests concerning thousands of websites and implying repetitive login attempts.
These login attempts can recur several times a minute and can reach several tens of thousands of attempts every day which will deeply threaten the security of your website as you can see on the screen below.
Several users have already reported some IPs as you can see on the below screen.
How to check if my website is subject to this kind of attack?
If you received a message from us, it means we have noticed an abnormally high number of requests. In that case, you can install our free Watchlog extension to detect and track the intrusions into your back office.
Why my hosting company can't protect my website against these attacks?
It is quite difficult to detect and to implement a firewall against that kind of attack for the following reasons:
- The IPs constantly change
- The IPs requests are made regularly and at different intervals of time
- The IPs try to access from different pages into your Magento back office (Downloader, Admin log in Page...)
What to do?
Fortunately, these attacks are easy to bypass! Several solutions exist to make your back office invisible to robots that try to log in:
- Modify the name of your backoffice
- Activate captcha for your backoffice
- Restrict the access to your backoffice by IP with htaccess
- OR use Watchlog PRO that will act as a firewall and replace all the above steps
How to use Watchlog PRO?
Watchlog PRO is an extension for Magento that is easy to use. You'll be able to see very quickly if your Magento Backoffice is threatened by a brute force attack and if someone or some robots are trying to log into your Magento admin panel.
STEP 1: Configure your Watchlog PRO extension
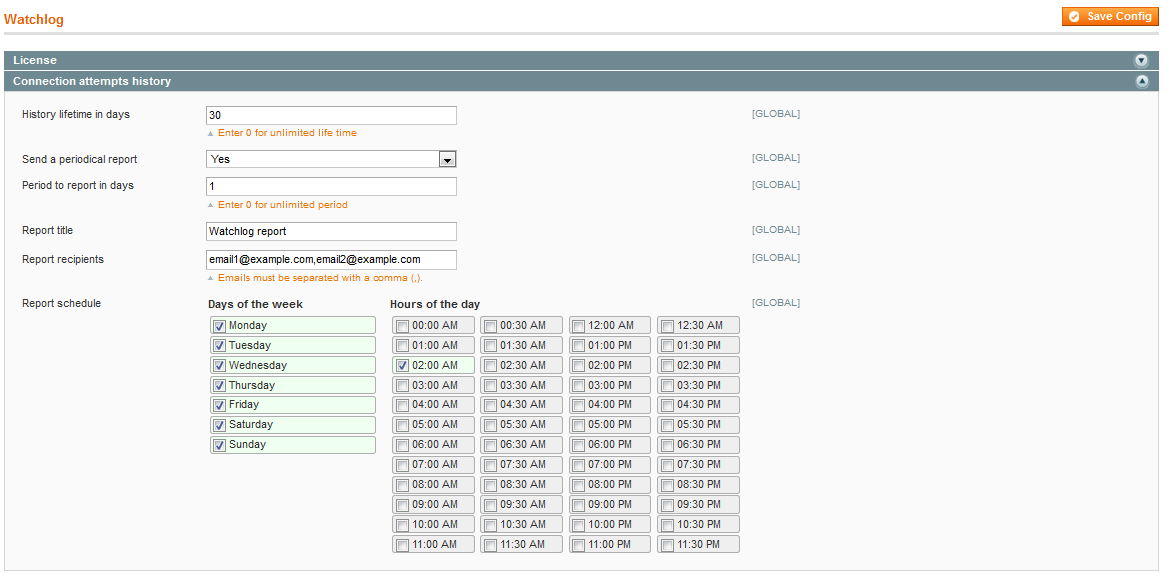
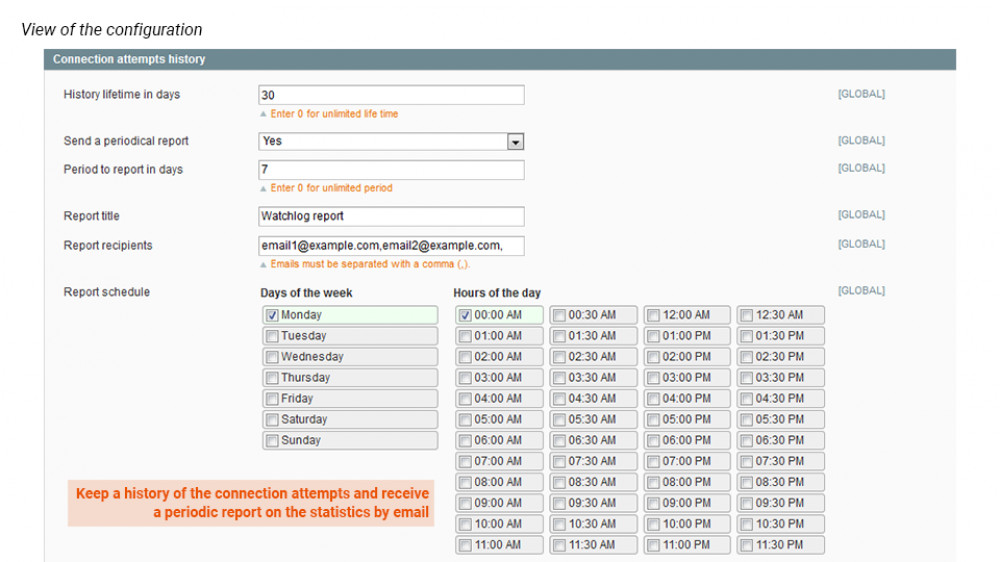
In the Connexion attempts history tab, you'll be able to configure a certain number of parameters.
History lifetime in days: You have the possibility to define a history lifetime in days in order to purge the history. For example, you'll be able to define the history lifetime on 30 days in order to remove automatically all the login attempts that are older than 30 days.
Send a periodical report: You can choose to receive periodical reports. If you have decided to set that option to YES, then you'll have to define:
- Period to report in days: define how many days you want to include in your report.
- Report title: define a title for your report.
- Report recipients: add the email addresses of the recipients separated by a comma.
- Report schedule: define a schedule to automatically send the reports.
White/Blacklist settings
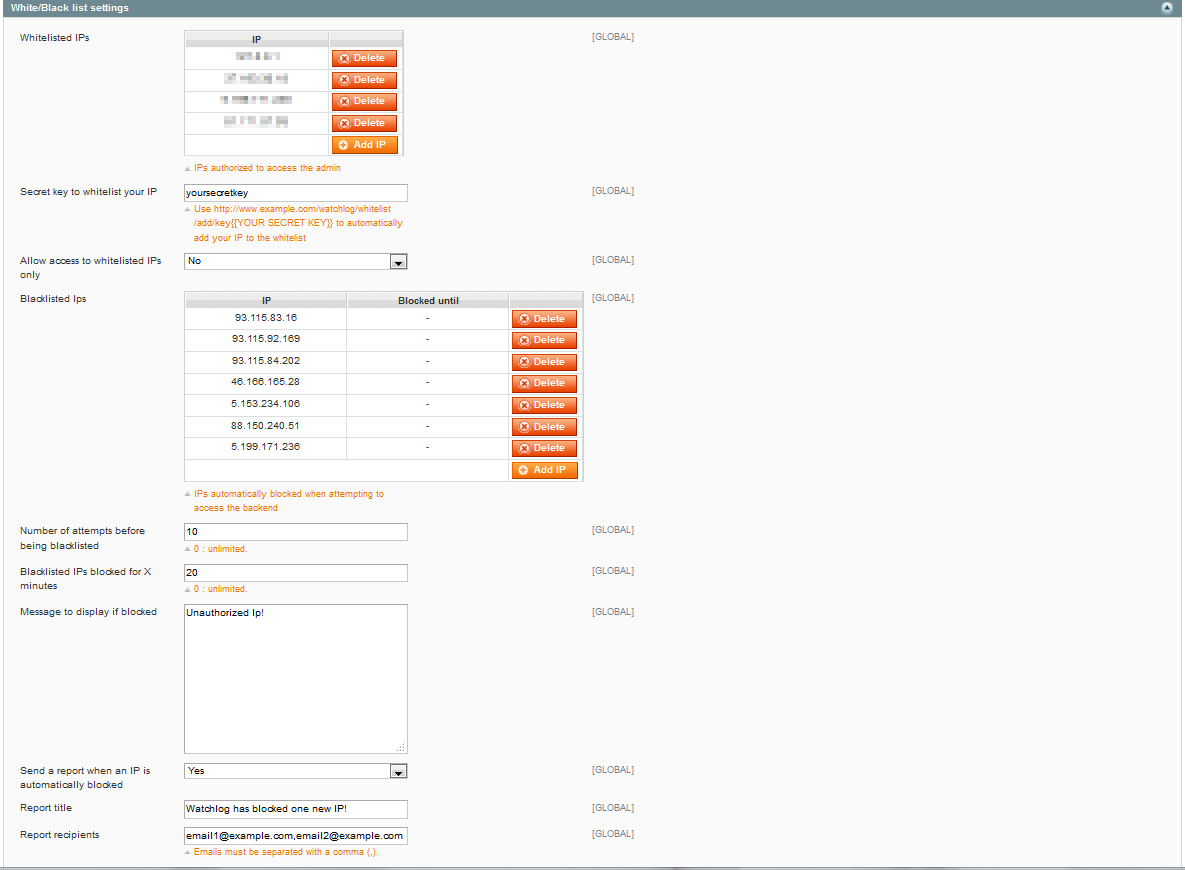
In the White/Blacklist settings tab, you also have the possibility to create a whitelist as well as a blacklist.
You have to fill in a certain number of fields:
- Whitelisted IPs
Click on Add IP to add an IP address into the whitelist and save the config.
- Secret key to whitelist your IP
In the case where your IP is blacklisted, you will be able to use that secret key to whitelist your IP.
- Allow access to whitelisted IPs only
You also have the possibility to allow access to whitelisted IPs only. - Blacklisted IPs
Here is the same process as the whitelist. Click on Add IP to add an IP address to the blacklist. - Number of attempts before being blacklisted
You can define a number of attempts before the IP is automatically blacklisted. - Blacklisted IPs blocked for X minutes
You can also choose to blacklist the IPs only for a defined period of time. - Message to display if blocked
Here is the message that will be displayed if someone with a blacklisted IP tries to log into your admin panel. - Send a report when an IP is automatically blocked
Choose to receive a report when IPs are automatically blocked or not. - Report title
Define the name of your report. - Report recipients
Enter the email addresses of the recipients separated by a comma.
STEP 2: Check the login attempts to your Magento back office
You'll have a global overview of the login attempts executed from your admin panel login page, if you go to:
SystemWatchlog
Statistics on the login attempts will be displayed in graphs and tables.
Login attempts graphs
You should get two graphs that recap the login attempts statistics on two different periods of time in order to give you the best possible view. The first chart will display the data on 30 days whereas the second one will sum up the login attempts in 24 hours.
On both graphs, you'll have several curves:
- Success: This represents the login attempts that succeeded.
- Failed: This represents the login attempts that failed.
- Blocked: This represents the login attempts with an IP that has been blocked (these IPs won't even have access to the Log into the Admin Panel page).
Login attempts grids
You should find the summary of the last days within two different views:
- Detailed view
- Summarized view
You'll know in both views if you have blacklisted or whitelisted some IPs from:
SystemConfigWyomindWatchlog
The IP will be displayed in colored boxes:
- Black: represents the IPs that are blacklisted
- White: represents the IPs that are whitelisted

In the summarized view, IPs will be in white or black boxes only if when they tried to log in, they were already defined as whitelisted or blacklisted IPs.
Note that in the case where an IP is whitelisted and blacklisted at the same time, the whitelist will always have the upper hand.
In the Detailed View, you'll find a detailed table of the login attempts. Among that grid, you'll have several data:
- The IP that tried to log into the back office.
- The date when the IP tried to log in.
- The login used.
- The message displayed when trying to log in.
- The URL from which the IP tried to log in.
- The status of the IP: Success or Failed.
By clicking on Switch to the summarized view you should get a table with the basic information. You'll find:
- The IPs that tried to log in
- The date of the last attempt
- The number of login attempts
- The number of failed login attempts
- The number of login attempts that succeeded
- The number of blocked login attempts
- The action: Add IP to the whitelist or Add IP to the blacklist
By default, both tables display data for the last 30 days. You can edit that in the History lifetime in days field, from:
SystemConfigWyomindWatchLog
At any time you can switch between both views.


 Magento 1














 I recommend this extension for every Magento site owner, Watchlog is a must have extension. I am using it for a few years now and it gives peace of mind about my sites security. Watchlog gives perfect information about login-attempts including IP address (with a direct link to an abuse database) and url where the attempt was made. The extension blocks every brute force attack after a few tries and with the Ip address info it gives it makes it easy to block access to my server via my firewall.
 This is a must have extension for Magento. Not only does it give you a real time view of any brute force hack attempts but also cuts them off as advertised. I would whole heartedly recommend this extension to any Magento site owner/developer
 I use the Wyomind Watchlog Pro extension because there is no other module like it. It has alerted us several times to multiple attempted unauthorized login attempts.I highly recommend this extension. Wyomind has a support staff as well.
 Brute force attacks are daily news nowadays and, besides not always needing worrying (if set up is safe) for every attempt, having a dog barking in the garden is useful, so that you might know if there actually is something going wrong or not. And with the increasing number of Magento installations, you risk entering the attackers attention With WatchLogPro you can anyway easily block any attempt, even if coming from different IPs, and make attackers look somewhere else. It is also good to keep track of who accessed your backend, from where, and when... The name says it all: it's a WatchDog+Logger..
 We have had major attacks over the past months and even though the free version lets you know this, we couldn't risk ignoring this and upgraded to the pro. It's a fantastic tool and would recommend it to anyone. It uses a simple UI so no confusion to blocking I'P's on the fly. Keep up the good work.
 Only today I received nearly twenty email from Watchlog that an IP had been blocked after 10 attempts. It offers peace of mind knowing that someone is watching the back door and keeping the site secure. I can only imagine how bad it would be without this extension.