How to use the Stock Barcode Scanner extension for Magento
Stock Barcode Scanner is an easy to use extension for Magento. It allows you to update your stocks in one go and to keep track of your stock transfers and of the different stock movements you've made.
With the Stock Barcode Scanner extension, you simply need to choose an action, scan or enter your product identifier and define the quantity of the item to transfer or to update. You will have the choice between several default actions:
- Outgoing stock
- Incoming stock
- Inventory update
The Stock Barcode Scanner extension can be used in combination with Advanced Inventory. In that case, you'll have the possibility to choose from the points of sale or warehouses that are already defined in your Magento admin, the ones that will come into play.
To use Stock Barcode Scanner, you can follow the 2 following steps:
- Manage your labels
- Update your stocks
STEP 1: Manage your labels
You can start by managing your labels. Your labels will describe the different stock movements you will add to the default ones. To create your own labels, you need to go to:
CatalogBarcode ScannerManage Labels
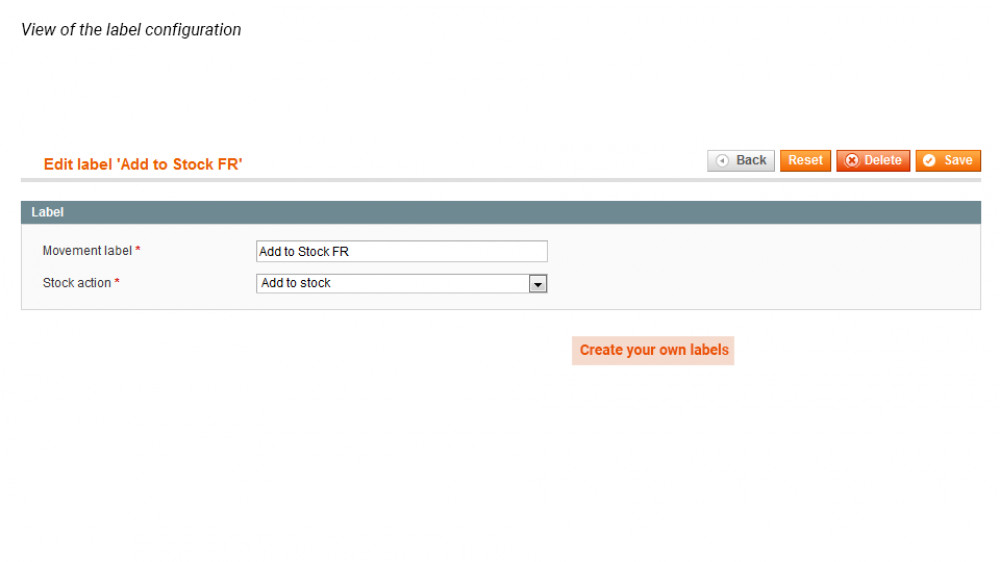
Click on Add New. You will have two required fields to fill in.
- Movement label: write your own label.
- Stock action: choose the type of actions you want to assign to that label
You can choose between 3 types of actions:
- Update stock
- Substract from stock
- Add to stock
From the Manage labels menu, you'll be able to see the list of all labels you've created. You'll also have the possibility to Delete or Edit them.
You can find the labels you've just created among the Custom tasks from the Action dropdown, in
CatalogBarcode ScannerUpdate Stocks
STEP 2: Update your stocks
To start transferring your stocks, you need to go to:
CatalogBarcode ScannerUpdate Stocks
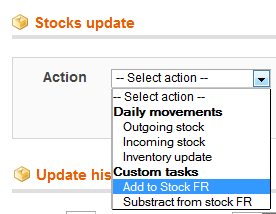
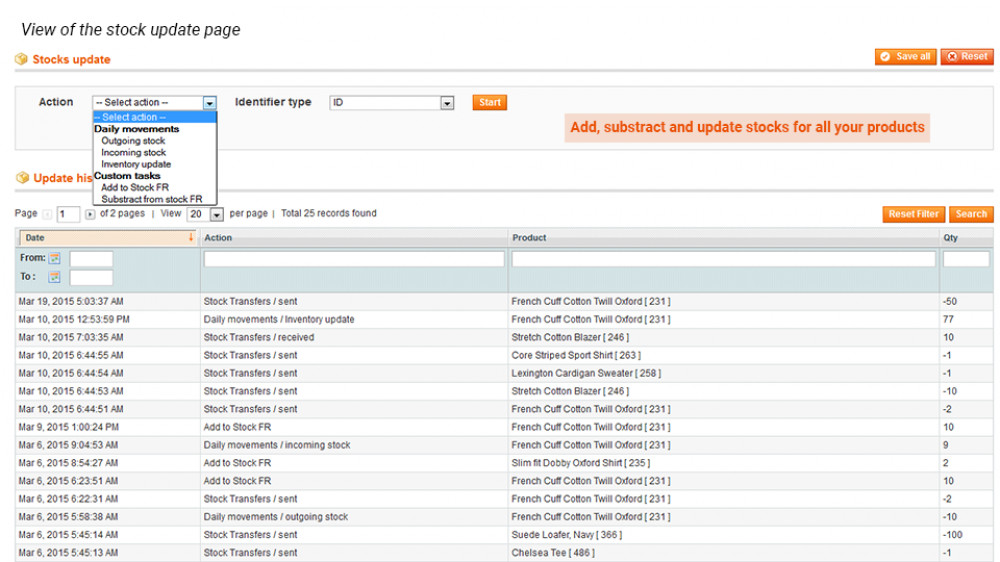
There, you will be able to choose the action you want to execute between:
- Daily movements
- Custom tasks
Daily movements
Among the daily movements, you can choose between 3 kinds of transfers:
- Outgoing stocks: allows you to define outgoing stocks. If you define 5 items, it will decrease the current quantity of your product by 5.
- Incoming stocks: allows you to define restocking for products. If you define 5 items, it will be added to the current quantity of the product.
- Inventory update: allows you to update your product stocks. If you define an inventory update for that product in particular to 5, its current quantity will be edited to 5.
Imagine you have incoming stocks for a particular product, you'll be able to define that you have received some items of that product.
Imagine you received 10 new items for a specific product (in our case id 231). The quantity is 31 at the moment, from:
CatalogManage products
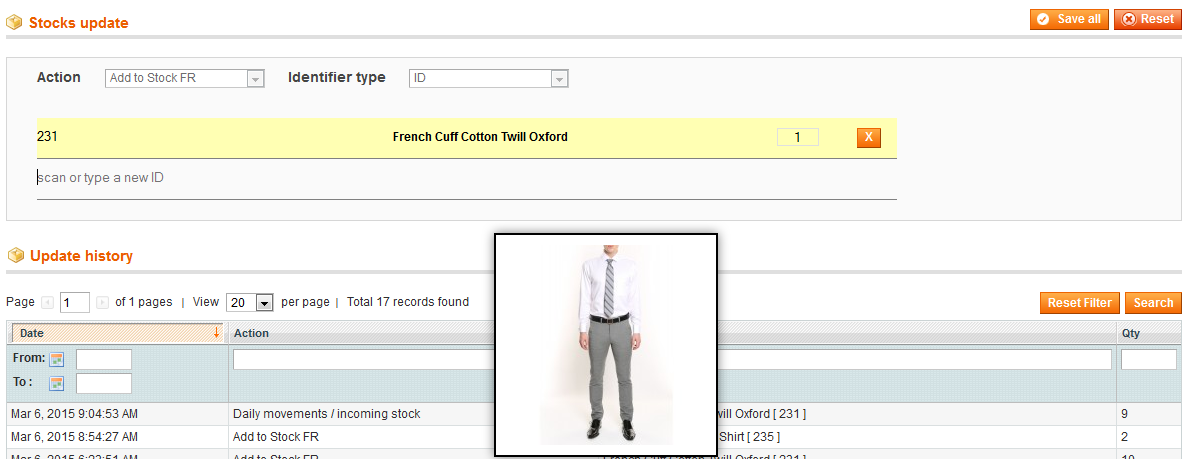
Define the Action on Incoming stocks and the Identifier type on ID, from:
CatalogBarcode ScannerUpdate Stocks
You can also choose any of the identifiers with a unique value that is defined in your Magento admin. By default, you have the choice between:
- ID
- EAN
- SKU
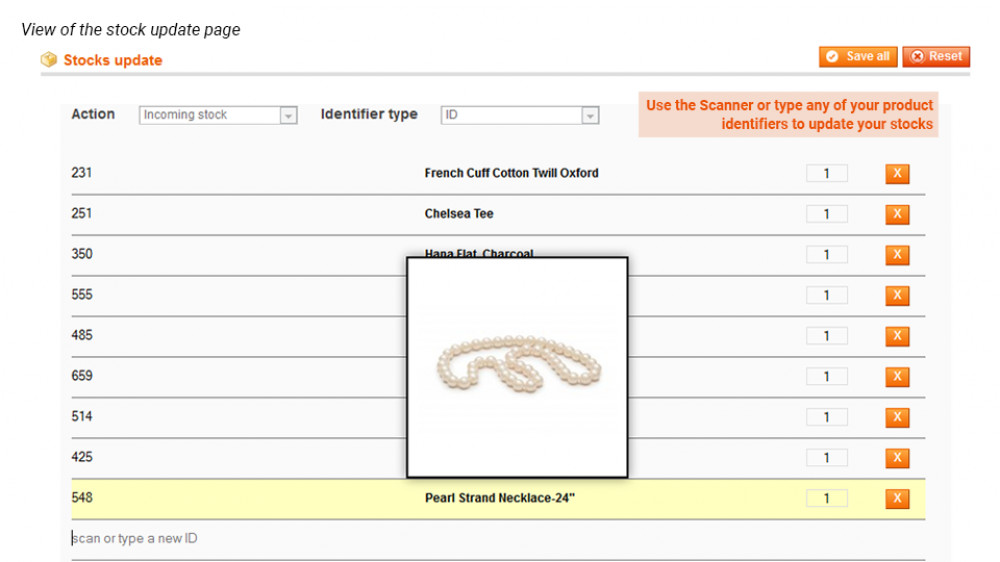
Enter the ID of the product or scan it (in our case 231) and press Enter. The image of the product should be displayed.
Then, define the number of incoming items, for example, 9, and click on Save all.
To edit the number of items you want to transfer, you have 2 possibilities:
- Edit the number of items directly from the dedicated input
- Scan the products several times
Check-in your Catalog of products. The quantity of the product which ID is 231 should have changed from 31 to 40.
You can also have a look to:
CatalogBarcode ScannerUpdate Stocks
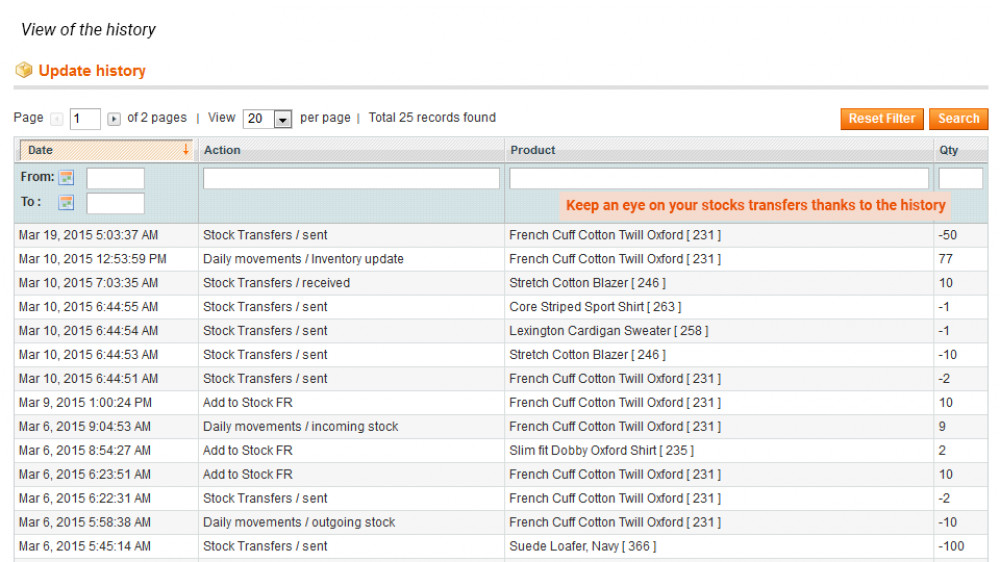
Under Update History, there should be a record of the operation you've just done.
Custom tasks
The Custom tasks are the labels you have defined in STEP 1. It will allow you to keep track of the stock transfers from one place to another. You can find the ones you've created in:
CatalogBarcode ScannerManage Labels
Let's imagine you have created a label Add to Stock FR. Choose this label from the Action dropdown under Custom tasks, in:
CatalogBarcode ScannerUpdate Stocks
Choose the ID as the Identifier Type.
Type your product ID (for example 231) and press Enter.
Define the number of items transferred for example 100 and click on Save all. Check that among the Transfer History, the action you've just done has been taken into account.
Use Stock Barcode Scanner with Advanced Inventory
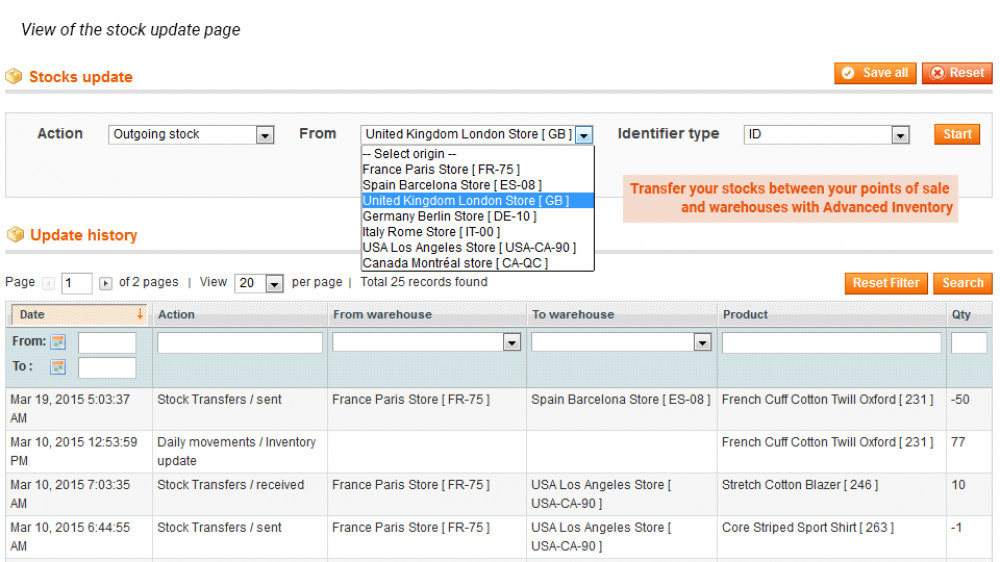
If you're using the Stock Barcode Scanner extension with Advanced Inventory, you'll have some more possibilities. You'll be able to manage stock transfers between your points of sale or warehouses.
You will have two more options among the Action dropdown, in:
CatalogBarcode ScannerUpdate Stocks
Among the Stock Transfers, you will be able to choose between:
- Send: this will allow you to specify that a point of sale/warehouse is sending stocks to another.
- Receive: by choosing that option, you'll be able to define that a point of sale/warehouse is receiving stocks from another.
Send stock from a point of sale/warehouse to another
Start with choosing the Send option from the Action dropdown.
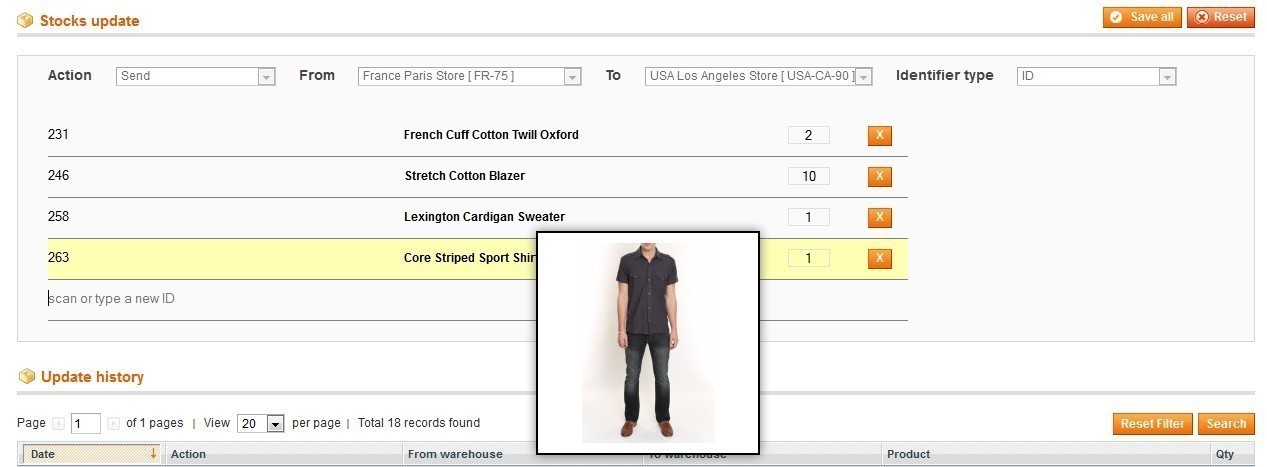
Then define the points of sale that are involved in the stock transfer. In our case, the French pos sends stocks to the American one.
After having defined your configuration, you can click on Start.
A line appears. It will allow you to specify the products you want to transfer. You have two possibilities of doing it:
- Type the ID or any attribute with a unique value and press ENTER
- Scan the ID or any attribute with a unique value
When scanning your product or typing the ID, its main image is displayed for a few seconds for you to have a quick overview if it is the right product.
After having listed all the products you are transferring from one point of sale to another and edited the number of items for each product, you can click on Save All.
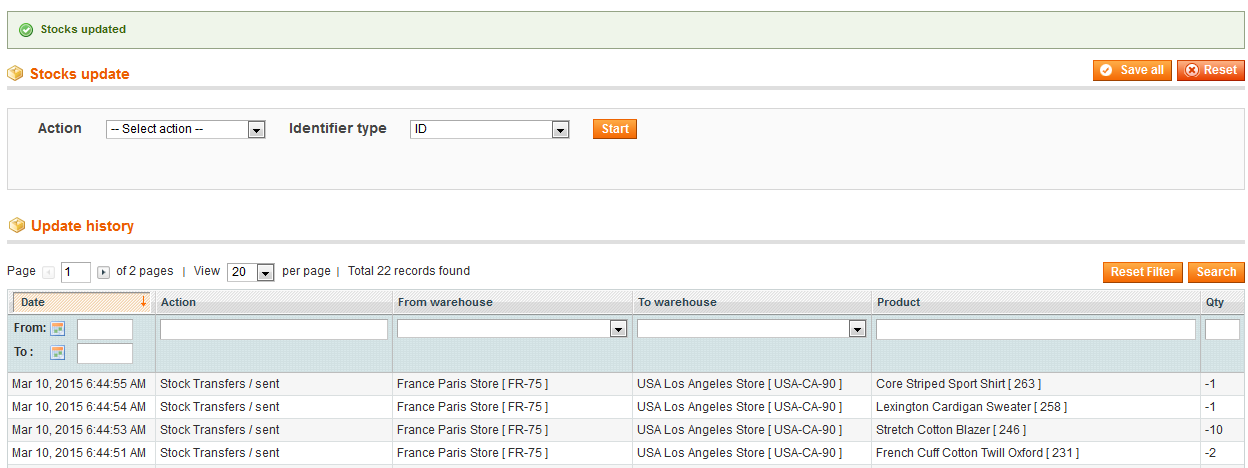
A green notification should appear on the top of your admin specifying that your stocks have been updated.
You'll be able to see the recap of your transfers in Update History.
Finally, you can check that these 10 items have been deducted from the French point of sale in:
CatalogManage Stocks
Receive stock from a point of sale/warehouse to another
On the other hand, you have another option that allows you to receive stocks in a specific point of sale.
In the previous part, we saw how to send stocks from a point of sale (FR) to another (US). Now you need to receive these stocks from the FR point of sale into the US one.
You can start by defining your configuration in:
CatalogBarcode ScannerUpdate StockS
You need to choose the Receive option from the Action dropdown.
Define the point of sale from which the stocks are deducted (FR) and the point of sale to which the stocks will be added (US). Choose the identifier type and click on Start.
Type or scan the ID of your product and edit the number of items to 10. Click on Save All.
You should get a notification on the top of your admin saying the stocks have been updated.
In the Update History, you should see a recap of your transfer with the action used, the different points of sale that are involved as well as the name and the quantity of the product.
Now, you should see that the 10 items have been correctly added to the stocks of the US point of sale, if you go to:
CatalogManage Stocks


 Magento 1














 After the implementation of this particular extension, my customer had the possibility to use a barcode scanner to update the stocks of the webshop. This saves a lot of time on a daily basis, so this extension was well worth the money!