Mass Product Import & Update allows you to update or import massively products in Magento in a record time thanks to CSV and XML files available from your website's server, from remote servers through FTP or HTTP.
Mass Product Import & Update allows you to create and/or update the below product attributes for all store views or specific store views:
- All system attributes (SKU, type, attribute set, visibility, status)
- All product attributes created within Magento (input, dropdown, yes/no, multi-select, text...)
- All product image attributes (image gallery, base image, thumbnail, small images... )
- All stock attributes (qty, availability, backorder, manage stock, low stock notification…)
- Categories associated with products
- Prices, special prices, special price dates, tax class…
How to configure Mass Product Import & Update
Configure Mass Product Import & Update in a general way
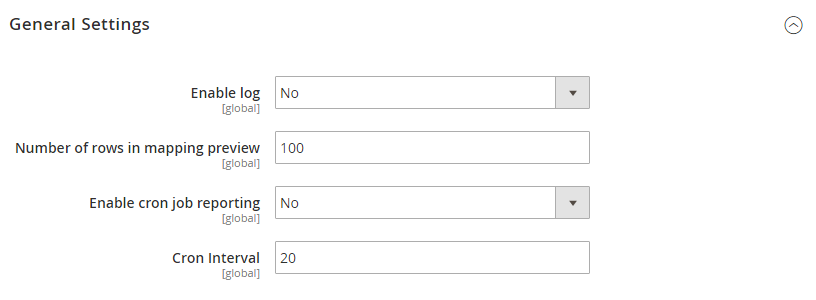
General Settings
To configure Mass Product Import & Update in a general way, you have to go in:
StoresSETTINGSConfiguration WYOMIND Mass Product Import & Update
Log file
Allows you to activate the log file available under the var/log directory. The file is named Wyomind_MassProductImportAndUpdate.log.

StoresSETTINGSConfiguration Advanced DeveloperLogs settings
M2E Pro update

Mapping preview
Allows you to define the number of rows returned in the browser data of the preview when editing a profile.
Cron job reporting
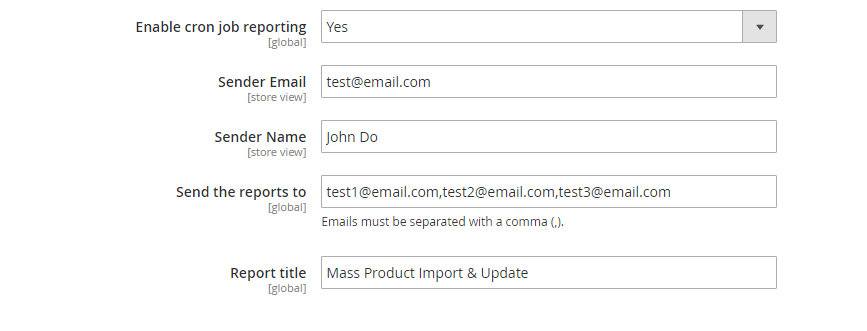
With Mass Product Import & Update, you have the possibility to enable cron job reporting.
- Enable cron job reporting
Allows you to define whether you want to enable the reporting or not in order to get notified each time a profile runs and if an error happens. The more important is the number of rows, the more the load time increases. A good compromise could be 1000 rows. - Sender Email
Type the email of the sender. - Sender Name
Define the name of the sender. - Send the reports to
Specify the email addresses to which the report must be sent. Emails must be separated with a comma (,). - Report title
Define your own title for the report.
Cron interval
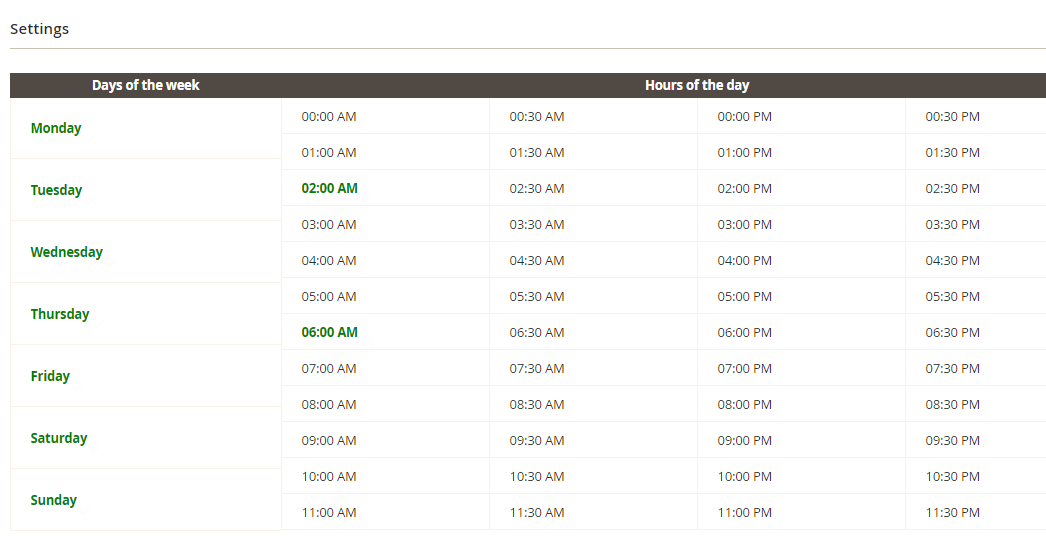
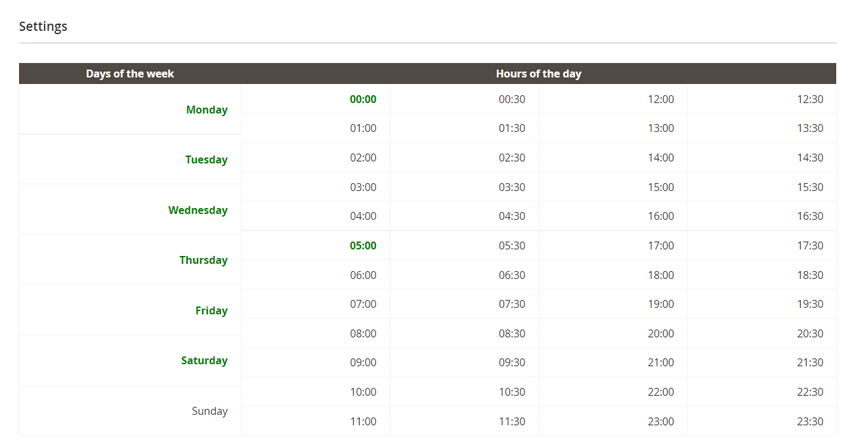
By default, cron tasks can be scheduled for each period of 30 minutes.
If you need a more precise hour, you can change that interval in the Cron interval field.
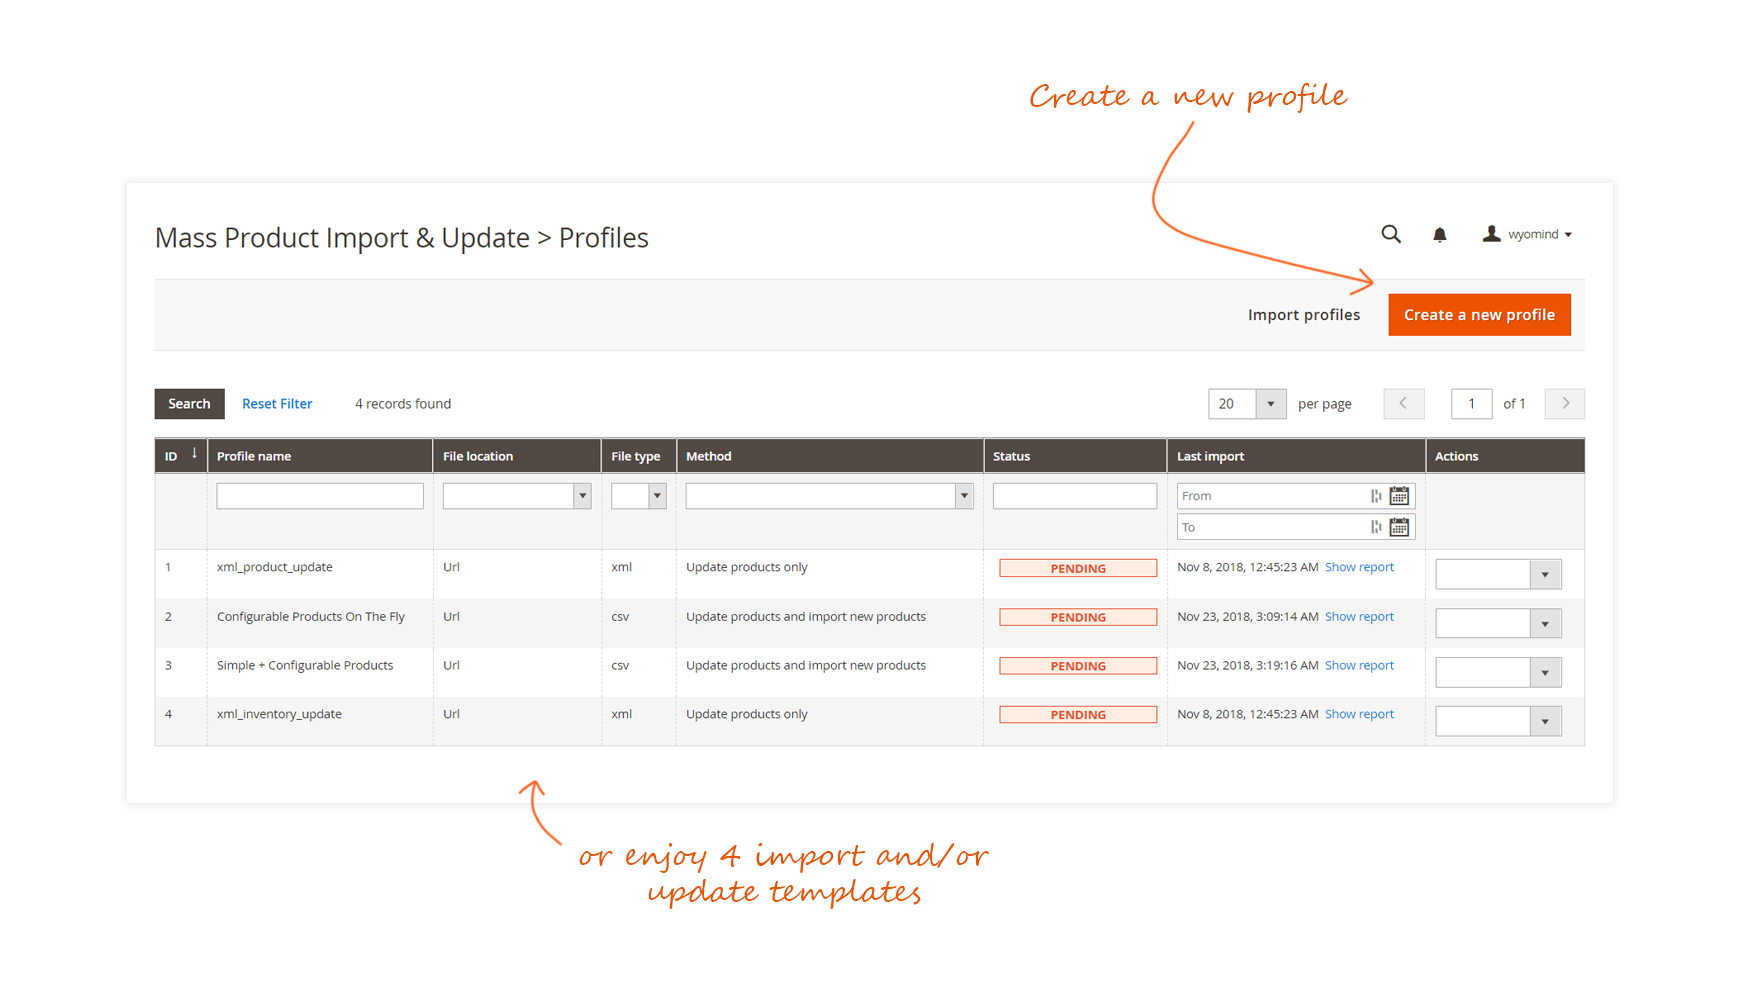
Create an import profile with Mass Product Import & Update
With Mass Product Import & Update, you can update Magento products or create new ones.
For this, edit one of the sample profile patterns or create a new profile by clicking CREATE A NEW PROFILE from:
SystemData TransferMass PRODUCT IMPORT & Update
Black Box
The black-box is a tool that will help you configure your mapping seamlessly. It is composed of 3 major features.
Input Data
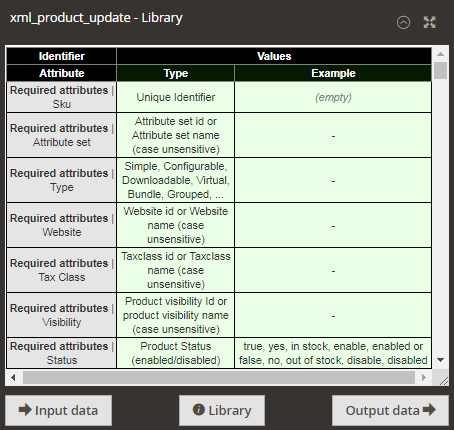
Library
Output Data
Settings
In this section, you will be able to define the source of the data.
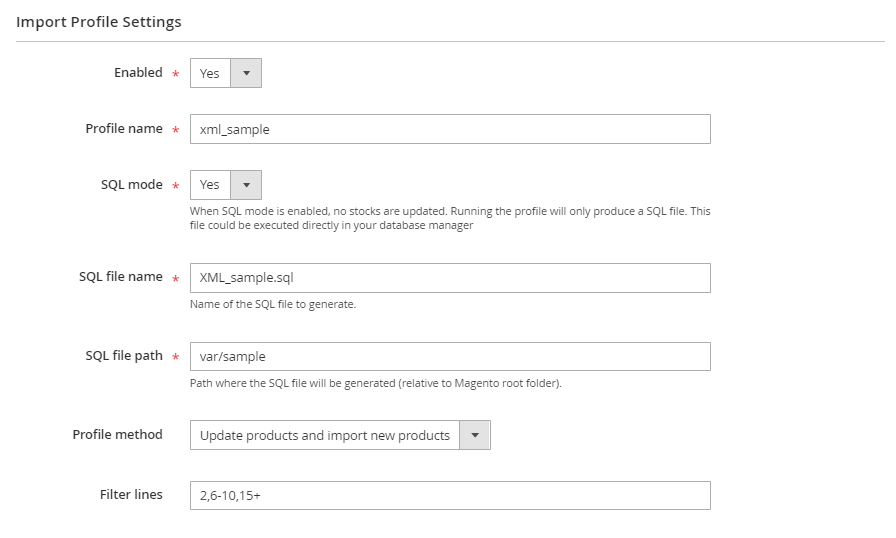
Profile settings
- Enabled
You can enable/disable the profile.
Note that the profile is disabled by default when it results from a duplication. - Profile Name
Only alphabetic and number are allowed + hyphens (-) and underscores (_).
The profile's name must be unique. - SQL mode
When SQL mode is enabled, no data are updated. Running the profile will only produce a SQL file. This file could be executed directly in your database manager.
If you activate SQL mode, you'll need to fill in several fields: - SQL file name
Name of the SQL file to generate.
XML_sample.sql - SQL file path
Is the path where the SQL file will be generated (relative to Magento root folder).
var/sample - Profile method
You can choose the action that the profile will trigger:
Update products only
Import new products only
Update products and import new products - Filter lines
Leave empty to export all lines:
e.g:means all lines will be imported
Type the numbers of the lines you want to import, making sure to separate each line or range with a comma (,):
e.g: 2,4,6,8,10means lines 2,4,6,8,10 will be imported
Use a dash (-) to denote a range of lines:
e.g: 8-10means lines 8,9,10 will be imported
Use a plus (+) to import all lines from a line number:
e.g: 4+means all lines from line 4 will be imported
Use regular expressions surrounded by # to indicate a particular group of identifiers to import:
e.g: #ABC-[0-9]+#
means all lines with an identifier matching the regular expression will be imported
When the Profile method option is on Update products and import new products, in the Mapping & Rules tab, you can define for each Target attribute dropdown if the value applies to the new products, or/and to the existing products:
- New products only
- Existing products only
- Both, new and existing products
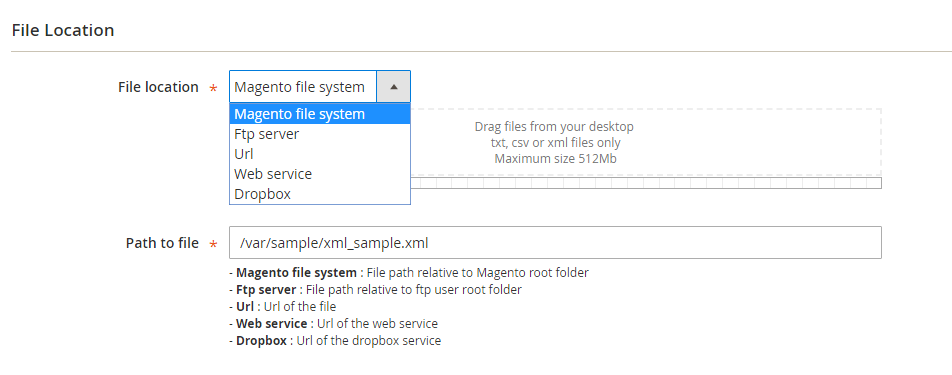
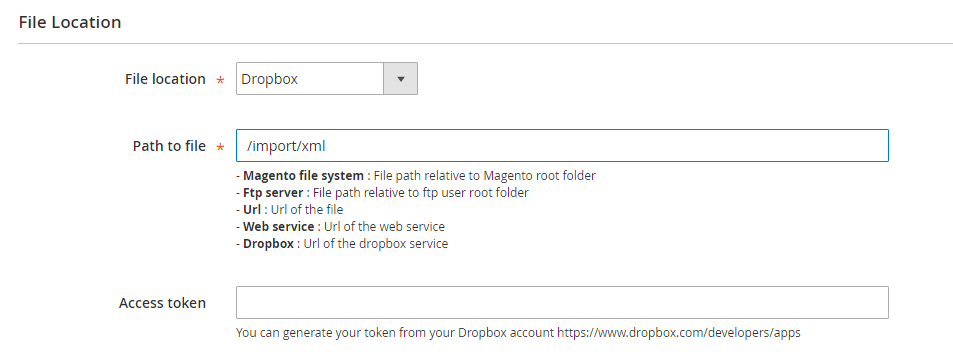
File Location
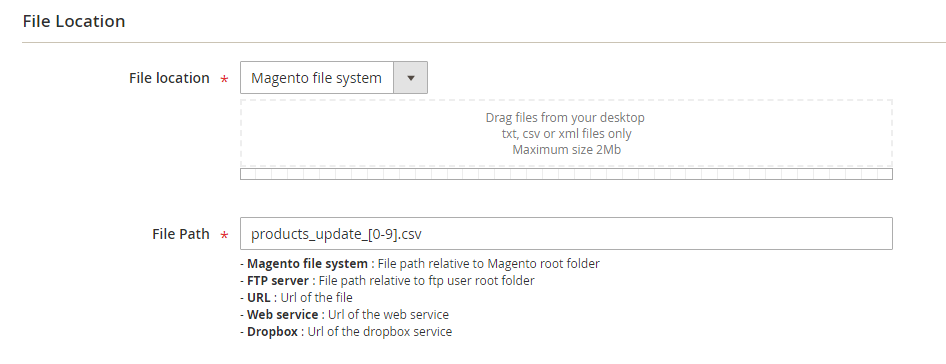
You have several options:
- Magento File System
The file is stored in the Magento root directory or a subdirectory of the Magento root directory.
File path relative to the Magento root folder.
See how to use regular expression in the file name. - FTP server
The file is stored on a remote server available from FTP or SFTP. Do not prefix the domain name or the IP with FTP://.
You'll be able to check if the FTP connexion is valid.
The file path is relative to the FTP user root folder.
You can also use regular expression in the file name when it is stored remotely via FTP.
You can also use FTPS (SSL over FTP) for downloading the import file. - URL
The file is stored on a remote server available from HTTP or HTTPS.
The file path is the URL of the file.
http://www.website.com/Inventory/AvailableInventory
If you' are using HTTP authentication, you must add the login and the password before the URL in the below format:http://login:[email protected]/Inventory/AvailableInventoryIf you are using a specific port, you can use the below format:
http://login:[email protected]:port/Inventory/AvailableInventory - Webservice
The file is available on a remote server accessible as web services.
The extension uses the CURL PHP library to connect the web service.
The file path is the URL of the web services.
You can provide the web service a login/password couple and any parameters formatted as URL parameters, as follows:
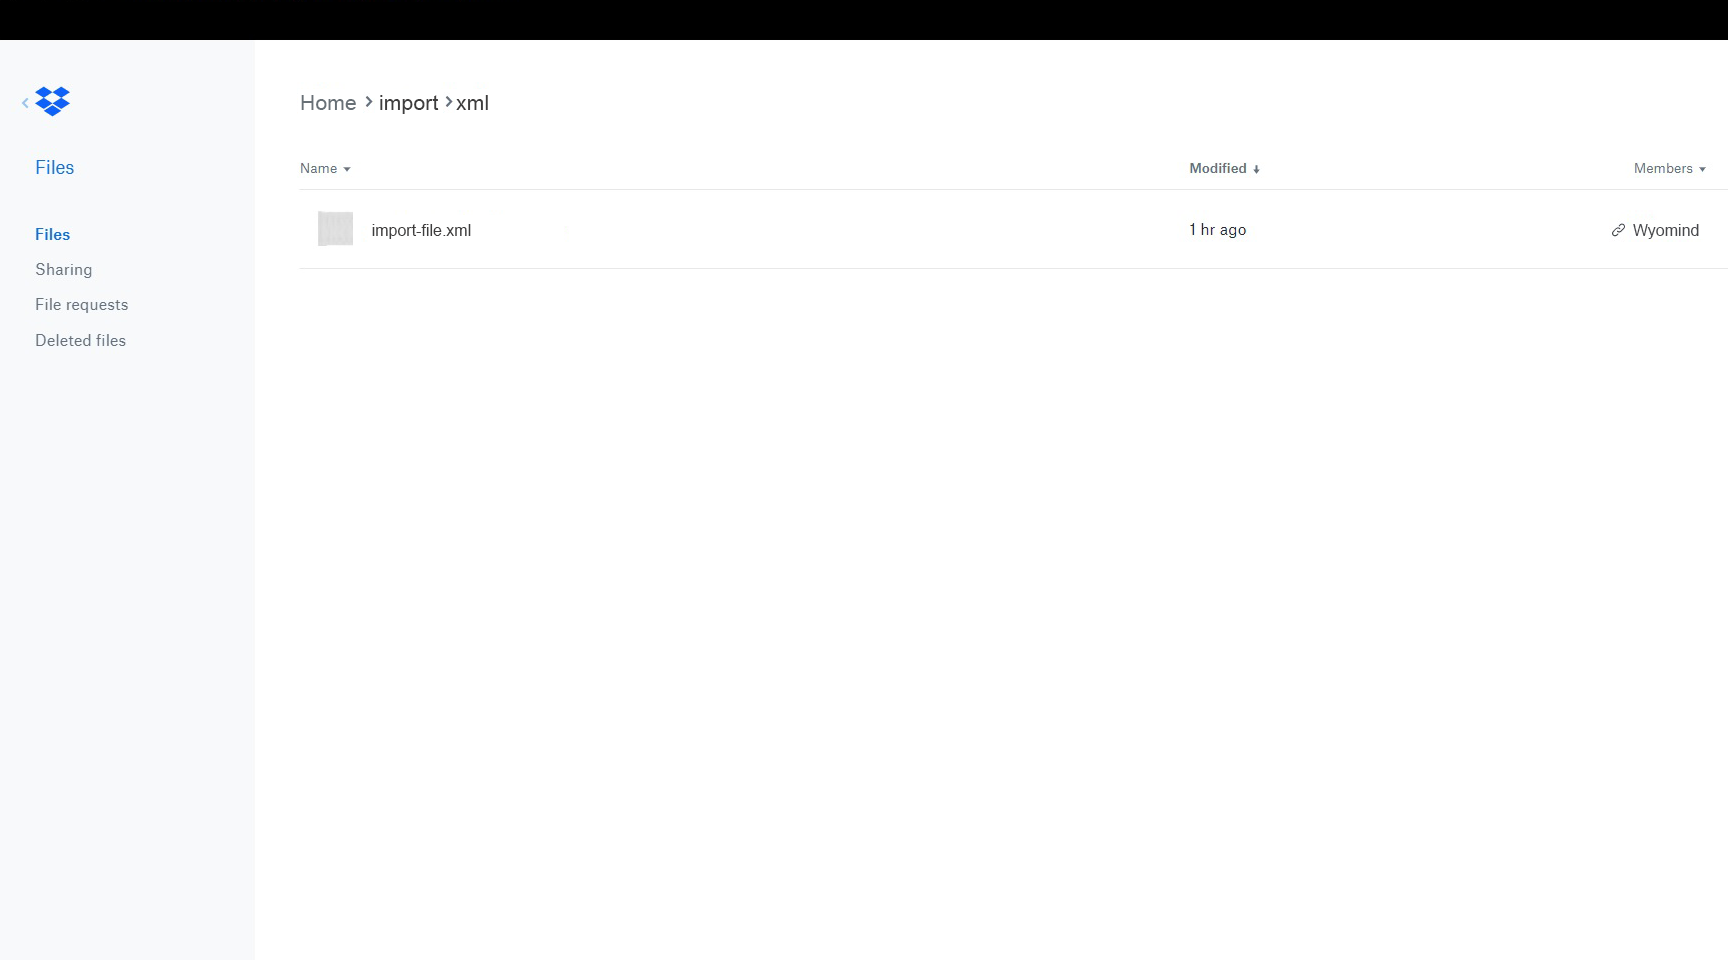
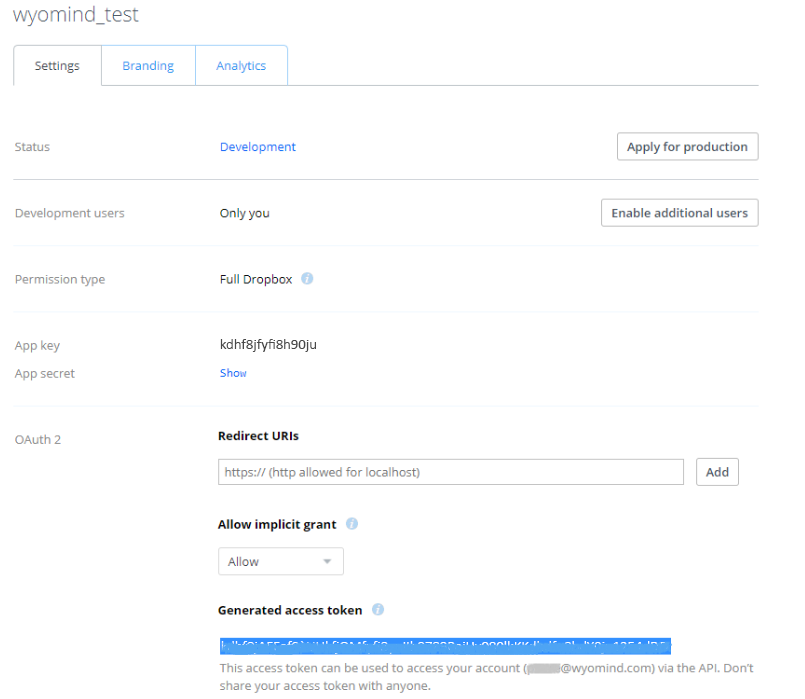
parameter1=value1¶meter2=value2¶meter3=value3 - Dropbox
You can generate your token from your Dropbox account https://www.dropbox.com/developers/apps
The file path is the URL of the dropbox service.
Have a look at our faq to see How to configure a file available from your Dropbox.
File Type
Allows you to specify the file type used for the update, XML, JSON, or CSV.
- File type
You have the choice between CSV, XML, and JSON files.
For CSV files, define:
- Column separator
Define the column separator. - Text delimiter
Select the text delimiter. - The first line is a header
Specify when the first line is a header. - Magento export file
Magento default export files are made of empty rows with values related to main rows, activating this option will merge the values into the main rows.
For XML and JSON files, define:
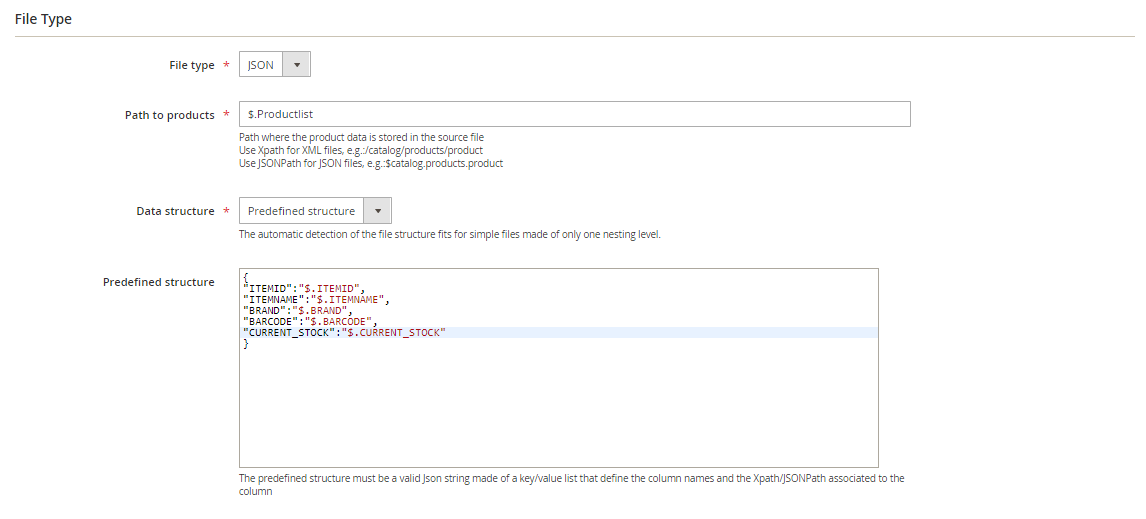
- Path to products
Fill in the path that targets the products. The path is case-sensitive.
See how to define the path to your products for XML or JSON files. - Data structure
You have two options: Automatic detection or Predefined structure
The automatic detection fits for simple files made of only one nesting level.
If you've selected the Predefined structure, see how to define your own file structure for XML or JSON source file.
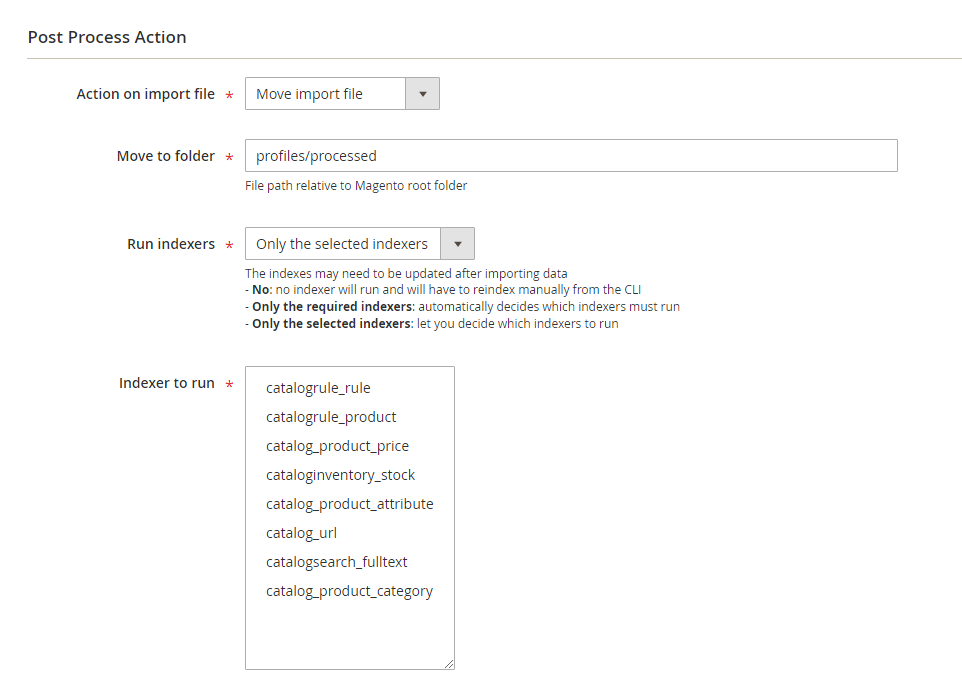
Post Process Action
- Action
Do Nothing
Delete the import file
Move import file - Move to folder
Define the file path where you want to move the import file, relative to your Magento root folder.
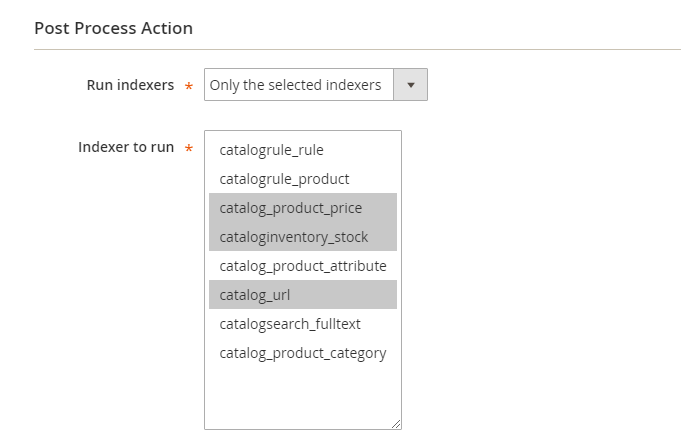
- Run indexers
You can choose to run the indexers after the import or not:
No: no indexer will run and you will have to reindex manually from the CLI
Only the required indexers: automatically decides which indexers must run
Only the selected indexers: let you decide which indexers to run
If the profile takes too much time to load, you can disable the indexers. - Indexer to run
Choose the indexers to run:
catalogrule_rule
catalogrule_product
catalog_product_price
cataloginventory_stock
inventory
catalog_product_attribute
catalog_url
catalogsearch_fulltext
catalog_category_product
catalog_product_categoryCatalog_product_flat and catalog_category_flat are managed if the option is enabled in:
StoresSettingsConfiguration Catalog CatalogStoreFront
Advanced Settings
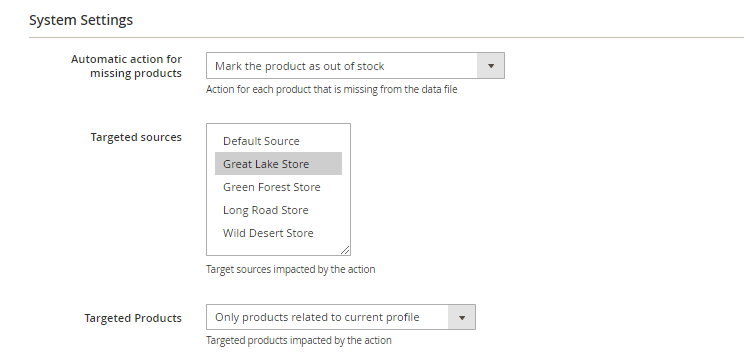
System Settings
- Do Nothing
- Disable the product
- Delete permanently the product
- Mark the product as out of stock
- Mark the product as out of stock and set qty to 0
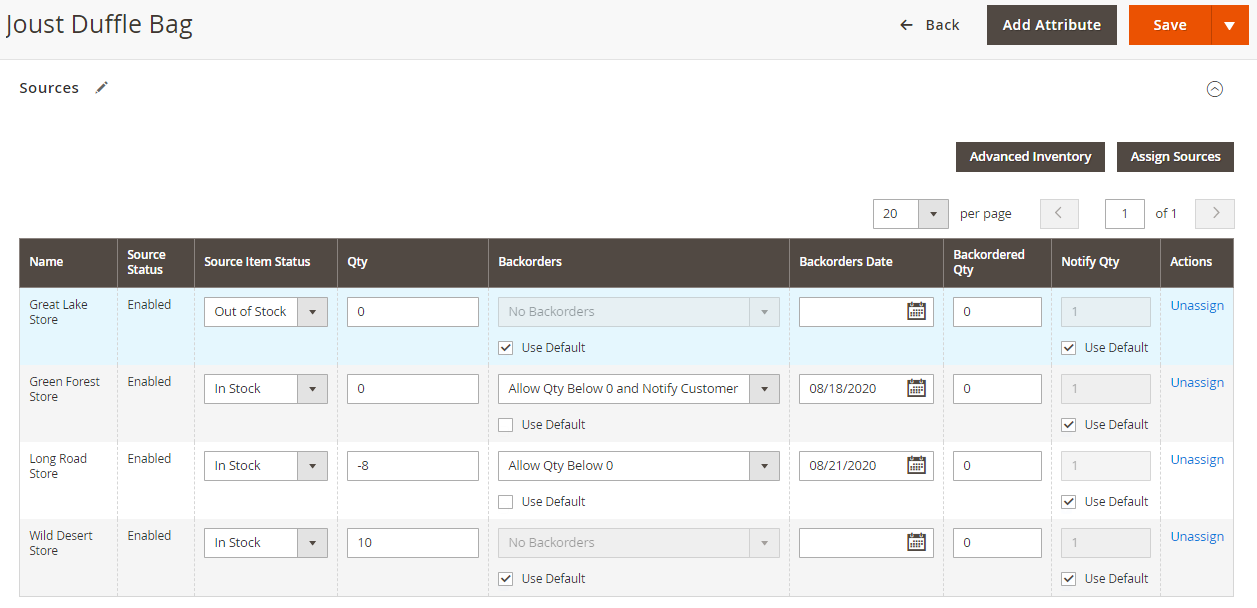
When you decide to mark products that are missing from the data file as out of stock, you must select the targeted sources impacted by the action.
Great Lake Store
When a product is imported using Mass Product Import & Update, it is associated with the profile. If you've selected action for missing products, you'll need to choose the targeted products:
- Only products related to current profile: products that are imported/updated with the same profile.
- Only products not related to current profile: all the products that are not created/updated by the profile.
- All products
Stock Settings
From the Stock Settings, you can define:
- Automatic stock status update
You can choose to automatically update the stock status (in stock / out of stock). - Use relative quantity update
Quantity will be added/subtracted to/from the current quantity.
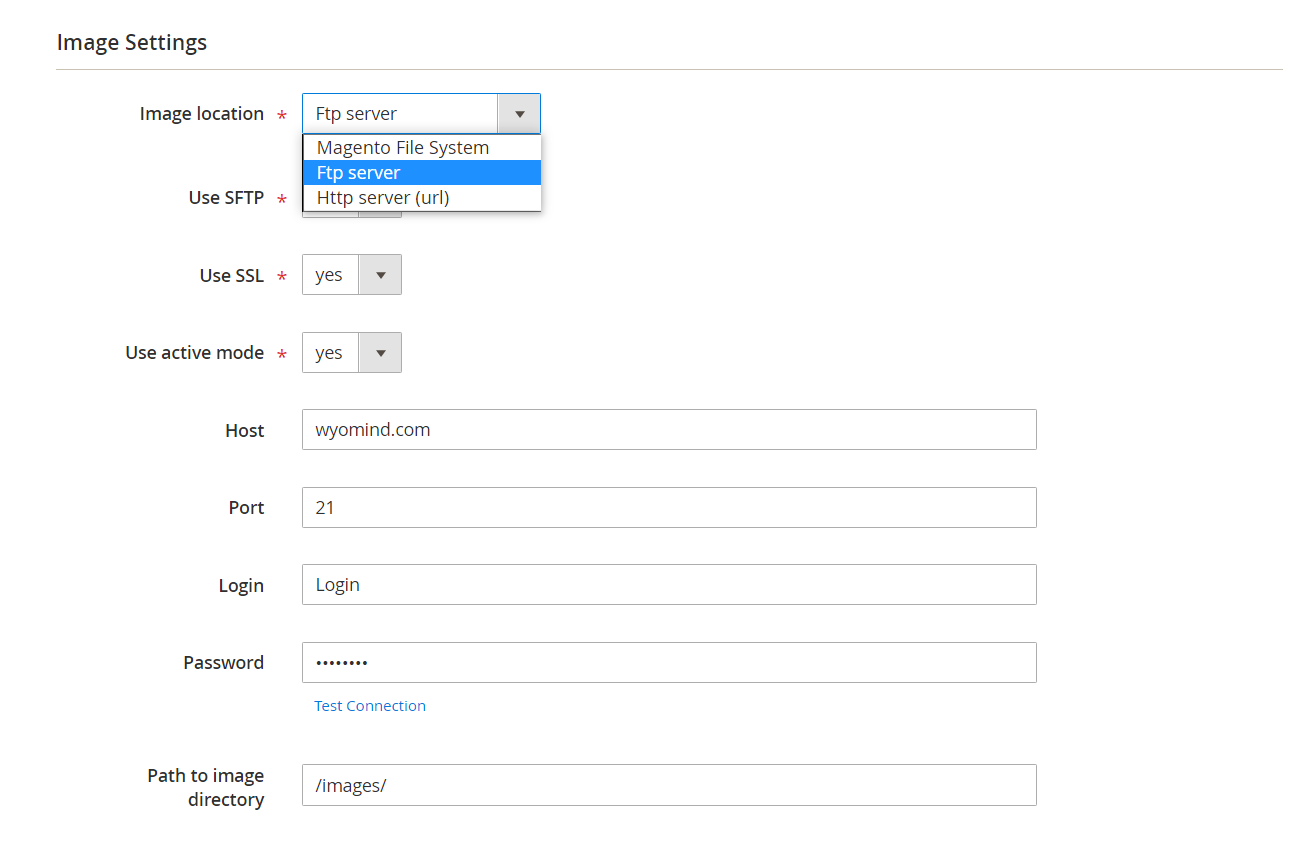
Image Settings
- Images location
Http server (URL)
Magento File System
Ftp server
Depending on what you've selected as the location of the images, you'll need to fill in several fields.
For the HTTP server:
- Download the image again if it has changed: Yes or No
For the FTP server:
- Use SFTP
- Use SSL
- Use active mode
- Host
- Port
- Login
- Password
For the FTP Server and the Magento file System:
- Path to images directory
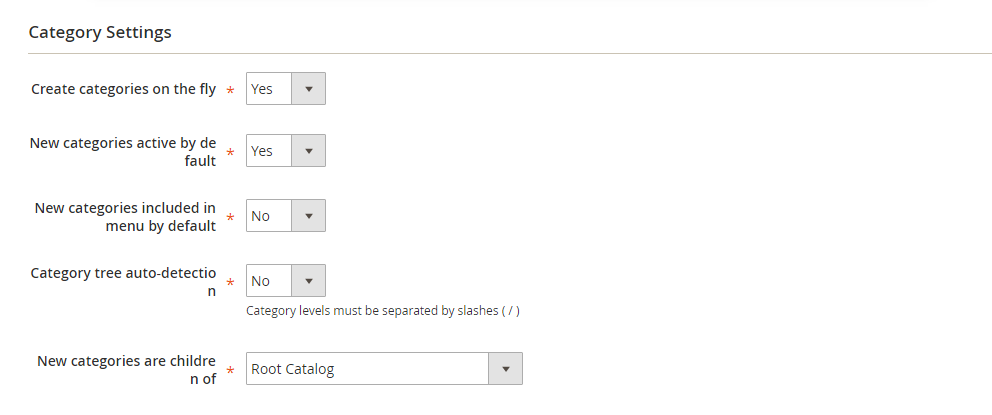
Category Settings
- Create categories on the fly
Yes or No. - New categories active by default
Yes or No. - New categories included in menu by default
Yes or No. - Category tree auto-detection
To automatically detect the category tree.
You need to use the complete path to the category. The category levels must be separated with slashes: A/B/C.
For example, instead of "Shirts", you should write:
Default Category/Men/ShirtsWhen the Category tree auto-detection is disabled, the category is added to the root category defined in New categories are children of.
- New categories are children of
Choose the parent category.
Take a look at our documentation for more details about the configuration of the category attribute.
Configurable Product Settings
Create parent of configurable products on the fly
You can also create/update a configurable product from the simple products available in the source file by enabling this option.
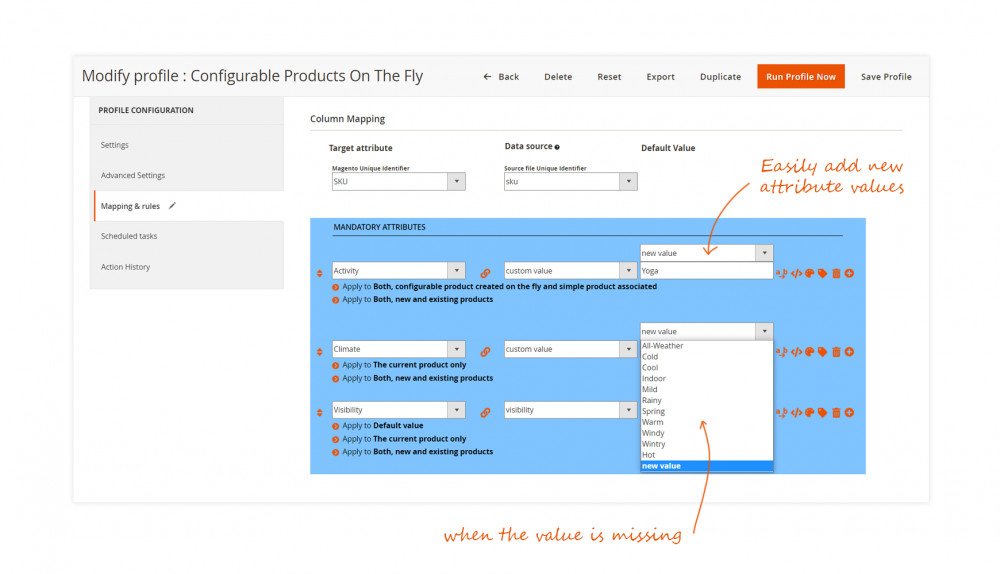
When that option is enabled, in the Mapping & Rules tab, you can find for each Target attribute dropdown an option for the configurable products to create on the fly. You have the choice to apply the settings on:
- The current product only
- The configurable product created on the fly only
- Both, configurable product created on the fly and simple product associated
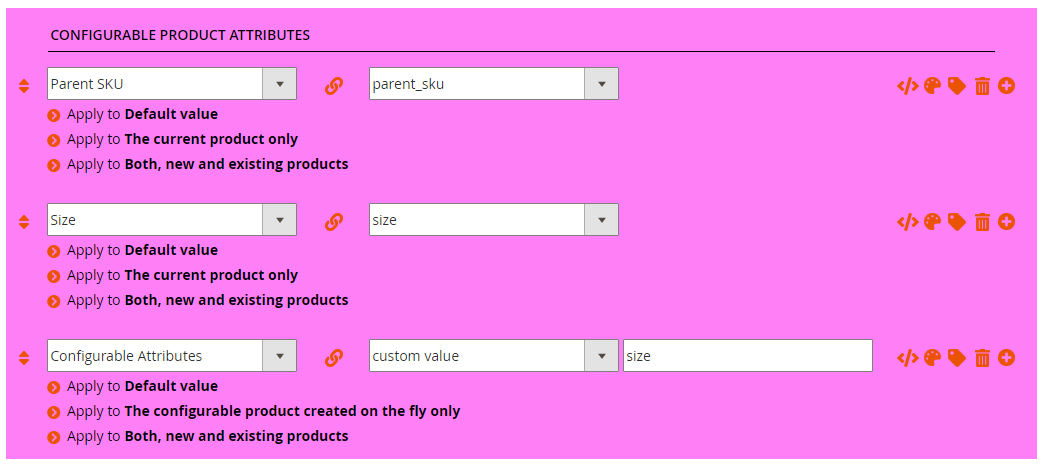
System attributes of the configurable products created on the fly must receive a value either by mapping a field from the source file for the simple product and the configurable product or for the configurable product only.
So that the configurable product and the simples variants are linked, the following attributes must be mapped:
Mapping & Rules
In this section, you can map each column of the file with one of the stock attributes.
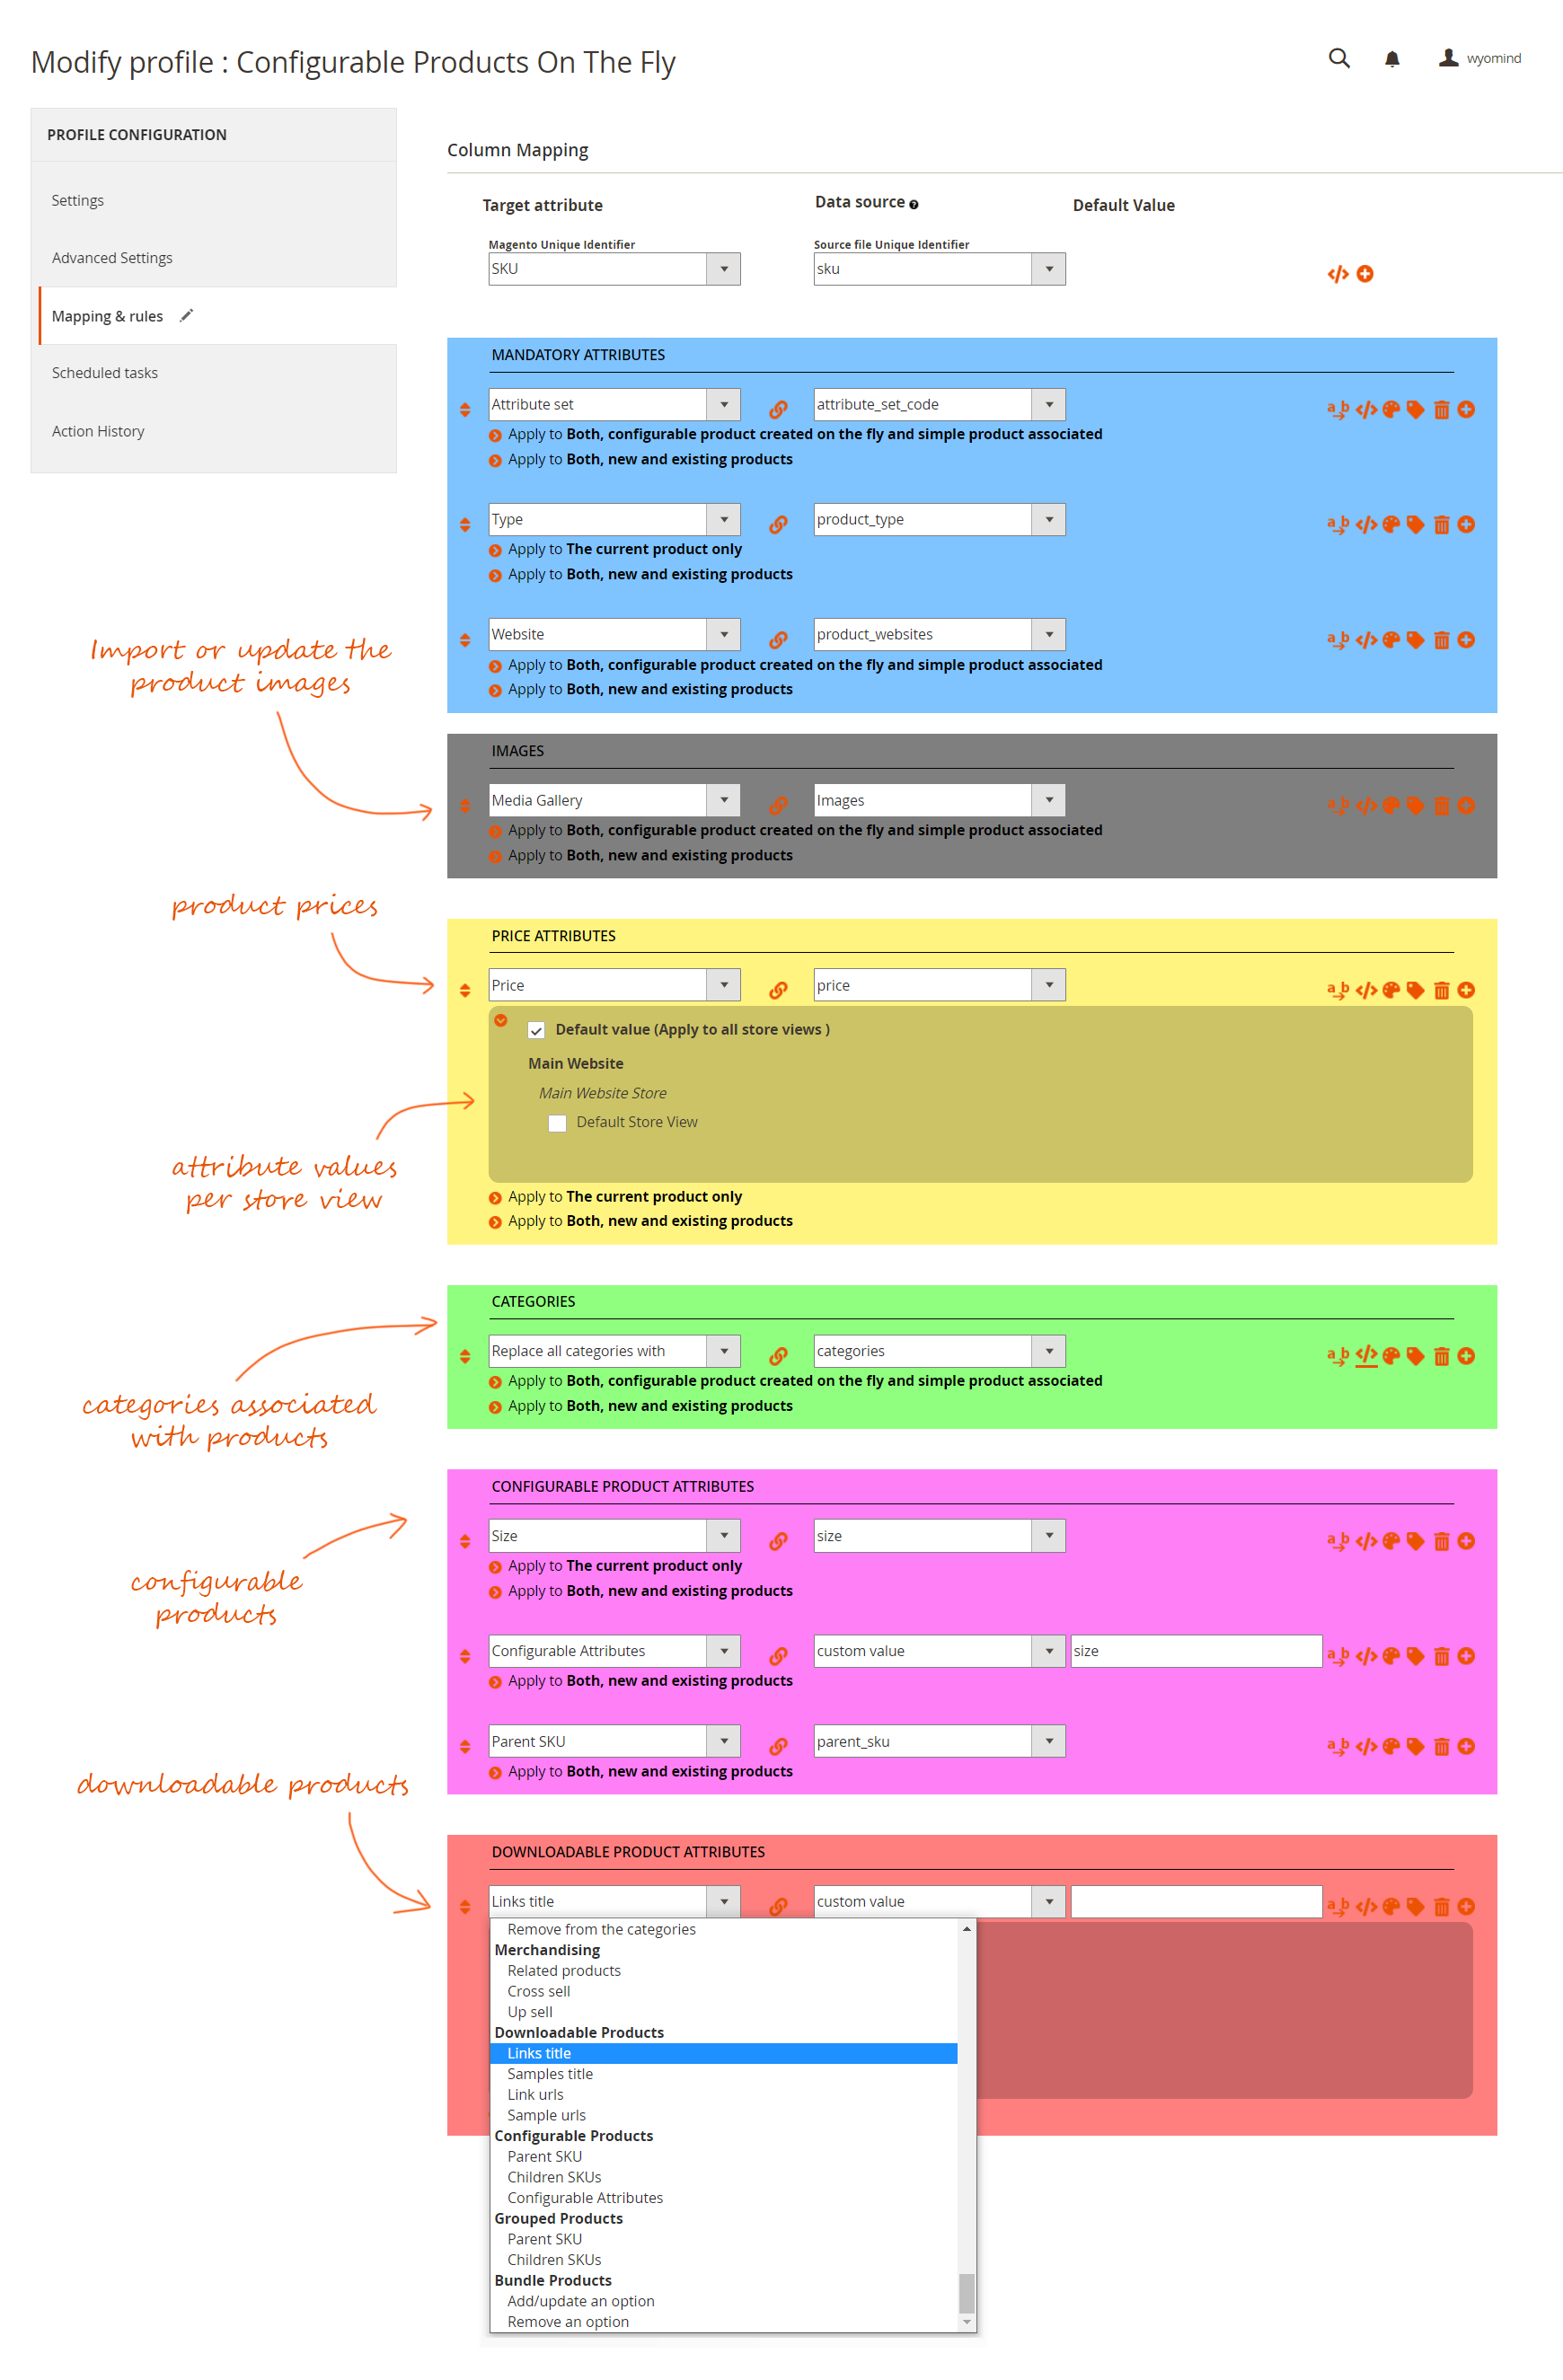
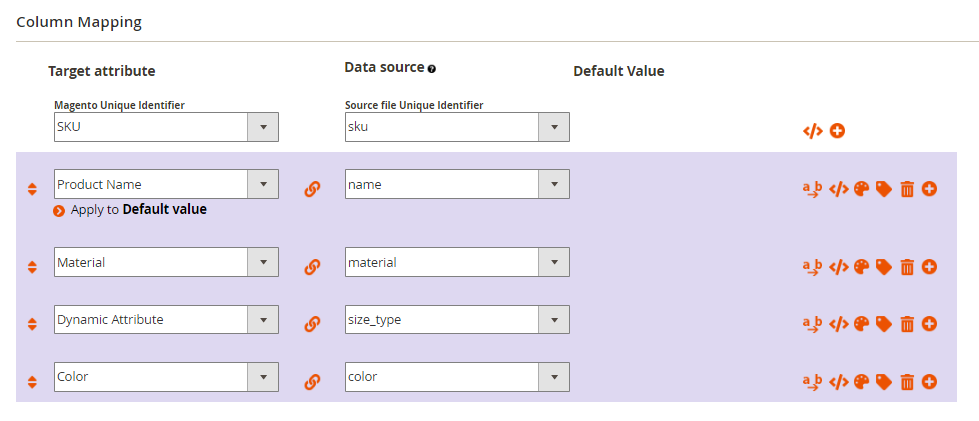
Column Mapping
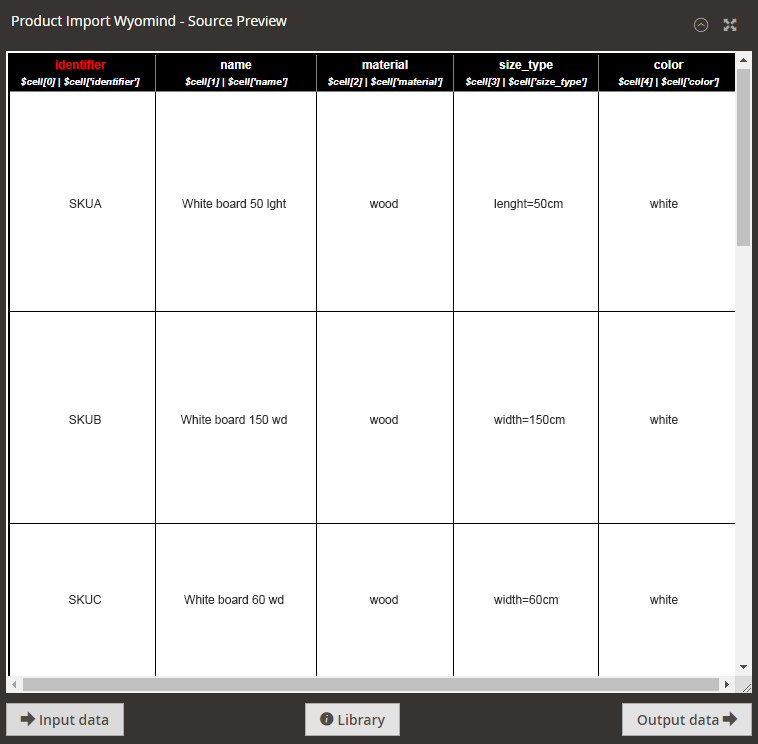
Each column can be mapped with one of the stock attributes. Note that at any time, you can preview the input and output data in the black box directly.
- Target Attribute
Select the target attribute from the ones available in your system.
You can find all the attributes grouped by type in our documentation.
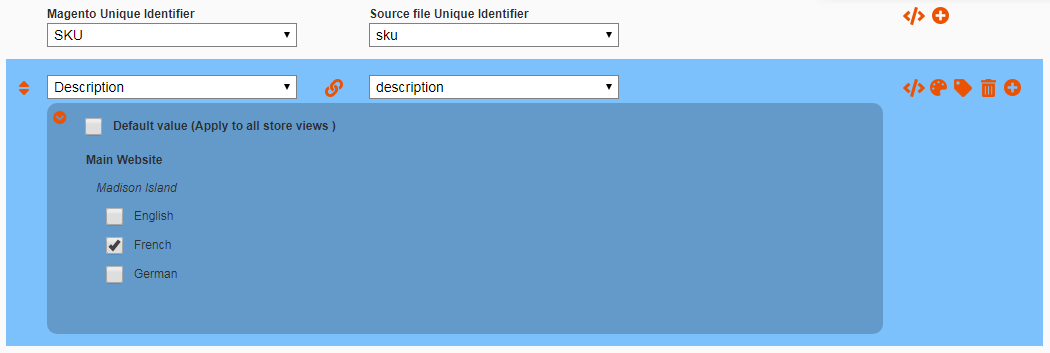
The first line is where you define the identifier of your products. The identifier must be unique,
SKU - Data source
In the Data source, you can define the attribute source that matches with the target attribute from your source file.
id - Default value
Sometimes, some columns can be missing. For example, when updating all stocks, the file does not necessarily include all stock attributes (backorders, minimum quantity in the cart...). In that case, you can choose custom value in the Data source and apply a default value.
yes
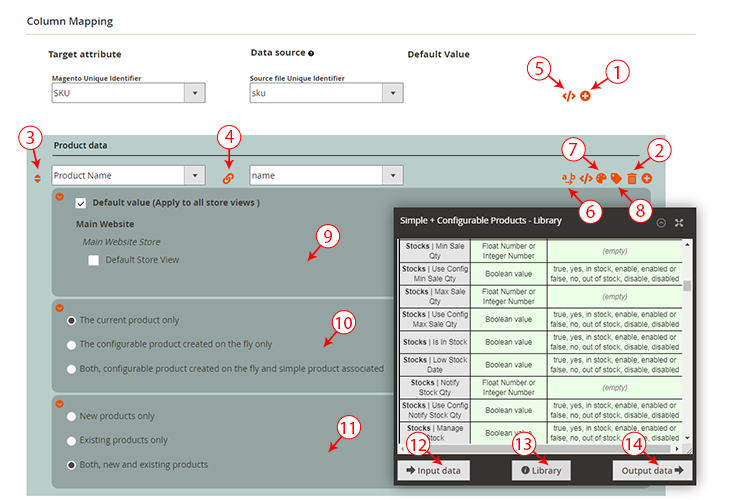
QUICK OVERVIEW OF THE INTERFACE
- Add as many columns as you want by clicking on + ADD A NEW ROW. In many cases, the update file may contain more columns than necessary; you don't need to add these columns and match them.
- DELETE a row easily.
- Change the order of each row using the drag and drop.
- Deactivate a line while conserving the settings by clicking on the LINK symbol.
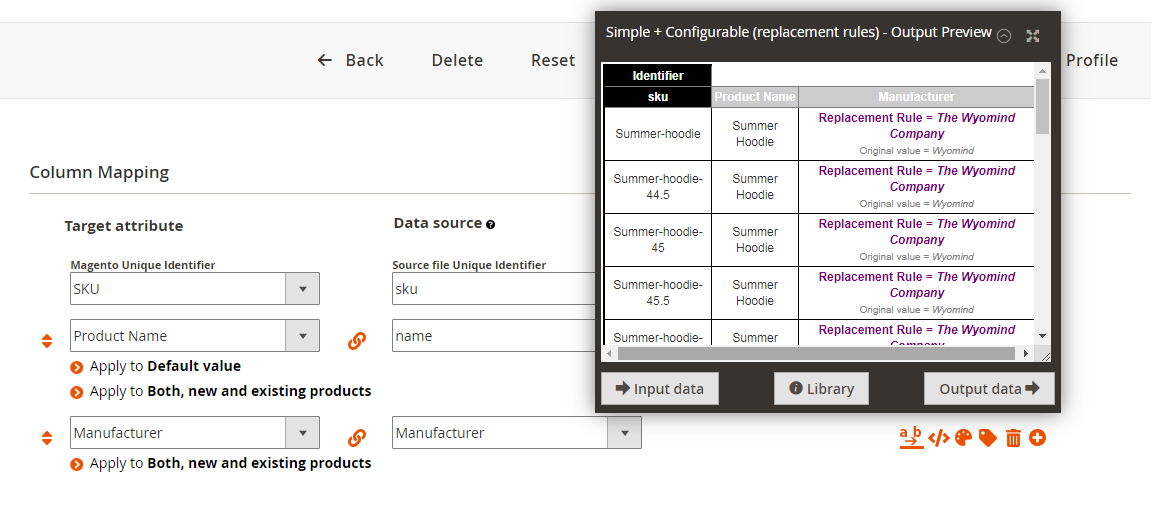
- Add your own custom script </>. These scripts can be previewed in the output. Note that when there is a script filled in, </> is underlined. See how to use the PHP API.
- Add your own replacement rule by clicking on the b icon. These rules can be previewed in the output. Note that when there is a rule selected, a b is underlined. See how to create your replacement rules.
- Apply the color of your choice to the row.
- Apply a label to the row.
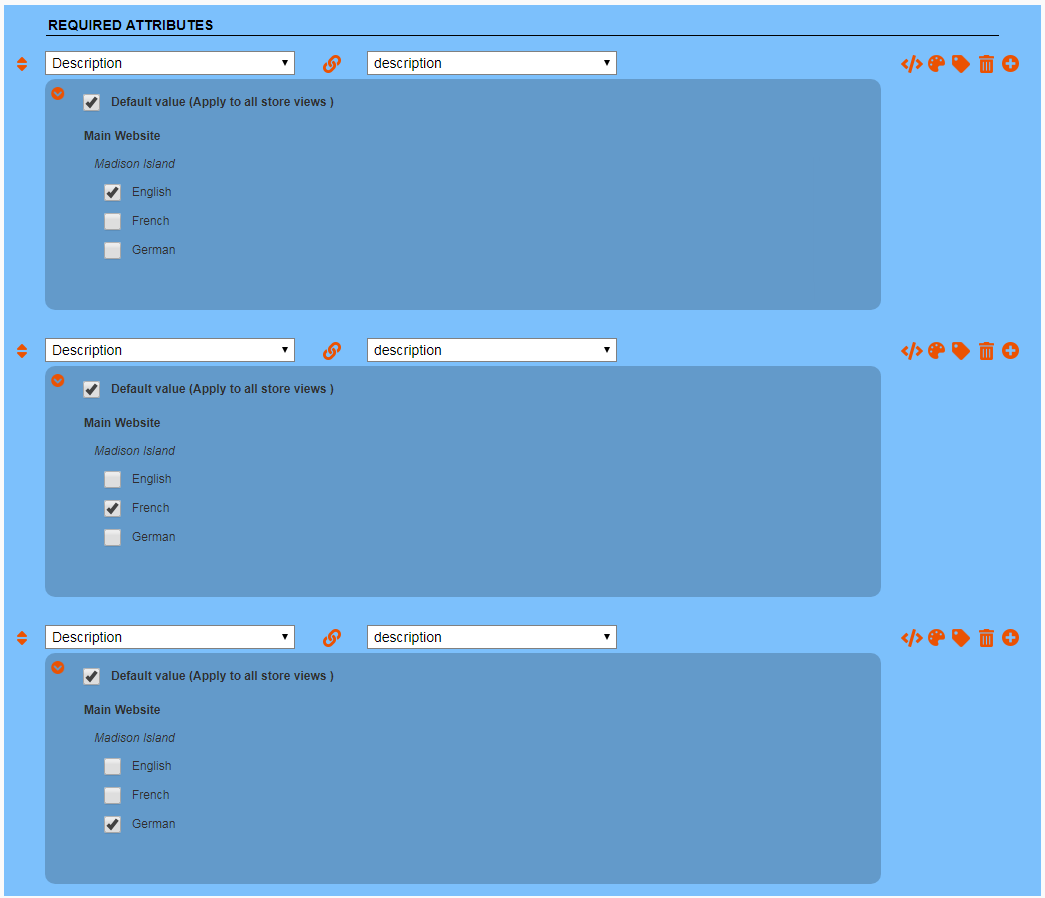
- Define to which store view(s) you want to apply these settings by clicking APPLY TO DEFAULT VALUE.
- Define to which product(s) you want to apply these settings by clicking APPLY TO THE CURRENT PRODUCT ONLY.
For this setting to appear, the Create parent of configurable products on the fly option must be activated. - Define to which product(s) you want to apply these settings by clicking Apply to Both, new and existing products.
For this setting to appear, the Profile method must be set on Update products and import new products. - Preview your file by clicking INPUT DATA.
- Find all the attributes grouped by type in the LIBRARY.
- Check the data as they'll be updated by clicking OUTPUT DATA.
Scheduled tasks
You can schedule the profile to be executed for all days of the week and with a default interval of 30 minutes between each execution.
You have the possibility to change the cron task interval from the General Settings tab.
Action History
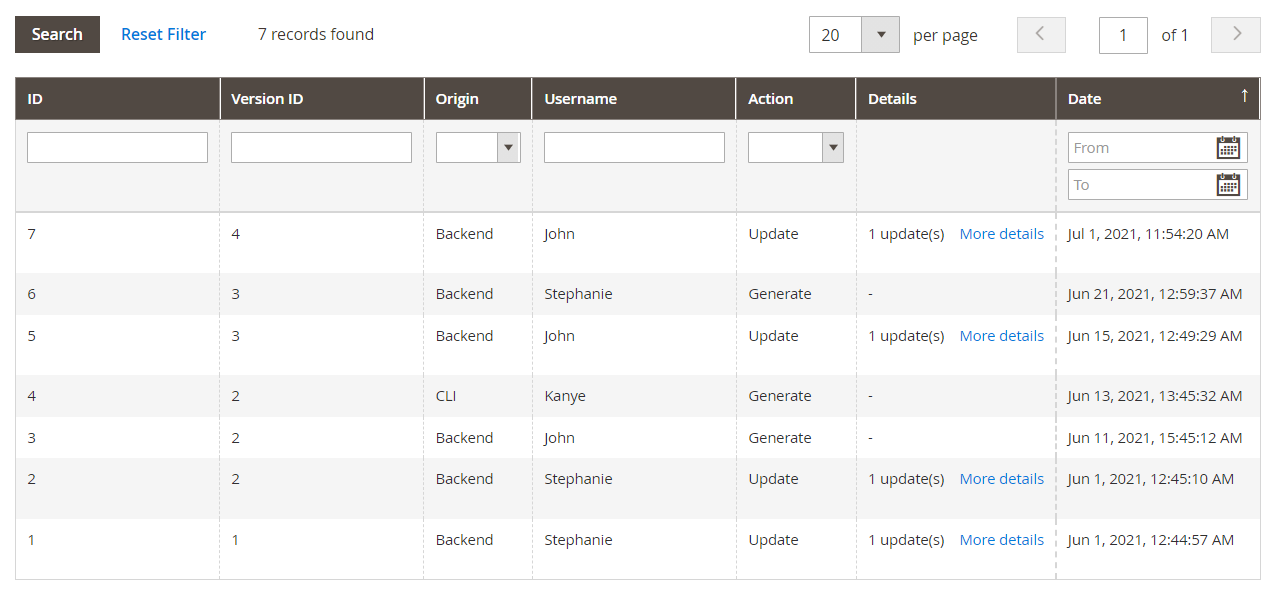
In the Action History tab, you can find a history of your previous generation and configurations.
- ID
It is the ID of the history line. - Version ID
It is the ID of the profile configuration version. - Origin
The origin of the action can be: Backend / Cron / CLI / API - Username
It is the name of the user behind the action. - Action
The available actions are: create / generate / update / delete - Details
If you click on More details, you can see the detail of the profile update from a grid.
If you click on a line of the above grid, you can check the differences of the updated field: red parts are the removed data and green parts are the inserted data.
- Date
It is the date of the modification.
Export and import your profiles pattern
Mass Product Import & Update also allows you to import and export patterns into and from your Magento 2 admin.
Export
To export a profile, edit an existing feed from:
SystemData TransferMass Product Import & Update
Edit a profile and click on Export.
You should find the profile pattern in your Downloads folder.
Import
Before anything, to import a profile pattern, it must be a .conf file, which is specific to the Mass Product Import & Update extension.
Click on Import a Profile from:
SystemData TransferMass Product Import & Update
Browse the .conf file and click on Import.
The profile pattern should have been added to the list.
Run your Mass Product Import & Update profiles
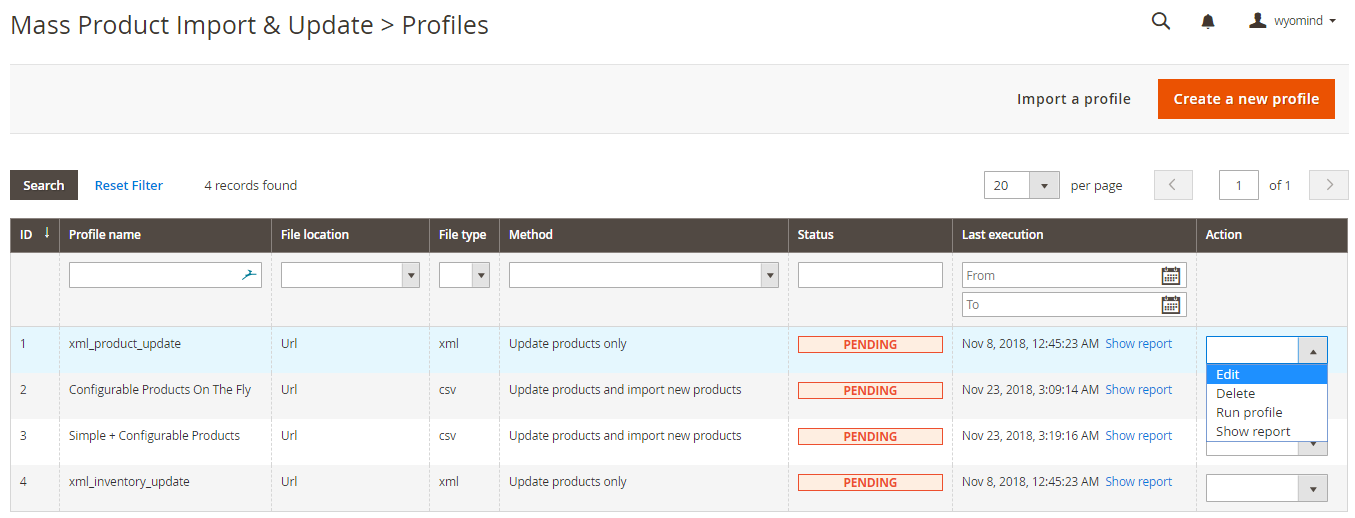
From the profiles grid
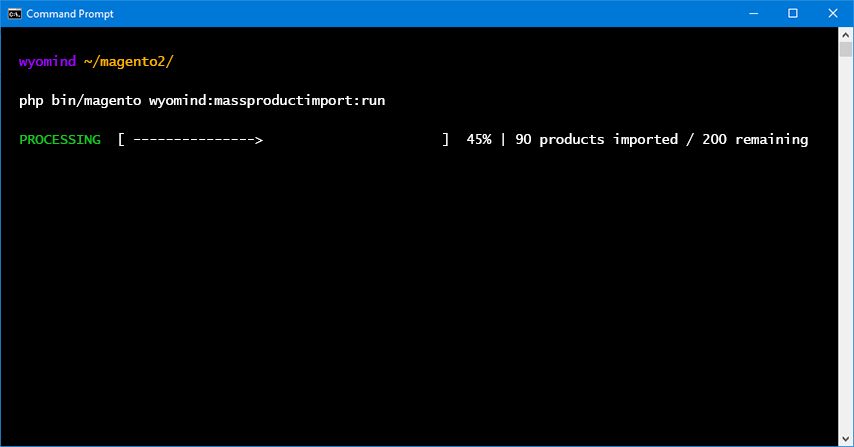
To run the profile from the grid, you just need to click on RUN PROFILE from the action menu on the right column. Then the status will be updated with a progress bar.
From the profile page
Edit the profile and then click on RUN PROFILE NOW.
![]()
Once the import/update process has ended, a message appears with details about how many products have been updated/imported and how many products have been ignored.
With the cron tasks
When the scheduled tasks are configured for the profile, then the profile will be automatically run at the day and the time selected.
So that the scheduled tasks work well in Mass Product Import & Update, the main cron task in Magento must be configured properly.
For more details about how to configure the cron tasks in Magento, look at the official Magento user guide:
http://devdocs.magento.com/guides/v2.0/config-guide/cli/config-cli-subcommands-cron.html
You will receive an email each time the cron task is run if you have enabled the reporting in:
Stores SETTINGSonfigurationWyomind Mass Product Import & Update
With the Command Lines Interface
Mass Product Import & Update includes command lines available from any shell console.
To run the profile:
bin/magento wyomind:massproductimport:run [-p|--profile_ids[="..."]]For example, for profile 2, run:
bin/magento wyomind:massproductimport:run -p 2
To execute the SQL requests that generate when the profile is set to use the SQL mode:
bin/magento wyomind:massproductimport:sql [-p|--profile_ids[="..."]]For example,, for profile 4, run:
bin/magento wyomind:massproductimport:sql --profile_ids=4Use SQL option
Updating or importing products massively may keep your server busy some times, especially when the update or the import includes numerous products and/or many attributes.
For better performances Mass Product Import & Update splits the process into two distinct steps:
- Source file analysis: the data are collected and the SQL queries for the update/import are built.
- The SQL file execution: the database is updated with the new data.
This step may be executed asynchronously when the SQL option is enabled.
Generate the SQL file
If you prefer to generate the SQL file without executing it, you must enable the SQL mode in your profile configuration.
Then run the profile by clicking on RUN NOW.
Execute the SQL file
Once the file is generated in the working directory, you only need to update the database with the generated file from the command line as follows:
mysql -h host -p DbPassword -u DbLogin DatabaseName < path/to/mysql/file.sqlAdvanced use
With Mass Product Import & Update, several events are triggered:
- massupdateimport_start
Triggered when the update/import process starts. - massupdateimport_success
Triggered when the profile is run and the data successfully updated/imported. - massupdateimport_failure
Triggered when the profile is not run and the data are not updated/imported.
The events can be used in your custom observers.
The argument passed is an instance of Wyomind/MassProductImport/Model/Profile.
Below are some examples of use in an observer:
- From etc/events.xml:
<config xmlns:xsi="http://www.w3.org/2001/XMLSchema-instance" xsi:noNamespaceSchemaLocation="../../../../../lib/internal/Magento/Framework/Event/etc/events.xsd"> <!-- Standard checkout --> <event name="massupdateimport_success"> <observer name="editor_module_massupdateimport_success" instance="EditorModuleObserverLassUpdateImportSuccess" /> </event> </config>
- From app/code/Editor/Module/Observer/MassUpdateImportSuccess.php:
<?php namespace EditorModuleObserver; class LassUpdateImportSuccess implements MagentoFrameworkEventObserverInterface { public function execute(MagentoFrameworkEventObserver $observer){ $profile= $observer->getEvent()->getProfile(); // TODO: Implement your own logic. } }
Attribute specifications to import or to update
Mass Product Import & Update allows you to import/update all attributes, even those with a custom model.
System attributes
The below attributes are required when importing new products.
If these attributes are not available in the mapping, then the imported products will be visible neither in the front-end or the back-end.
Sku
The unique identifier of the product to update or to import.
sku1Attribute set
The attribute set to apply to the product.
You can either use the attribute set name (case insensitive) or the attribute set ID.
bag
15
To know the attribute sets available in your system, go to:
StoresAttributesattributE Sets
Type
The product type.
You must use the product type name (case insensitive).
It can be:
- simple
- configurable
- grouped
- bundle
- virtual
- downloadable
- custom product type
simple
Website
The website(s) to which belongs the product separated by a comma.
1
1,2
You can either use the website IDs or the website names (case insensitive).
Main Website Store
Main Website Store,Second Website Store
To know the names and the ids of the websites available in your system, go to:
StoresSettingsAll Stores
Tax Class
The product tax class.
You can either use the tax class name (case insensitive) or the tax class ID of the product.
Taxable Goods
2
To know the names and the ids of the tax classes available in your system, go to:
StoresSettingsConfigurationSalesTaxtax classes
Visibility
The product visibility.
You can either use the visibility name (case insensitive) or the numerical value associated.
- Not visible Individually
- Catalog
- Search
- Catalog & Search
Catalog,Search
4
Status
The status of the product: enabled or disabled.
You can use any of the below values:
- enabled / disabled
- enable / disable
- true / false
- yes / no
- 1 / 0
enabled
Products attributes
All attributes created in your stores and/or any attributes that are listed in another section are available in the product attributes section.
Text or textarea attribute
The text or textarea attributes accept any value without any restriction.
Your text
Yes/no attribute
- enabled / disabled
- enable / disable
- true / false
- yes / no
- 1 / 0
true
Dropdown attributes
The drop-down attributes can be updated with:
- the option id
4 - the option label
red
The values of dropdown attributes can be translated to the different store view languages as below with the color attribute:
red[de=rot|fr=rouge|es=rojo]
For each store view language, you can choose to use the default value by using #empty#. Below, the DE translation will be empty and the default value red will be used (the default store is FR):
red[fr=rouge,de=#empty#]
If you want to use a fixed value, you can select one from the dropdown.
Stores SettingsAll stores
Multi-select attributes
The multi-select attributes can be updated either with a list of option labels or a list of option ids separated with a comma.
Men, Boys
Note that all the multi-select options are now automatically populated and you can directly select multiple values:
To know the labels and ids of the drop-down and multi-select attributes, go to:
StoresAttributesProduct edit attribute Manager label / option
Date attributes
The date attributes must be formatted with the date and time GMT:
YYYY-MM-DD hh:mm:ss
2019-06-11 15:09:52
Prices attributes
Price
The price attribute can be a float number or an integer number.
It must be formatted with a dot as a decimal separator.
15.50
Special price
The special price attribute can be a float number or an integer number.
It must be formatted with a dot as a decimal separator.
10.50
Special price from/to date
The special price from/to date must be formatted with the date and the time GMT as below:
YYYY-MM-DD hh:mm:ss
2019-06-17 11:29:51
Tier price/Group price
You have two possibilities:
- Add Tier price/Group price
Creates a new Tier price/Group price that is added to the existing ones. - Replace Tier price/Group price
Replaces all the existing Tier prices/Group prices with the new ones.
The list of tier prices must be separated by ~ as below:
[Group id 1]|[Qty 1]|[Price 1]~[Group Id 2]|[Qty 2]|[Price 2]~...
*|5|9.99~*|10|7.99~...
To import your tier prices as discounts, add % at the end of each price. Otherwise, your tier prices will be imported in cash.
*|5|10%~*|10|5%~...
Below is the list of the codes to use for the customer groups ids:
- *: All groups
- 0: Not logged in
- 1: General
- 2: Wholesale
- 3: Retailer
- 4: VIP Member
- 5: Private Sales Member
Weee tax
The list of taxes must be separated by ~ as below:
country1|region1|tax1~country2|region2|tax2~...
- Country code
It can be: FR, US, CA, NZ... - Region
Use * for all states - Tax
This is a fixed value
FR|*|13~UK|*|18
Stock attributes
All attributes related to the stock management in Magento are available in this section.
All these attributes must be updated with numeric values or boolean values.
Boolean values
- 1 / 0
- yes / no
- true / false
- enable / disable
- enabled / disabled
- in stock / out of stock
in stock
Numeric values
- Integer number (no white space)
- Float number (decimal separated by a dot)
10.50
MSI attributes
Mass Product Import & Update allows you to update all attributes related to the Magento Multi-Source Inventory Management (MSI).
 All these attributes must be updated with numeric or Boolean values and mapped as follow.
Quantity
Notify Qty
Use default for notify Qty
Stock Status
MSI Backorders attributes
Mass Product Import & Update also allows you to update all attributes coming with the MSI Backorders extension, also available in the MSI Suite.
You can retrieve these attributes in the products pages from:
CatalogProducts
Backorders
- Allow Qty Below 0
- Allow Qty Below 0 and Notify Customer
- No Backorders
Allow Qty below 0
Backorders date
YYYY-MM-DD hh:mm:ss
2020-03-25
Backordered qty
50
Dynamic attributes
You have the possibility to create a dynamic mapping giving you more flexibility in the configuration of your profile. In your source file, for the same column, you can indicate the Magento attribute to map as well as the associated value.
Dynamic attribute
Code of the Magento attribute to map and the associated value.
The syntax to use is:
attribute_code=value
length=150
You can also use several dynamic attributes separated by a pipe in the same mapping row.
color=red|size=XL|description=description
Media attributes
All attributes related to the media management are available in this section.
The image/video source directory must be defined in the Image Settings tab.
Media Gallery
The images to insert in the image gallery must be listed in the Image Gallery field as the relative path to the image source directory specified in the Image Settings tab for local storage or FTP storage and as an absolute path if hosted on a remote server.
Each image path must be separated by one of the below characters:
- | (pipe)
- , (comma)
- ; (semi-colon)
You can use the below parameters:
- media_type
image (default value)
external-video - disabled
Default value is 0.
You have the possibility to assign values by storeview by suffixing disabled with the store code. - label
Default value is empty.
You have the possibility to assign values by storeview by suffixing label with the store code. - position
Default value is 0.
You have the possibility to assign values by storeview by suffixing position with the store code. - destination
Default value is empty.
It is the name of the new image.
path/to/image_1.jpg[position=1|label=image 1]
path/to/image_2.jpg[position=2|label=image 2]
path/to/image_3.jpg[destination=new_image_3.jpg]
path/to/image_4.jpg[position=1|disabled=1|label=image 4]
path/to/image_5.jpg[disabled=0|label=red|disabled_de=1|label_de=rotte|disabled_fr=0|label_fr=rouge]
You can use additional parameters for external-video media type:
- provider
Default value is empty. - url
Default value is empty. - title
Default value is empty. - description
Default value is empty.
path/to/video/preview.jpg[media_type=external-video|title=Video 1|url=https://vimeo.com/6370469]
In the case where you don't add the parameters in the syntax, the default values will be used.
Base Image, Small Image, Thumbnail
You can associate a specific image from the Image gallery to any image attribute.
By default the image attribute available in Magento are:
- Base Image: image that appears on the product page
- Small Image: image that appears on the category page
- Thumbnail: image that appears on the cart, on the checkout, on the customer account...
If you have created your own image attributes in your stores, these attributes will be visible in this section.
Swatch attributes
Swatch
You can import/update Swatch attributes using their label for the default store:
magenta
You can also use the below parameter:
- color
You must add the hexadecimal code for the color in the below format:
label[color=#HEXACODE]
red[color=#FF0000]
Note that when the color property is not imported, the existing color is kept for the swatch.
The values can also be translated to the different store view languages as below:
label[storecode="translated label"|color=#HEXACODE]
red[fr="rouge"|de="rotte"|es="rojo"|color="#FF0000"]
To remove the existing color for the swatch, you can import the color property using the empty value.
indigo[color=empty]
Category attributes
The categories associated with the products can be imported/updated with new values.
You have the possibility to choose the action between:
- Replace all categories with
- Add to the categories
- Remove from the categories
Category mapping
List your category names (case sensitive) or category ids separated with a comma:
category ID 1 [position],category ID 2 [position]...
You can use the below parameter to define the position of the products in the categories:
- position
Default value is empty.
For example, to import your product in position 2 in the category ID 10 and in position 1 in the category ID 13, you can write:
10[2],13[1]
10[position=2],13[position=1]
The values will be translated into category paths according to the parameters you have defined in your profile configuration from:
Advanced SettingsCategory Settings
In the case where you don't add the parameter in the syntax, the default value will be used.
For example, to import products in the New Arrivals (ID: 10) and Dresses & Skirts (ID: 13) categories, from the Mapping & rules tab of your profile configuration, map the product attribute of your choice, for example, Add to the categories with a custom value.
In the following field, you can define:10,13
If you prefer using the category names, you could have written:
Default Category/Women/New Arrivals,Default Category/Women/Dresses & Skirts
Categories will be created/updated according to what you've defined in the Advanced Settings tab
Merchandising attributes
The related/up-sell/cross-sell products can be imported/updated with new values.
Related / Cross sell / Up sell products
List of related product SKU's separated by commas.
SKU1,SKU2,SKU3...
Configurable product attributes
With Mass Stock Import & Update you can create configurable products on the fly and create relationships between children and parents.
Parent SKU
Specify the parent SKU.
skuparent
When updating/creating a simple product, you can add the configurable product reference so that the simple products will be automatically associated with the configurable product.
Children SKUs
List of the children SKUs separated by commas.
sku1,sku2,sku3
When updating/creating a configurable product, you can add the children references so that the simple products will be automatically associated to the configurable product.
Configurable attributes
Attribute code or attribute IDs separated by commas as below:
attribute code 1[position],attribute code 2[position]
You can use the below parameter to define the position of the configurable attributes:
- position
Default value is empty.
size[1],color[2]...
In the case where you don't add the parameter in the syntax, the default value will be used.
When creating/updating a configurable product, the configurable attributes must be specified.
Downloadable product attributes
With Mass Stock Import & Update you can import or update downloadable products.
Links title
Title of the downloadable resource.
Downloadable file
Samples title
Title of the downloadable resource.
Downloadable sample
Link URLs
Link to the file (relative or absolute path) and optional file's name separated by a pipe (|).
Link | File name
http://www.example.com/filename.ext | My downloadable file
Sample URLs
Link to the file (relative or absolute path) and optional file's name separated by a pipe (|).
Link | File name
http://www.example.com/filename.ext | My downloadable sample
Grouped product attributes
With Mass Stock Import & Update you can create grouped products and create relationships between children and parents.
Parent SKUs
When updating/creating a grouped product, you can add the parent references so that they will be automatically associated with the grouped product.
List of related parent product SKU's separated by commas
parentsku
Children SKUs
When updating/creating a grouped product, you can add the children references so that they will be automatically associated to the grouped product.
List of related children product SKU's separated by commas
You can use the below parameter:
- position
Default value is empty.
sku1[position=2],sku2[position=1]
Bundle product options
With Mass Stock Import & Update you can add/update or remove options from bundle products.
Add/update an option
Bundle items option title as below:
Bundle items option title [type=select|required=1|option_position=1
|sku=SKU ABC|selection_qty=1|is_default=0|selection_price_type=0|selection_price_value=0
|selection_can_change_qty=0|position=1]
[sku=SKU XYZ|selection_qty=2|is_default=1|selection_can_change_qty=0|position=2]
You can use the below option parameters:
- type
select / radio / checkbox / multi
Default value is select. - required
Default value is 1. - option_position
Default value is 1.
And you can use the below product parameters:
- sku
SKU of the option's products
It is a required value. - selection_qty
Default value is 1. - is_default
Default value is 0. - selection_price_type
Default value is 0. - selection_price_value
Default value is 0. - selection_can_change_qty
Default value is 0. - position
Default value is 1.
Primary bag [type=select|required=1|option_position=1|sku=24-MB01|selection_qty=2|is_default=0|selection_can_change_qty=1|position=1][sku=24-MB05|selection_qty=1|is_default=1|selection_can_change_qty=0]
The above example will create the following option:
In the case where you don't add the parameter in the syntax, the default value will be used.
Remove an option
Bundle items option title to remove
Accessoiries
The above example will remove the "Accessoiries" option.
Custom options
With Mass Product Import & Update you can import or update your product custom options.
Dropdown / Radio / Checkbox / Select / Multi-select
Custom option title and option values in the following format:
Custom option [title=title1|sku=sku1|price=10%|sort_order=1][title=title2|sku=sku2|price=10|sort_order=2]
You can use the below parameters:
- is_require
If the custom option is a required field: is_require=1.
Default value is: is_require=0 - title
Default value is empty. - sku
Default value is empty. - price
Note that the price can be a percentage or a fixed amount.
10 or 10%Default value is null. - sort_order
Default value is null.
In the case where you don't add the above parameters in the syntax, the default values will be used.
Engraving [is_require=1|title=Gold engraving|sku=engraving01|price=20%|sort_order=1][title=Silver engraving|sku=engraving02|price=10%|sort_order=2]...
Engraving [title=Gold engraving|sku=engraving01|price=50|sort_order=1][title=Silver engraving|sku=engraving02|price=30|sort_order=2]...
Text Field / Textarea
Custom option title and option values in the following format:
Custom option Text [is_require=1|title=text|sku=txt|price=10|sort_order=1|max_characters=100]
You can use the below parameters:
- is_require
If the custom option is a required field: is_require=1.
Default value is: is_require=0 - title
Default value is empty. - sku
Default value is empty. - price
Note that the price can be a percentage or a fixed amount.
10 or 10%Default value is null. - sort_order
Default value is null. - max_characters
Default value is null.
If no value is defined for the above parameters, the default values will be used.
Custom option Text [is_require=1|sku=txt|price=10.00|sort_order=1|max_characters=100]
File
Custom option title and option values in the following format:
Custom option Text [is_require=1|title=text|sku=txt|price=10|sort_order=1|file_extension=jpg]
You can use the below parameters:
- is_require
If the custom option is a required field: is_require=1.
Default value is: is_require=0 - title
Default value is empty. - sku
Default value is empty. - price
Note that the price can be a percentage or a fixed amount.
10 or 10%Default value is null. - sort_order
Default value is null.
- file_extension
Default value is null.
If no value is defined for the above parameters, the default values will be used.
Custom option File [sku=upload|price=99.99|sort_order=2|file_extension=jpg,png,gif]
Replacement rules
Mass Product Import & Update allows you to control the data output by using replacement rules.
Create a replacement rule
You can create your own rule from:
SystemMass Product Import & UpdateReplacement Rules
Click on Create a new Rule.
Create a replacement rule manually
You can create your own rule manually.
Fill in a name and add the values you need to replace in the Input column with other values in the Output column.
For example, the below example shows how to replace each "Summer 2018" with "Summer 2019" and all the rest with "This season".
Note that you have the possibility to use regular expressions.
Import a rule set from a CSV file
You also have the possibility to import a rule set directly from a CSV file.
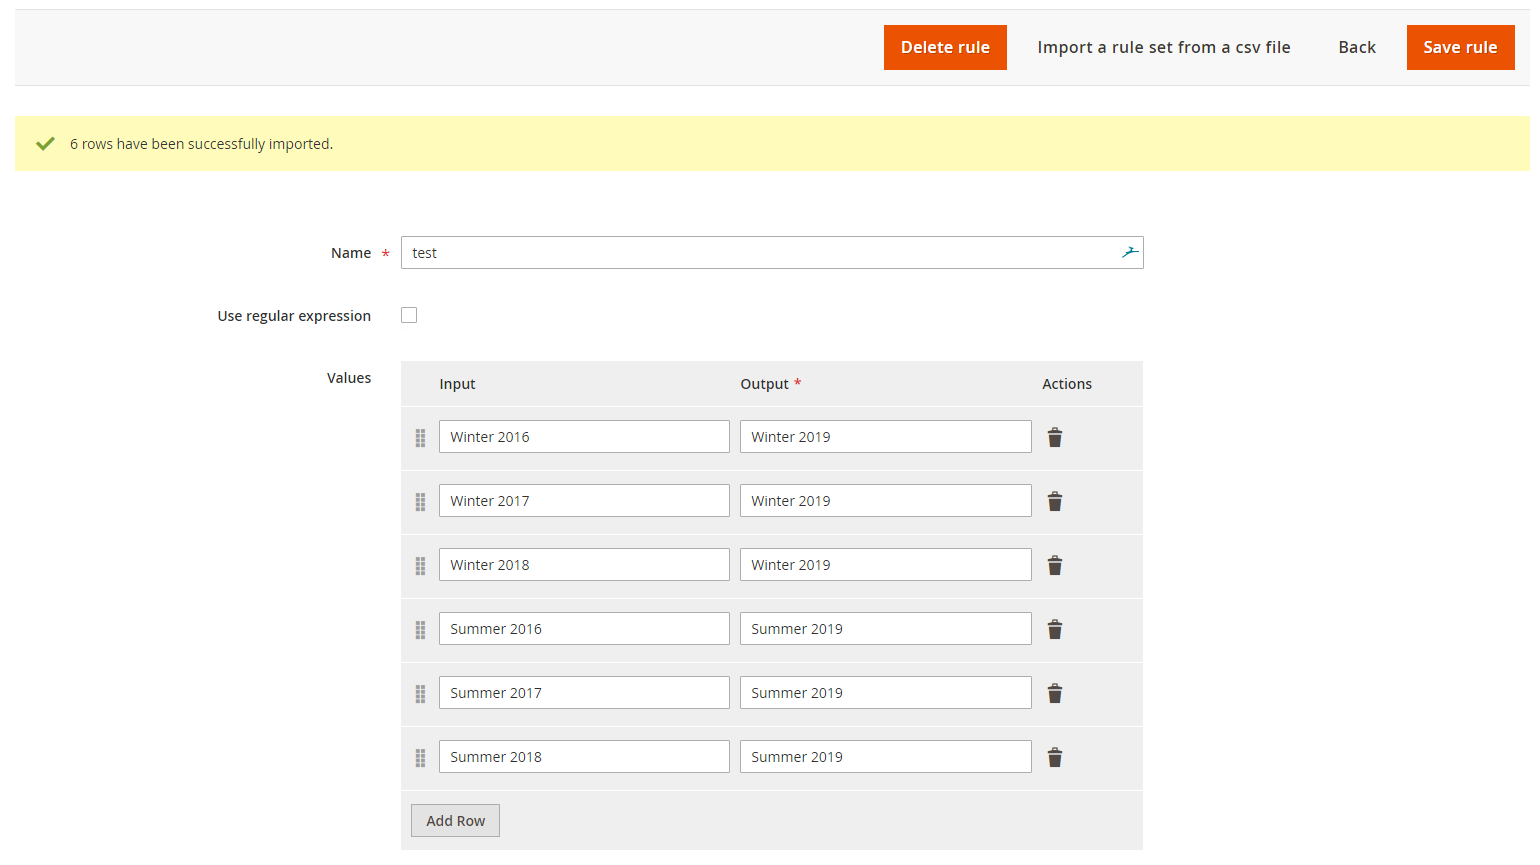
Click on Import a rule set from a CSV file and choose your CSV file. Click on Import.
The CSV file must be composed of 2 columns, the first one for the values to replace and the second one for the replacement values.
These values must be separated by commas and enclosed by quotation marks.
"Winter 2016","Winter 2019"
"Winter 2017","Winter 2019"
"Winter 2018","Winter 2019"
"Summer 2016","Summer 2019"
"Summer 2017","Summer 2019"
"Summer 2018","Summer 2019"
Once the lines have been imported, you receive a notification.
Use a replacement rule in your profile
Select a replacement rule
Once your rule is saved, you can use it in your profile from:
SystemMass Product Import & UpdateProfiles
For the attribute you want to edit, click on the ab icon.
A popup displays where you can select the rule you want to apply. Select the rule and click on Validate.
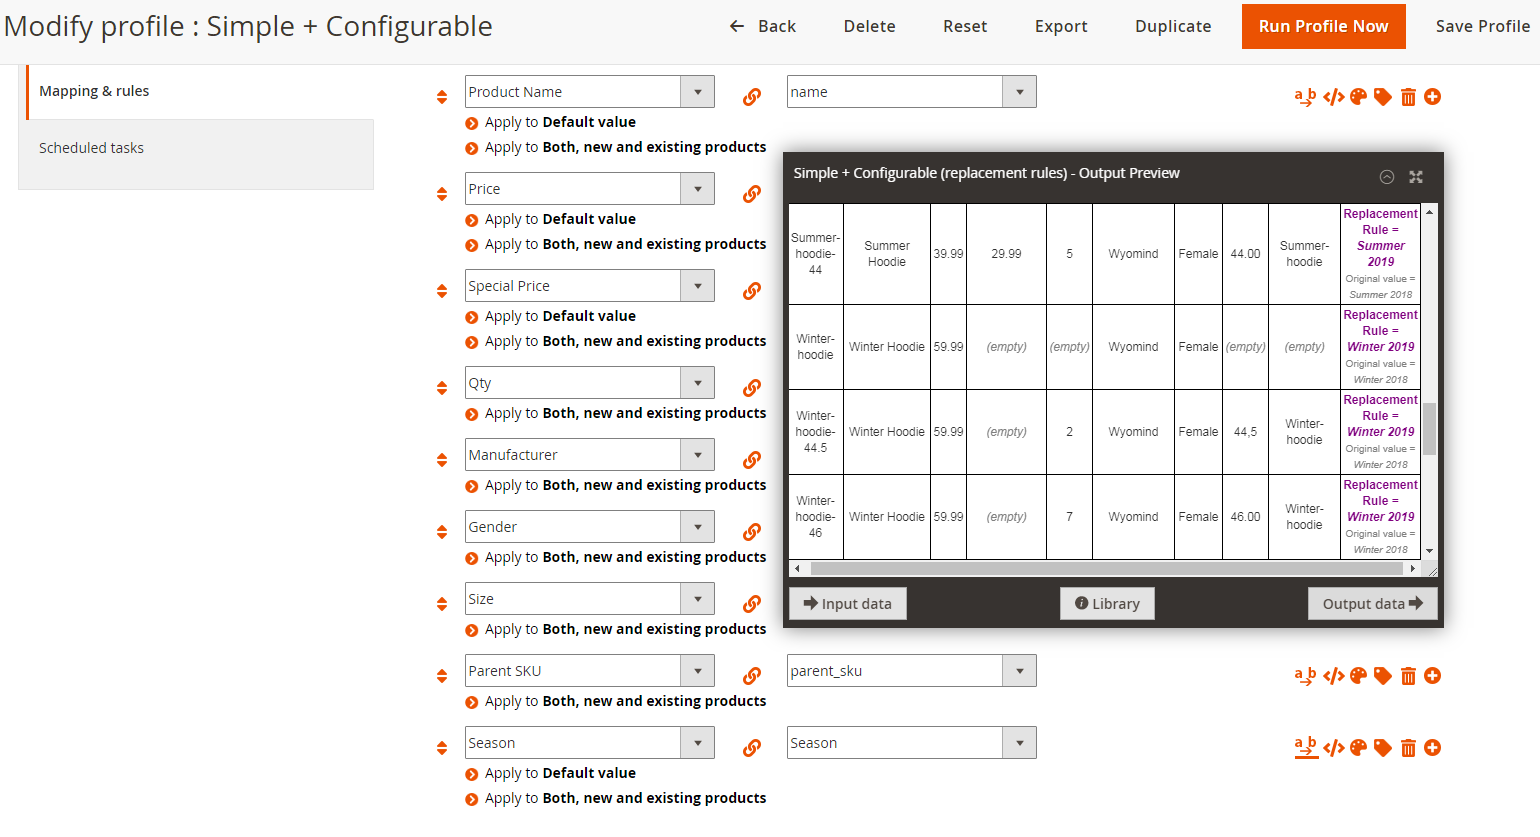
Output the replacement rule value
If you click on Output Data from the black box, you should see the replacement rule value in purple followed by the original value in grey.
PHP API for Mass Product Import & Update
Mass Product Import & Update allows you to fully customize and control the data output by using PHP scripts in different ways.
API coding standards
For each line in the Mapping & Rules tab of your profile, you can add your own custom script based on a PHP syntax.
To add your custom script, click on </> at the end of the line you want to edit. You can then update on the file the value of each column.
Opening and closing tags
<?php /* Your custom script */ return $self;Outputting a value
return
Any value that you want to output in your profile, must be returned with the return instruction.
$this object
$this->skip() or return false (boolean false)
To ignore the pending line (all the columns of the line).
$this->skipRow() or $this->skip() or return false;
To ignore the pending cell as well as all the following cells.
$this->skipCell() or return true;
To ignore the pending cell.
Variable $cell
You can call any column of the source file using $cell. It is an array that indexes each column numerically (1,2,3,...) and with a key corresponding to the name of the column header ("name","description","price"...).
$cell["name of the column"] or $cell[INDEX]
For example:
return $cell["description"]. " ".$cell["name"]Variable $self
$self
To retrieve the current value of the column and manipulate the data:
<?php return $self;For example:
<?php return strtolower($self);Examples of use
Below are some examples of use with the PHP API.
Change the separator
Transform a number with a floating value separated with a dot instead of a comma.
For example:
<?php return number_format(str_replace(",",".",$self),2,".",""); ?>Change a text to lowercase or capital letters
Change a text in lowercase and add a capital letter as the first letter of each word.
For example:
<?php return ucwords(strtolower($self)); ?>Retrieve images
Retrieve only one image from a list of images.
For example:
<?php return array_pop(explode(",",$self)); ?>Group several columns
Put together several columns to create a description.
For example:
<?php return $self." ".$cell["product_name"].", starting at $".$cell["price"]; ?>Define the visibility of a product
Define the visibility of a product depending on a column value.
For example:
<?php
switch($self){
case "parent":
return "Catalog, Search";
break;
default:
return "Not visible individually";
}
?>
Map value to other ones
Map values to other ones.
For example:
<?php
if($self=="something"){
return "something else";
}
else if($self=="foo"){
return "bar";
}
else{
return "default value";
}
?>
Retrieve values based on conditions
Output values based on different conditions.
For example:
<?php
if ($self > 200) return "0";
else return $self;
?>

 Magento 2
































 I bought the Mass Product Import & Update extension as I needed to import products to my website daily from feeds provided by the various distributors. We work with about 60,000 products with various distributors this tool helped us to have updated stocks with few errors.
 my experience is 2 website on same machine, the first website; 4.000 products (Configurable and Simple) second 110.000 products (Simple products) in any case, it can manage both. Time for sync proliant G8 dual Xeon 32gb ram dedicaded. 4.000 products: about 3 minutes. If you have already update images is a dream machine. 100.000 products: not easy to config, time to execute 4/5 hours. be carefull to Elasticsearch issues, if it fail the process looping and you have to work for let it run flawless. you need a good skill in Magento and Linux system, moving thry logs and fixes. the support is ok.
 I bought the extension Mass Product Import & Update as I needed to import products to my website daily from a feed that a large distributor provides me. The support was impeccable and the extension does exactly what it sets out to do.
 We found evrything we want on this extension. we have about 30 xml from diffrenet vendors and about 150.000 products udated daily with out any problem Its real fast and flexible
 The extension is widely used here for daily stock import, but also for new items. However, the manual could have been a bit more extensive and especially the php api
 We were looking for a tool that could allow us to handle stock updates and new product imports, witout creating mess with the magento 2 installations. This tool from wyomind, although not super immediate to configure, has done the job, also thanks to the super assistance by their support team
 Je pense que le module Data feed Manager et celui ci sont les modules les plus important de Magento 2 ! On peut vraiment tout faire avec les 2 combinés. Merci à Wyomind pour ces modules exceptionnels
 Rich in features but a bit complicated. It is need some technical knowledge to deal with it. Very helpful customer service team (they even provide technical support and assistance after the end of the technical support period). Thank Wyomind Team
 By far the best solution we tried which is directly incorporated into magento. There is one other solution that is desktop based and is excellent aswell. But as far as this one goes it's really by far the most flexible one that allows to incorporate your own scripts into the process directly. No match out there. If you have this solution no need for anything else to keep your products and stock up to date.
 This module is perfect for us because we have multiple suppliers and Mass Product Update and Import allows us to easily duplicate an existing profile and make the necessary changes. The fact that you can use PHP to manipulate the data straight from the Admin Panel is absolutely amazing.
 We're using this extension on every single Magento website we have and saves us a lot of time! The support is top notch and happy to assist every single time fast and efficiently! Would recommend with no hesitation!
 I have been using this extensions for more than 6 months and this extension is simply great and the features provided in the extension are very good. Support of the extension is great and team is highly responsive and always tends to provide the solution. I highly recommend this extension to everyone if they are looking forward to do a frequent product import. Extension is highly configurable and you can achieve almost all of your requirements by tweaking the settings in the admin panel
 Loved this extension , The extension offers number of options to execute your own demands. Like :- - Number of file support to import products. - Mapping of fields is really great , you organise in proper way if there there is so many fields to import. - Best thing s is you add your own script as well to for every field , like in my case I needed to store LxWxH in one custom attribute and it was possible only because of custom script option provided by extension.
 The extension offers many possibilities to customize it as we like to suite our needs and when we need to something additional the support is very helpful and proactive. Great extension with awesome support.
 This is the best and most advanced plugin to make custom imports in Magento 2. We're using it for a serval customers and almost nothing is impossible. We'll keep using it in future projects, we will recommend everyone who need to import products to use Wyomind
 The Mass Product Import & Update extension has been an absolute game changer for us. We are using it to connect to our PIM which means that our product info is able to be consistent across all of our systems. It allows us to run the export/import of data on a regular schedule as well as trigger it to run on our own when we need a quick update. This has made our site way easier for our non-technical team members to manage and saved us the time and money of creating a custom solution. The Wyomind team has been super responsive and supportive when we need help as well.
 The code and support are excellent!
 wyomind doing great job for product imports. we have more than 60K products and we schedule both imports and updates with separate profiles... Now this module made life easier. No touch to system, but system making scheduled imports and updates... Both xml and csv imports are available and also configurable import PAIN finished for us. Thanks a alot for this great extension I highly recommend...
 Great product work as expected easy to install. User friendly Interface to import and export CSV/XML file. Feature is great easy to map the columns . It is saving lot of time to update /Add records . Great and quick support!
 This extension helps a lot with the import and export, that is not easy at all to manage just with the standard Magento feature. Great works!
 This extension was easy to install and worked as expected out of the box. It has been a quick csv processing workhorse for us for 1+ years. Though rarely needed, Wyomind support is phenomenal. While many of the other extension providers tend to pass the buck and blame other extensions or your theme or play the language barrier game, Wyomind provides quick answers and solutions. Definitely recommended!
 We have been using this extension on our site for a while now and its a much welcomed improvement to the default Magento import tool. We import a large number of products and this has dramatically reduced the amount of time spent manipulating CSVs. Would definitely recommend!
 The module is very useful and the support is fast.
 We have been using this plugin to pull data from our supplier and update catalogue, around 12.000 entries. After set up cron tasks are executed in the background so no manual action is required.
 This module works out of the box to help you manage/update larger catalogs. Proactive support and the best update extension in the market.
 Wyomind has always been great at answering our questions and helping us pick the right module. Their support is great and they are very helpful with installing and keeping the the moduls running.
 Since I became aware of wyomind, I always try to use one of their modules first, if there is one for my current project. It started with google simple shopping. Then a long time passed and then I came across wyomind again when I needed modules for the article import and the order export. And the experiences I made then led to the fact that I now look here first to see if something is available for my current goal. The support is simply outstanding. I don't think I have ever waited longer than 1 hour for an answer. And even more important: No matter who answers you from the support team, everyone is obviously very competent in their extensions on a technical level. Up to now I always had the feeling to communicate with a technician and not with a sales person. For me this makes a big difference to other developer studios. If I may make a wish: Please develop a mega menu and a OneStepCheckout. I would change immediately! :D
 Import-export extension it's just the best we win a lot of time we upload 3000 products in minutes with no problems we are steel using the extension for a lot of mass action work... The support as always was excellent with a very very fast reply Awesome extensions! the best support! highly recommended.... Thank you wyomind Keep Up the Good Work!
 We use this for all mass changes to our catalog as well as for new products. Sometimes a little tricky to get it right but most of the time it is very easy - even for me that is just a merchant. We also use it for updating stocks through CSV files from a third party ERP system. Importing new items is quite easy as we have done many mass imports with 2000+ sku's.
 We were looking for a module to handle large files with new products and product updates that I found here. After importing the module and testing the module on test environment, I was impressed with the import speed and how seamlessly it all ran. There have been no problems so far. It would be nice if the module could handle Json. :-)
 Its been 1 year using this extension in Magento V2 and highly satisfied with the extension so far. We have 100,000 of products that's been imported and updated daily and wyomind does a fantastic job here.
 It makes uploading products very fast and in a consistent way.
 The module Mass Product Import and Update from wyomind is very helpful. We have a tremendous number of products and the module helps to get fast on this organization. The simplicity of excel usage, gets super fast the update of products.
 We were looking for a secure, agile way to get an automated daily catalog update and a scheduled sales exportation. Wyomind got the job done with 2 affordable but full-fledged extensions that allow for thousands of updates in no time, as well as sending sells in a reliable way. Furthermore, Wyomind support helped us a lot to patiently address the typical early days issues.
 The module updates the stocks daily here. This is quick and well-arranged. However, when importing new products I ran into a bug. The module first updated and the bug was gone. Unfortunately a new bug has been added that now needs to be fixed. I can't adjusted the fields anymore in the latest version. Also the stock is not updated anymore.
 This extension is a life saver for businesses need to update their stock or retrieve data from other websites. Highly recommended.
 Great plugin overall. Worked perfectly and simplified our uploads. Never contacted support in 1 year using it. Always good
 Actually, it seems an easy task to use csv files and Magento 2 to import the products. But if you want to do this automatically without the Enterprise Edition, you will quickly come up against limits. There are many providers for such a module, but none offers this quality and flexibility. Thanks for this module. :)