solutions for e-commerce

14 years of business 2578 reviews 4.9 average rating
User guide

What are Rich Snippets?

Rich Snippets is the term used to describe structured data markup that site operators can add to their existing HTML, which in turn allows search engines such as Google to better understand what information is contained on each web page.

The benefits of these Rich Snippets are:

  • Better ranking in the search engines results pages
  • Better visibility of your product information in the result pages of the search engines (price, availability, ratings...)
  • Automatic update of your product data in Google Merchant Center

The Rich Snippets may be built with different markup :

  • Microdata
  • Microformats
  • RDFa
  • JSON-LD (recommended by Google)

The Google Rich Snippets extension allows applying in a few minutes the required structured data to the product pages of your website and taking benefits of the search engine optimizations.

How to use Google Rich Snippets for Magento?

Create a Rich Snippet template with the wizard

Creating a new Rich Snippet template is really easy and quick with the Google Rich Snippets extension.

Go to:

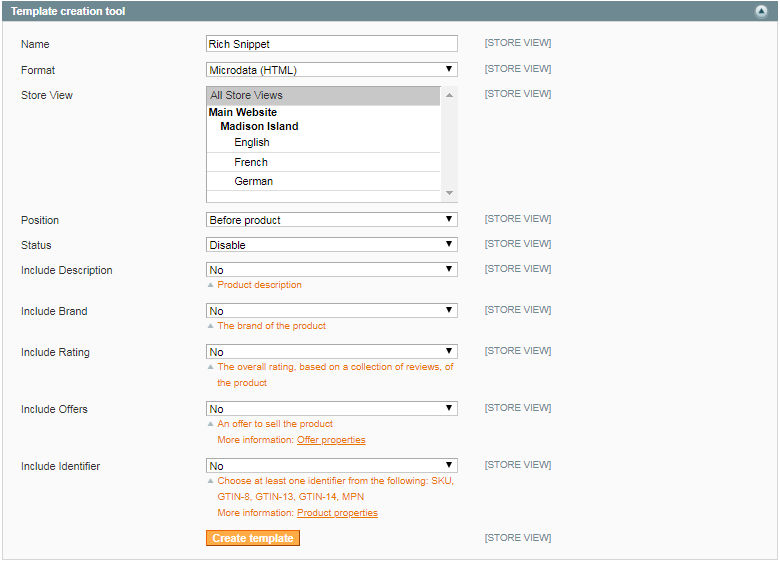
system configurationWyomind Rich SNippets managERTemplate creation tool
Name

Give a name to the new Rich Snippet template that you are creating.
This name is only visible in the back-office and doesn't have any incidence on the front-end.

Format

Choose the Rich Snippets format to use:
  • Microdata (HTML)
    The microdata is based on the schema.org syntax and adds invisible HTML tags in your pages that describe the content of your pages.
  • Json-LD (recommended by Google)
    Json-LD is a syntax that is recommended by Google. This syntax is based on JSON and makes the content easy to read for human eyes.

Store view

Select the store view(s) to which the Rich Snippet template must apply.

Position

Choose in which part of the page the Rich Snippet template must be applied.
  • Before the product
    That option is not recommended, except if you are using Google Rich Snippet for other purposes than the Rich Snippets management.
  • After the product (recommended)
    All resources that are not necessary to the visitors of your website or for which the payload can differ must be placed below the fold (Google Insight recommendations). That's why we suggest placing any Rich Snippets after the product data. 

Status

Define if the Rich Snippet is enabled or not.
A template that is not enabled will not have any incidence on the front-end.

Include Description

Indicate if the Rich Snippet must include the description of the product or not, if necessary, which attribute must be used.

Include Brand

Indicate if the Rich Snippet must include the brand of the product or not, if necessary, which attribute must be used.

Include Ratings

Indicate if the Rich Snippet must include the rating of the product or not, if necessary the customers' review as well.

Include Offers

Indicate if the Rich Snippet must include the price and the availability of the product.

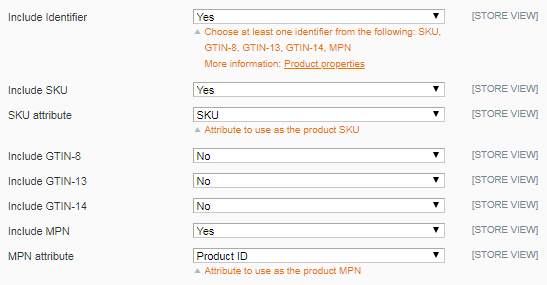
Include Identifier

Indicate if the Rich Snippet must include one or more unique identifiers of the product, and if necessary, which ones must be used from the below:
  • SKU
  • GTIN 8
  • GTIN 13
  • GTIN 14
  • MPN

Once the template is configured, you can click on Create template, the template will be automatically saved in your Rich Snippets templates library. You will then be able to update this template in:
Catalog Rich Snippets Manager

Test the template

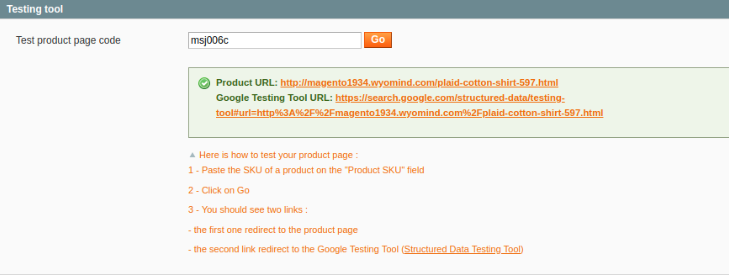
Thanks to Rich Snippet Manager, you can test the result of the Rich Snippets that are present in your product pages.
To do so you just have to insert the product's SKU that you want to check in the testing tool and then click on GO, from:
system configurationWyomind Rich SNippets managerTesting tool

Two links appear:

  • The first link is the one of the product page as you customers see it.
  • The second link is a direct link to the Google testing tool, Google Structured Data Testing Tool: this tool allows you to visualize the Rich Snippets as Google sees them, and if necessary, to identify potential errors and to fix them.

Refine the Rich Snippets thanks to the editor

Rich Snippets Manager creates for you a PHTML template from your settings while creating a Rich Snippet template from:
System Configuration

The template is then converted automatically into PHP, HTML, and/or JSON code without any further action required from your end.

However, you can edit and update the templates from the editor available in Google Rich Snippets. To do so, go to:
catalogRich snippets manager

The grid lists all the rich snippets available in your library.

Editing the code of the rich snippets requires a good understanding of the PHP code and also a basic knowledge of HTML.

The black box

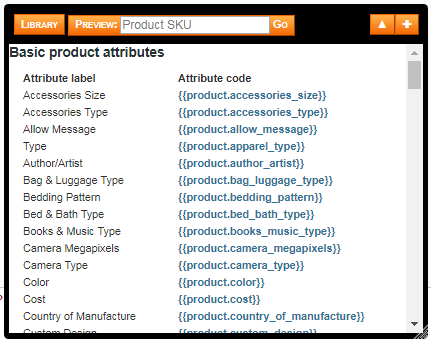
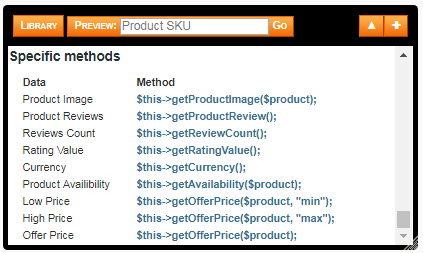
In order to make the editing of the rich snippet easier, the rich snippet editor includes a toolbox (so-called the "Black Box").

This toolbox allows visualizing several things. 

Placeholders

You can check the different placeholders available for the products under Basic product attributes.

Methods

The available methods of the PHP API are listed under Specific methods.

Preview

You can check the result of the rich snippet for a given product by adding the SKU of a product in the Preview.

Predefined objects and placeholders usage

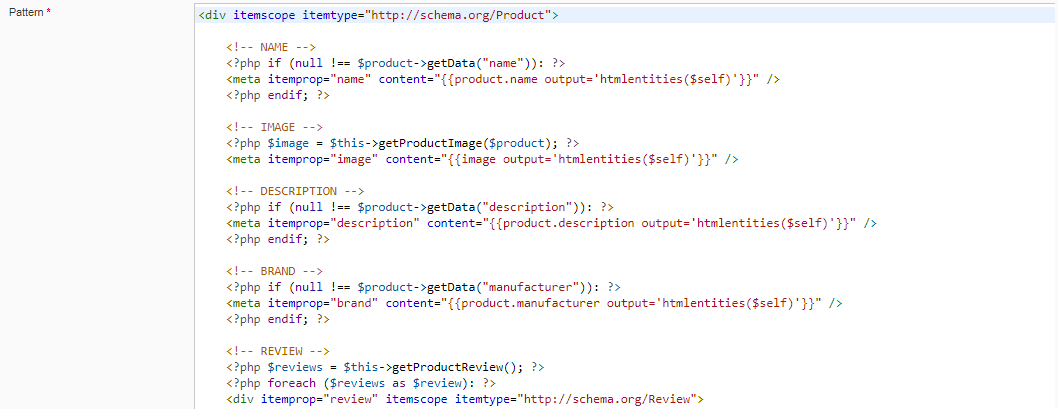
When editing a Rich Snippet template, a code editor appears and displays the code used by the rich snippet.

The source code of the template uses PHP code samples and placeholders (also called shortcuts) that make the source code editing easier to read and edit.

The syntactic colorization will help you to write PHP and HTML code.

Product data

$product is an instance of the Catalog/Product model.

/**
* Catalog product model instance
*
* @var Mage_Catalog_Model_Product
*/
var $product;​

The product attributes are available through the usual methods:
  • $product->getData("attribute_code");
  • $product->getAttributeText("attribute_code");
  • $product->getAttributeCode();

  
For example:

<?php
// Display a product SKU
echo $product->getSku();
// Display a product NAME
echo $product->getData("name");
// Display a product DESCRIPTION
echo $product->getDescription();
// Display a product MANUFACTURER
echo $product->getAttributeText("manufacturer");


Product attributes are also available through the placeholders as follows:

{{product.attribute_code}}

  
For example:

<!-- Display the product SKU -->
{{product.sku}}
<!-- Display the product NAME -->
{{product.name}}
<!-- Display the product DESCRIPTION -->
{{product.description}}
<!-- Display the product MANUFACTURER -->
{{product.manufacturer}}

Reviews data

$reviews is an instance of the Review/Review_Collection model.
/**
* Product Review model instance
*
* @var Mage_Review_Model_Review
*/
var $reviews;​​


If you want to iterate through each element of the collection, then you must use a foreach loop, as follows:

foreach($reviews as $review){
...
}

Each review is available through the $review variable and the properties are available through the usual methods:

  • $review->getData("attribute_code");
  • $review->getAttributeCode();

  
For example:

<?php foreach($reviews as $review): ?>
    <div itemprop="review" itemscope itemtype="http://schema.org/Review">
        <meta itemprop="name" content="<?php echo $review->getTitle(); ?>"/>
        <meta itemprop="author" content="<?php echo $review->getNickName(); ?>"/>
        <meta itemprop="datePublished" content="<?php echo $review->getCreatedAt(); ?>"/>
        <div itemprop="reviewRating" itemscope itemtype="http://schema.org/Rating">
        <meta itemprop="ratingValue" content="<?php echo $review->getScore(); ?>"/>
    </div>
    <meta itemprop="description" content="<?php echo $review->getDetail(); ?>" />
    </div>
<?php endforeach; ?>


The data related to the reviews are also available through the placeholders as follows:

{{review.attribute_code}}

  
For example:

<?php foreach ($reviews as $review): ?>
        <div itemprop="review" itemscope itemtype="http://schema.org/Review">
        <meta itemprop="name" content="{{review.title output='htmlentities($self)'}}" />
        <meta itemprop="author" content="{{review.nickname output='htmlentities($self)'}}" />
        <meta itemprop="datePublished" content="{{review.created_at output='htmlentities($self)'}}">
        <div itemprop="reviewRating" itemscope itemtype="http://schema.org/Rating">
        <meta itemprop="ratingValue" content="{{review.score output='htmlentities($self)'}}" />
        </div>
        <meta itemprop="description" content="{{review.detail output='htmlentities($self)'}}" />
        </div>
<?php endforeach; ?>

PHP API usage

Rich Snippet Manager offers a few methods that allow to access the data related to the products easily.

Image

Get the image of a product:

/**
* Get product image
* 
* @return Mage_Catalog_Helper_Image|string
*/
$this->getProductImage($product);

Average rating and number of reviews

Get the number of reviews left by the customers for the product:

/**
* Retrieves total reviews
* 
* @return string
*/
$this->getReviewCount();

Get the average rating of the customers for the product:

/**
* Get rating value
* 
* @return float
*/
$this->getRatingValue();

Currency

Get the store view currency:

/**
* Get currency
* 
* @return string
*/
$this->getCurrency();

Availability

Get the availability of the product:

/**
* Get product availibility
* 
* @return string
*/
$this->getAvailability($product);

Price

Get the price for the product, the minimal price, and the maximum price:

/**
* Get offer price according to product type
* 
* @param string[min|max|NULL] $which
* @return float
*/
$this->getOfferPrice($product, $which = null);

PHP variables

All PHP variables that are initialized in the Rich Snippet editor are available through the {{placeholders}}. 
  
For example:
<!-- RATING -->
{{ratingValue output='htmlentities($self)'}}
 <?php $reviewCount = $this->getReviewCount(); if({{ratingValue output='htmlentities($self)'}} return "{{ratingValue output='htmlentities($self)'}}";)?>
 <?php if ($reviewCount > 0): ?>
 <?php $ratingValue = $this->getRatingValue(); ?>
 <div itemprop="aggregateRating" itemscope itemtype="http://schema.org/AggregateRating">
  <meta itemprop="ratingValue" content="{{ratingValue output='htmlentities($self)'}}">
  <meta itemprop="reviewCount" content="{{reviewCount output='htmlentities($self)'}}"/>
 </div>
 <?php endif; ?>

PHP functions in attribute calls

You can use any PHP function to apply in the attribute calls even if the function requires one or more additional arguments, for instance:

{{ratingValue output='htmlentities($self)'}}

Enhance the visibility of your Magento® website in Google's search result pages

100% Easy

Thanks to the creator wizard, you can create new rich snippets templates in no time without any coding knowledge.

100% Customizable

Once the template is created you can edit, update, and customize the rich snippet template to refine the data.

100% Compatible

Our extension allows managing any type of Rich Snippets (JSON-LD, schema.org, RDFa,....) and supports all product types.

Freqently Asked Questions
Pre-sales informations

This extension works with Magento Community Edition and also Magento Enterprise Edition. To know if Google Rich Snippets is compatible with your Magento version, please check the Compatibility tab. 

License and domains

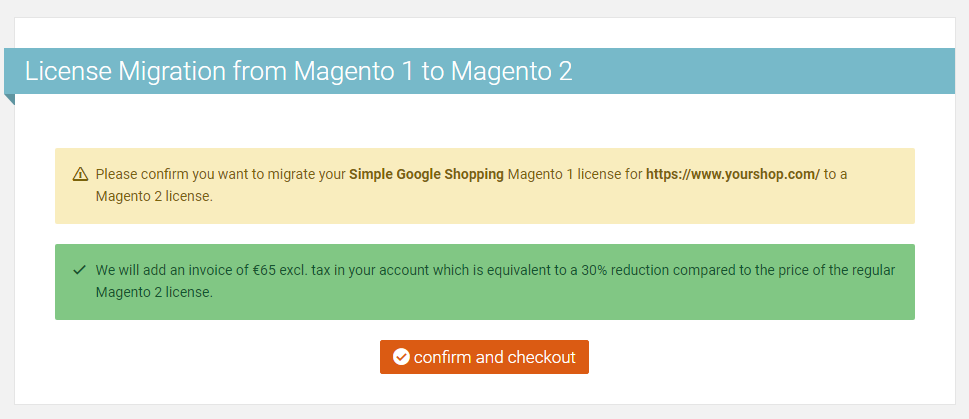
We offer our customers who want to migrate their Magento 1 license to a Magento 2 license, the transfer at a reduced price. 
You have the possibility to migrate your license directly from your Wyomind account in:
My accountLicenses & Downloads

Click on migrate to magento 2  in front of the extension and the domain you want to transfer. 

Confirm you want to migrate your license to a Magento 2 license by clicking on Confirm and checkout .

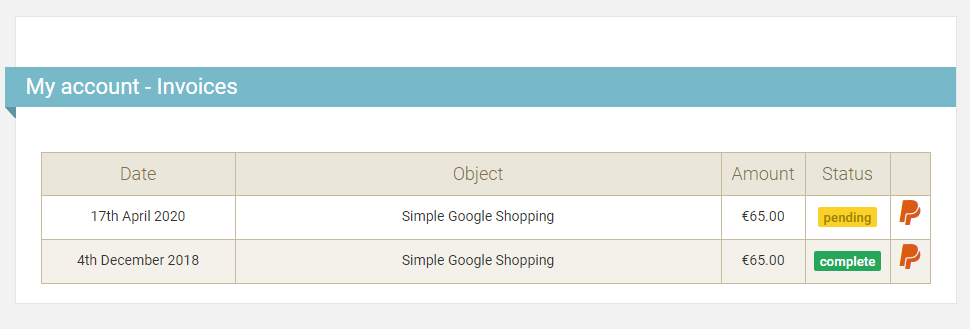
An invoice will be automatically added to your account from: 
My accountInvoices


The price of the transfer is equivalent to a 30% reduction compared to the price of the regular Magento 2 license.

You can proceed to the payment by clicking on PP .

Once the payment is done, you can go back to: 
My accountLicenses & Downloads

There you will be able to download and install your license for Magento 2. 

Note that your license for Magento 1 will remain active indefinitely in your Wyomind account in order for you to migrate with peace.
A license is valid for an unlimited period of time on one single Magento installation.

If you use more than one Magento installation, you will have to buy a separate license for each one.

If you run several domains on the same Magento installation, you will need only one license for all of them.

Although your license doesn’t have a limited period of validity, your support period does. By purchasing an extension, you’ll be granted a 6-month support period for free. Passed this period, you will have to renew your Support plan (see FAQ: How to extend my support period?).

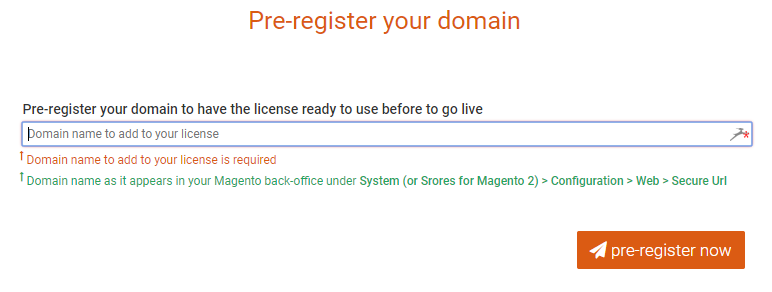
You can pre-register your live domain to your license in advance.

Thanks to this option, you'll be able to get the extension ready to use on your domain before it goes live.

To pre-register your production domain: 

  1. Go to:
    mY accountLicenses & DOwnloads
  2. Click on  next to the extension you want your domain to pre-register on.
  3. Click on the link at the bottom of the page saying:
    Do you want to pre-register your domain in order to be ready to go live?
  4. Finally, enter your domain name and click on pre-register now .
Attention, this doesn't mean your license is activated. You'll still have to activate it on your new domain when the extension is installed. 

One license is valid for an unlimited period of time on one Magento installation only.  

It is possible, however, to extend or transfer your license in 2 cases: 

  • If you'd like to add your testing environments to your license.
    In this case, it is possible to extend your license to an unlimited number of domains for free.
    For example mywebsite-staging.com or mywebsite-dev.com
  • If you want to transfer your license to another live domain.
    In that case, the support period for your license must still be active.


To be able to use Google Rich Snippets on both your production and testing environments, follow the instructions below:

  1. Download Google Rich Snippets.
    (see FAQ: Extensions download)
    .
  2. Install Google Rich Snippets on your production environment.
    (see FAQ: Extensions installation)
  3. Activate the license.
    (see FAQ: Extensions activation).
  4. From your Magento admin panel, enter your current Activation Key in:
    syStem CONFIGuration WYOMING YOUR EXTENSION 
  5. Save your configuration.


Now that you can use Google Rich Snippets on your production environment, repeat the same steps as above on your testing environments.

The only difference this time: a notification will appear in your Magento admin

You will be given a choice between:

  1. buy a new license now
  2. add this domain to my license


Click on Add this domain to my license.

A transfer request will then be sent to our team within an hour.

Once the request is taken care of, you will receive a confirmation email.

If your transfer request is accepted, you can use Google Rich Snippets on both environments at the same time.

The order in which you activate your license on your domains does not matter.
You can start with your staging/dev/local environment or with your live domain, the process will be the same.
Modules versioning and download

In order to download Google Rich Snippets, log into your Wyomind account:

    1. Go to:
      my accountLicenses & downloads 
    2. Click on the  icon next to Google Rich Snippets.

      A new window opens.

    3. Choose the version of Google Rich Snippets.
      You will be able to choose the most recent version of Google Rich Snippets (for both Magento 1 and Magento 2).
    4. Click on  .

Your download can start.

When purchasing an extension from wyomind.com, you benefit from a lifetime upgrade. You can at any time download the latest version of the extension directly from your account. 

To upgrade Google Rich Snippets, follow the steps below:

  1. Go to:
    my accountLicenses & Downloads
  2. Click on  next to Google Rich Snippets.
  3. Choose the latest version of Google Rich Snippets (for Magento 1 and Magento 2).
  4. Click on download .
  5. Install the new version of Google Rich Snippets to update your Magento admin. 

Modules Installation/Uninstallation

To uninstall Google Rich Snippets, go on its zip folder and open it.

You will find a shell file (such as: yourextension-uninstall.sh) that you must execute on both your server and Magento root directory.

Once the uninstallation is over, refresh your cache and enable the compiler back again (if you use it).

Before installing Google Rich Snippets, you’ll have to:

  • Backup your Magento installation in:
    system  tools   backups
  • Disable the compiler in your Magento admin panel if it’s not already disabled:
    system  tools   COMPILATIONS
  • Refresh your cache in:
    systemselect cache typeactionsrefreshsubmit


Now you can install Google Rich Snippets:

  1. Download Google Rich Snippets (zip file) from:
    my account my downloads
    Refer to FAQ here: Extensions download
  2. Once Google Rich Snippets is downloaded, open the folder and unzip it.
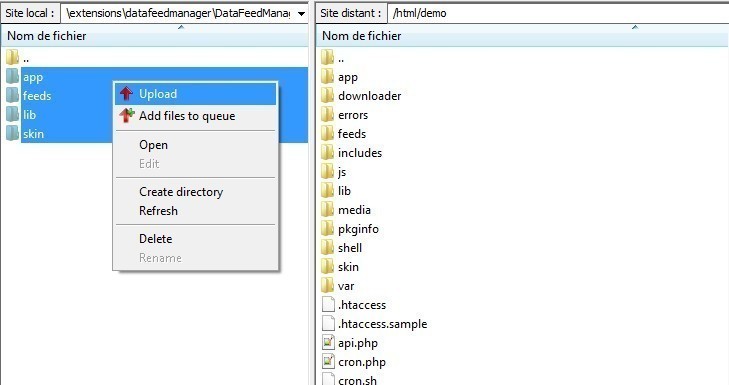
  3. Copy the content of the unzip folder and paste all files and directories in your Magento root directory (the folder content can vary according to the extension but it generally includes app, lib and skin folders).

  4. Once your installation is complete, don't forget to enable the compiler back (if it was already enabled before the installation) and run compilation process.
  5. Refresh your cache, logout from your admin panel and log back in right after.

Next step is to activate your license, to do so, click here: Extension activation

Modules activation

Once Google Rich Snippets is installed, you have to activate the license: 

  1. Go to your Magento admin panel. A message pops up at the top of the page.

    If the message doesn't appear then you must check that:

    Wyomind's License Manager has not been removed from your installation.
    Wyomind's License Manager is enabled in: app/etc/modules/Wyomind_Licensemanager.xml
    The HTML output for Wyomind_Licensemanager and/or Adminhtml_Notification are not disabled in your system under: system   configuration  advanced advanced

  2. Copy your activation key.

    You can find your activation key in 2 different places:
    - In the confirmation email that you received after purchasing Google Rich Snippets
    - In your Wyomind account:MY ACcount My downloads, select Google Rich Snippets and click on  . A new page opens where you'll find your activation key (see below).
  3. In your Magento admin go to:
    SysteMConfigurationWyomindYour extension

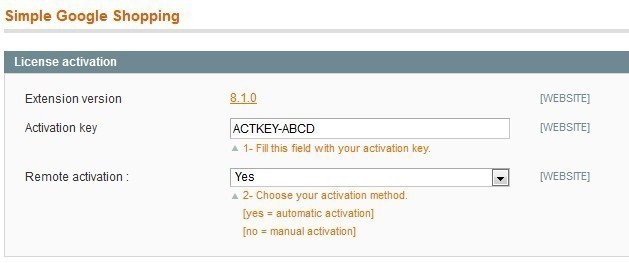
    Paste the activation key in the Activation Key field and choose between the automatic (yes) or the manual (no) activation method:
    - By choosing Yes, the connection to Wyomind license server will be automatic. 
    - By choosing No, you will have to log on to Wyomind license server yourself.


  4. Save the configuration.
  5. Clear your caches. 
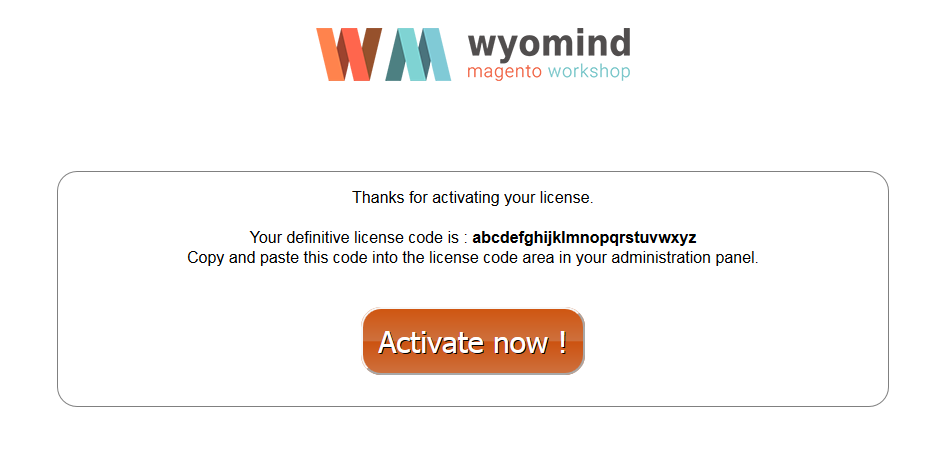
  6. A message appears at the top of your admin panel: Activate it now!  Click on that link.

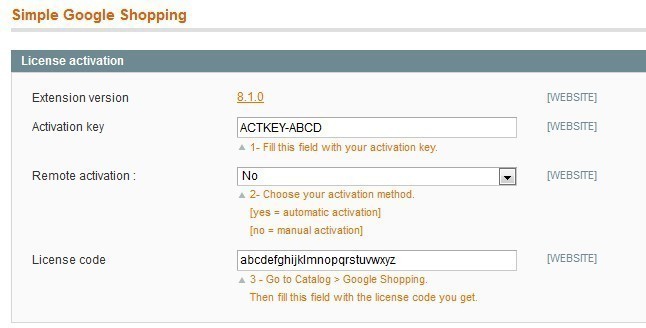
  7. Copy and paste the license code in the License code field from your admin or simply click on Activate now! 
  8. Finally, refresh your cache, log out and log back in straight after, to complete the installation.

To activate the license of an extension that includes other modules, you’ll have to repeat the steps described above for each extension, using the corresponding activation keys (each module has its own activation key).

Troubleshooting

If your site crashes and gives this error message after uploading all files to the correct folders:

Fatal error: Class 'Wyomind_Notificationmanager_Model_Resource_Setup' not found in includes/src/Mage_Core_Model_Resource_Setup.php on line 234

It probably comes from installing an extension while the compiler is still enabled.

Important note:

  • If the compilation is enabled on your website, disable it first before installing any extension from: 
    SystemToolsCompilation
    After installation re-run the compilation process and re-enable the compiler.
  • Before installing any extension, it's advisable to backup your Magento installation.

Here is how to disable the Magento compiler:

  1. Edit the following file: includes/config.php and add a # before the 2 following lines:
    define('COMPILER_INCLUDE_PATH', dirname(__FILE__).DIRECTORY_SEPARATOR.'src');define('COMPILER_COLLECT_PATH', dirname(__FILE__).DIRECTORY_SEPARATOR.'stat');​

    to get:

    #define('COMPILER_INCLUDE_PATH', dirname(__FILE__).DIRECTORY_SEPARATOR.'src');#define('COMPILER_COLLECT_PATH', dirname(__FILE__).DIRECTORY_SEPARATOR.'stat');
  2. Then go back to your website admin and re-run the compilation process.

If you're getting a white page using the extension, you should enable the error reporting in order to display the error. You can do that from index.php.

Most of the time log-out/log-in may solve this issue.
Magento 1 / Openmage Compatibility

Magento 1 / Openmage®

  • 1.1.3
  • 1.1.4
  • 1.1.5
  • 1.1.6
  • 1.1.7
  • 1.1.8
  • 1.2.0
  • 1.2.1
  • 1.3.0
  • 1.3.1
  • 1.3.2
  • 1.3.3
  • 1.4.0
  • 1.4.1
  • 1.4.2
  • 1.5.0
  • 1.5.1
  • 1.6.0
  • 1.6.1
  • 1.6.2
  • 1.7.0
  • 1.8.0
  • 1.8.1
  • 1.9.0
  • 1.9.1
  • 1.9.2
  • 1.9.3
  • 1.9.4
  • 1.10.0
  • 1.10.1
  • 1.11.0
  • 1.11.1
  • 1.11.2
  • 1.12.0
  • 1.13.0
  • 1.13.1
  • 1.14.0
  • 1.14.1
  • 1.14.2
  • 1.14.3
  • 1.14.4

Magento 1 / Openmage® Enterprise (deprecated)

  • 1.1.3
  • 1.1.4
  • 1.1.5
  • 1.1.6
  • 1.1.7
  • 1.1.8
  • 1.2.0
  • 1.2.1
  • 1.3.0
  • 1.3.1
  • 1.3.2
  • 1.3.3
  • 1.4.0
  • 1.4.1
  • 1.4.2
  • 1.5.0
  • 1.5.1
  • 1.6.0
  • 1.6.1
  • 1.6.2
  • 1.7.0
  • 1.8.0
  • 1.8.1
  • 1.9.0
  • 1.9.1
  • 1.9.2
  • 1.9.3
  • 1.9.4
  • 1.10.0
  • 1.10.1
  • 1.11.0
  • 1.11.1
  • 1.11.2
  • 1.12.0
  • 1.13.0
  • 1.13.1
  • 1.14.0
  • 1.14.1
  • 1.14.2
  • 1.14.3
  • 1.14.4
User's reviews
Log into your account to leave your review and get up to 3 months of free Support & Upgrade.

6th June 2018

The BEST rich snippet extension out there by far! (and we tried quite a few)!

For months we've been looking for a rich snippet extension that will easily allow us to have full control. Been searching up and down the web for something that is easy enough to use and extremely powerful with no luck. Until we got in touch with Wyomind and told us that they are working on an extension which will just do that! We decided to wait! And all this waiting worth every day/hour/second! Finally out! Using this extension we were able to fix lots of issues in our Google merchant center and we are not tied up on what more we can do with it - the sky is the limit! Not to mention the support from Aurelie which is top notch every time we have a question or problem. Extremely fast response and helpful advice! I can't fault this company. Their support is just like next door and will answer any query in no time! For any Magento 2 extensions we need they are the first to look first! Thank you so much Wyomind for making our life so much easier!

Changelog

Initial release for the master version

Initial release for the legacy version

Enhancement

  • New testing tools with quick links to check the rich snippet in Google's testing tool and direct link to the page
Patch v2.1.0.1

  • Fix on the currency according to the storeview selected

First public release

Patch v2.0.0.2

  • Fix on the currency according to the storeview selected

Patch v2.0.0.1

  • Fix for the template generator

Demo store
Front-end
Back-end
Login
GoogleRichSnippets
Password
GoogleRichSnippets123

Stay tuned and get a coupon code of 10% off any purchase while creating your account!

Subscribe now for updates, promotions and products launch twice a month at most.

Please indicate a valid email