How to use the Enhanced Autocomplete for Elasticsearch 6/7 extension?
Elasticsearch is a real-time distributed search and analytics engine that allows you to explore your data very quickly. It is used for full-text search, structured search, analytics, and all three in combination.
And it packages up all these functionalities into a standalone server that your application can talk to via a simple RESTful API, using a web client from your favorite programming language, or even from the command line.
The Enhanced Autocomplete extension will allow you to make the link between the search and analytics engine and Magento.
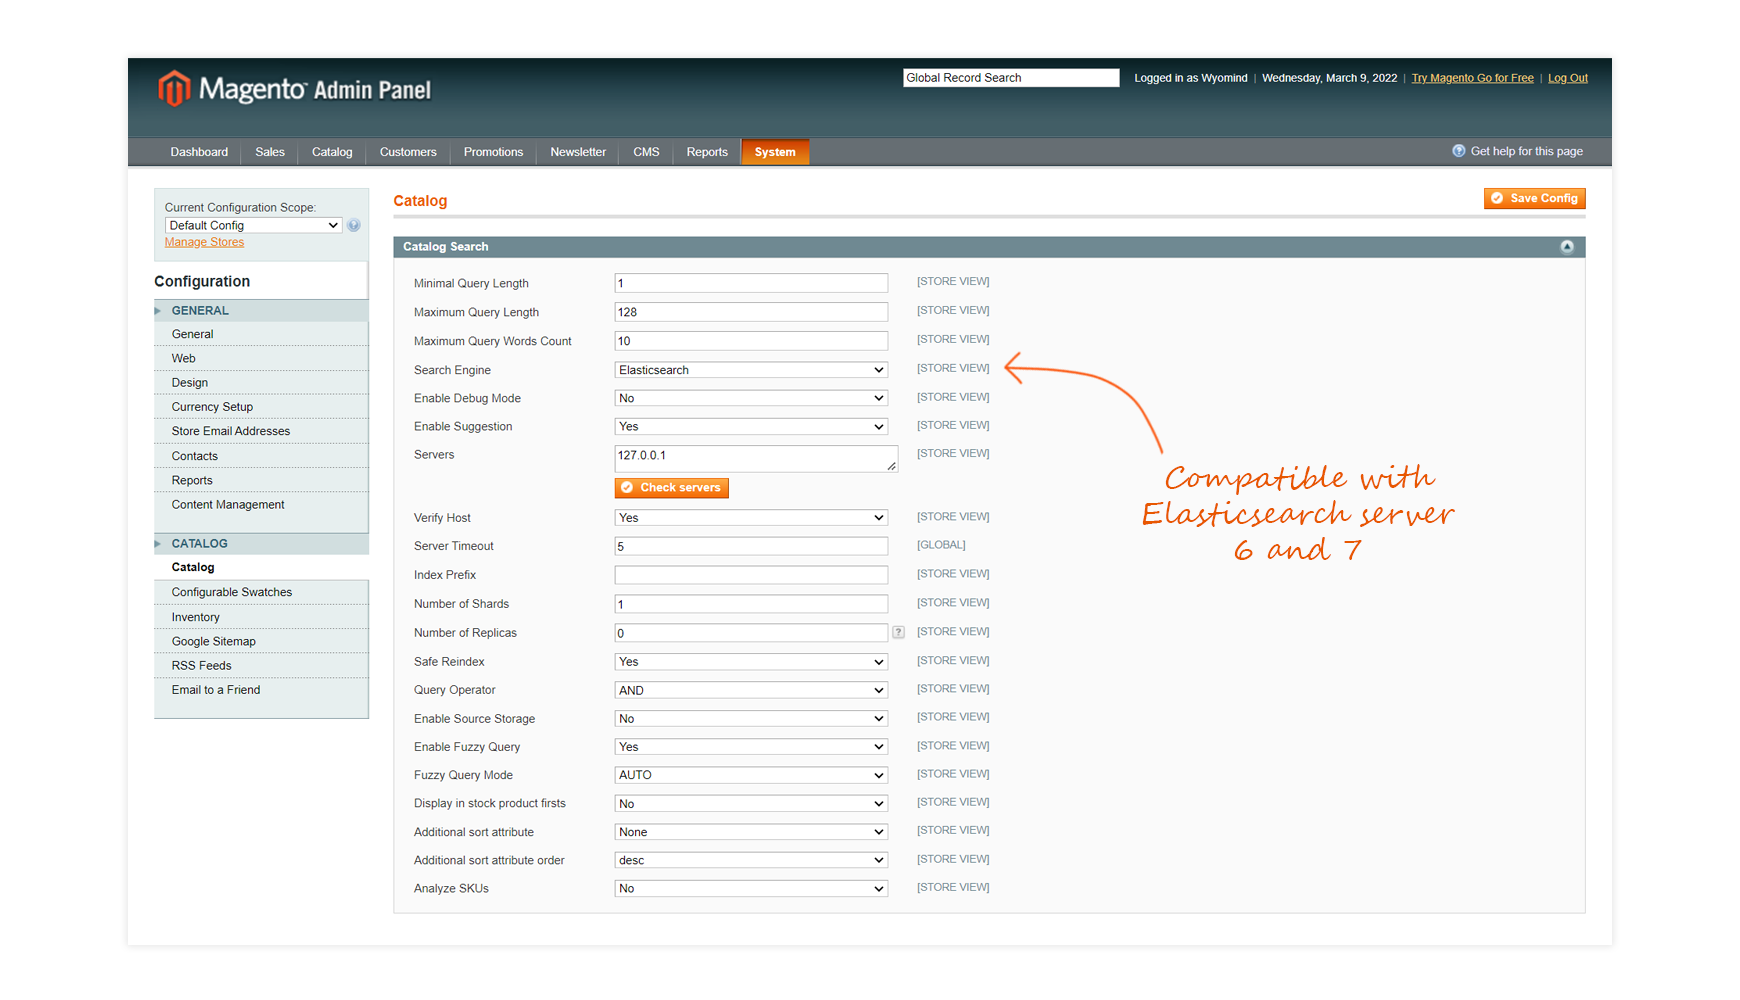
The extension is completely compatible with Elasticsearch server v6 and v7.
You can find more information on the product here:
STEP 1: Install and run Elasticsearch server
As Elastic advises, "the easiest way to understand what Elasticsearch can do for you is to play with it".
To be able to use the Enhanced Autocomplete extension and reach the server, you first need to have a recent version of Java. You can easily install the latest version of Java from www.java.com .
Then you can install and run the Elasticsearch engine following the below steps.
Install Elasticsearch
You can download the latest version of Elasticsearch compatible with our extension from elastic.co/downloads/elasticsearch.
Once it is downloaded, you can extract the archive file.
Run Elasticsearch
To run Elasticsearch, open a console, and run the following command:
cd elasticsearch-<version>./bin/elasticsearchIf you’re running Elasticsearch on Windows, simply run:
bin\elasticsearch.batTest Elasticsearch
You can easily test if the Elasticsearch engine is reached by opening a new terminal window and running the following:
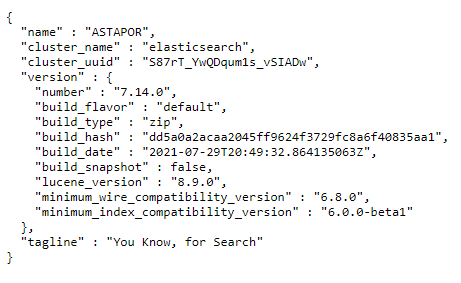
curl 'http://localhost:9200/?pretty'You should then get:
You now have an Elasticsearch node up and running.
STEP 2: Enable the Elasticsearch method
To configure Enhanced Autocomplete for Elasticsearch 6/7 in a general way, go to:
SystemConfigurationCatalog Catalog Search
Configure the general parameters
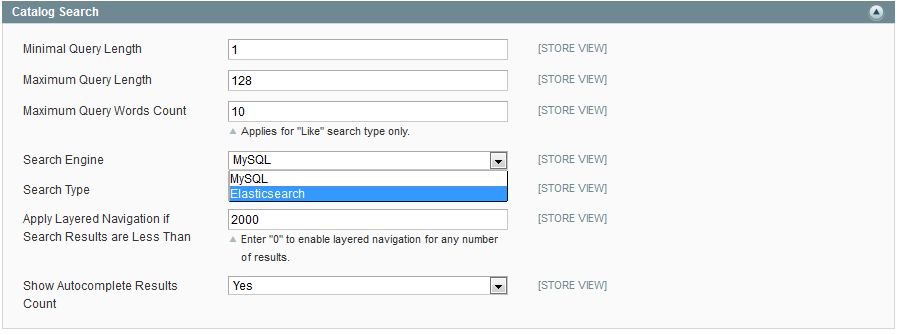
In the Catalog Search tab, you can choose Elasticsearch as the Search Engine.
When choosing Elasticsearch as the Search engine, more options should display:
- Enable Debug Mode
Will display potential error messages in the frontend. - Enable Suggestion
Will display a suggestion if the search engine detects a better text query ("Do you mean?" feature).
- Servers
Must be written as host:port and separated by a comma.
To check the connection, click on Check Servers. - Verify Host
Only used for HTTPS connection. Set that option to No if you don't have a valid SSL certificate. - Server Timeout
Number of seconds after a timeout occurs for every request. If you’re using indexing of file, a large value is necessary. - Index Prefix
Used to prefix index names in order to avoid potential collisions. - Number of Shards
Having more shards enhances the indexing performance and allows to distribute a big index across machines. - Number of Replicas
Define the number of replicas. Note that having more replicas enhances search performance and improves cluster availability. - Safe Reindex
Reindex in a temporary index and switch to it once finished. Especially useful for large product catalogs.
- Query Operator
By default, it is set to AND. For example, with the AND operator, the same query is translated to "digital AND camera", with the OR operator, the query "digital camera" is translated to "digital OR camera". You may have fewer results with the AND operator but they’ll be more relevant. - Enable Source Storage
Should we store source data in Elasticsearch or not. Keep this setting to No for better performances. Will be forced to Yes if fast autocomplete is enabled. - Enable Fuzzy Query
Enable the approximate search. - Fuzzy Query Mode
You have the possibility to choose the fuzziness level. For example:
0, 1, 2: the maximum allowed Levenshtein Edit Distance (or number of edits)
AUTO: should generally be the preferred value. Generates an edit distance based on the length of the term.
For lengths:
0..2: must match exactly
3..5: one edit allowed
>5: two edits allowed
- Display in stock product first
When this option is enabled, the out of stock products will be displayed after the in-stock products. - Analyze SKUs
When Fuzzy Query is enabled, you have the possibility to analyze the SKUs. The SKUs will be analyzed like other product attributes. It is useful if SKUs are multi-part values, such as XXX-YYY-ZZZ. If you don't want to analyze SKUs, then the SKU attribute is considered as one single word.
Manage your Indexes
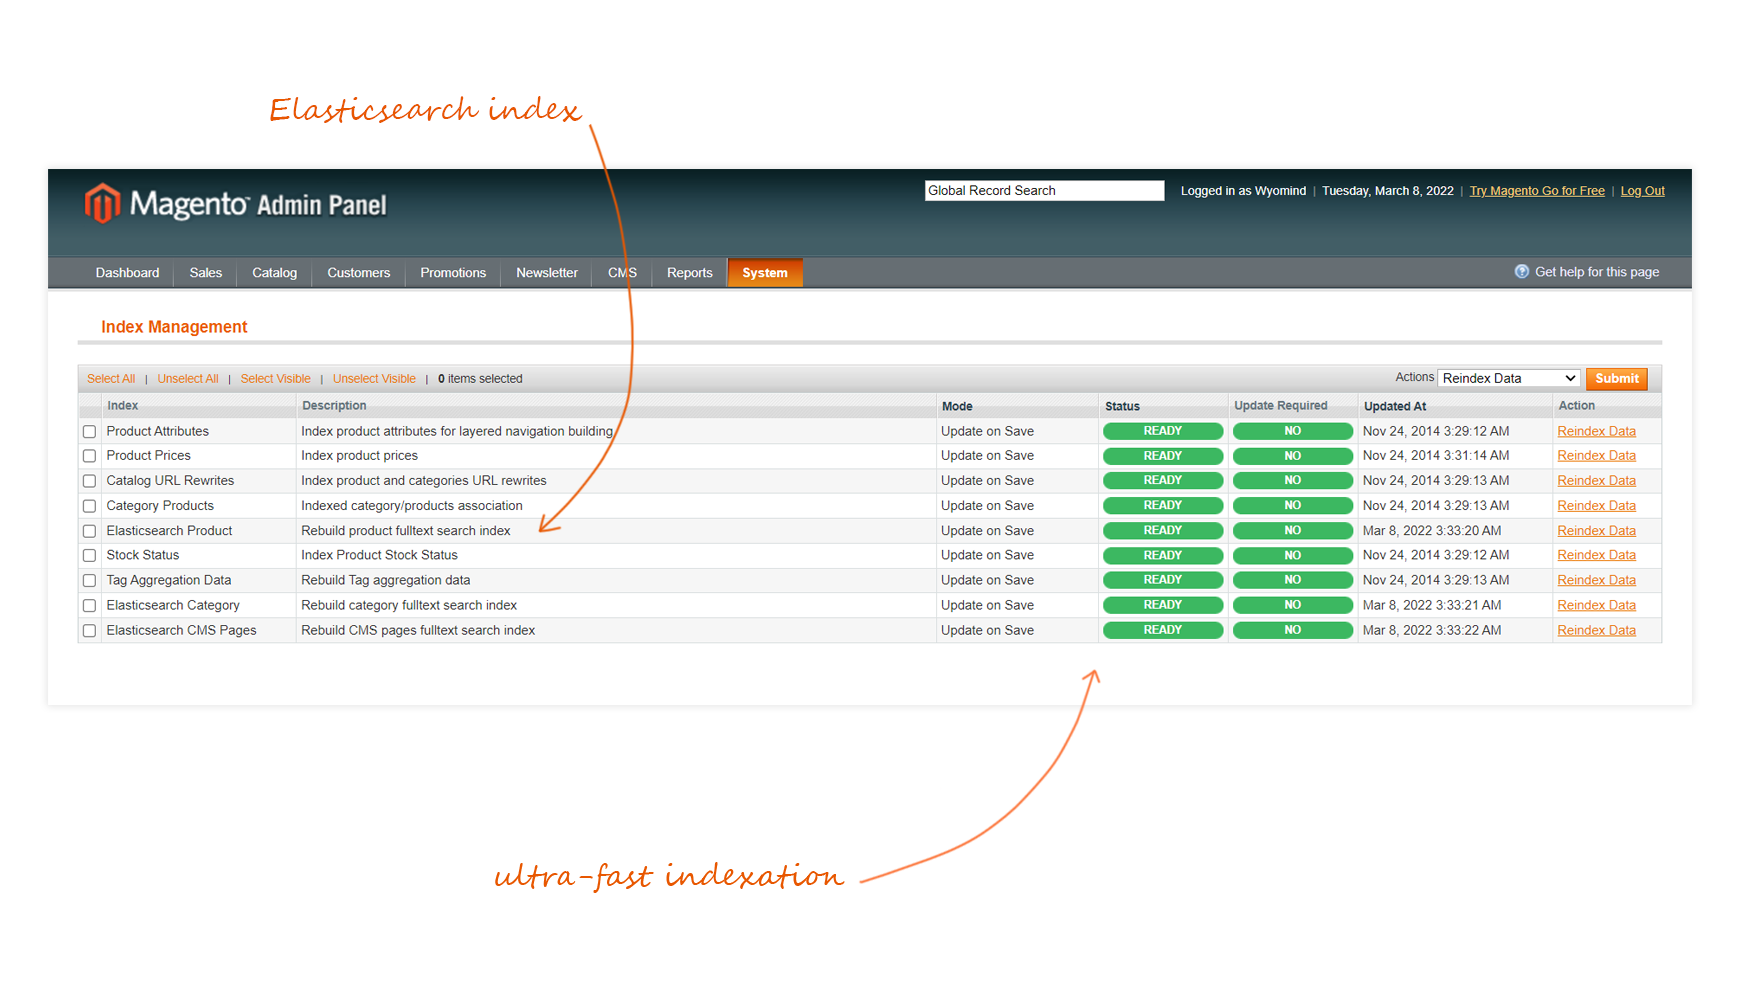
The Enhanced Autocomplete extension adds 3 more indexes that you can find in:
SystemIndex Management
- Elasticsearch Product
Rebuild product full-text search index - Elasticsearch Category
Rebuild category full-text search index - Elasticsearch CMS Pages
Rebuild CMS pages full-text search index
You can easily reindex data by selecting those 3 indexes and by clicking on Submit .
STEP 3: Configure your search with Elastic Search
You can now configure your search in:
SystemConfigurationWYOMIND Elasticsearch
General Settings
In the General Settings subtab, you will be able to Enable Response Header. This will enable a custom response header for debug purposes.
Autocomplete Settings
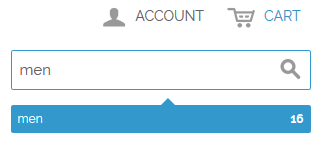
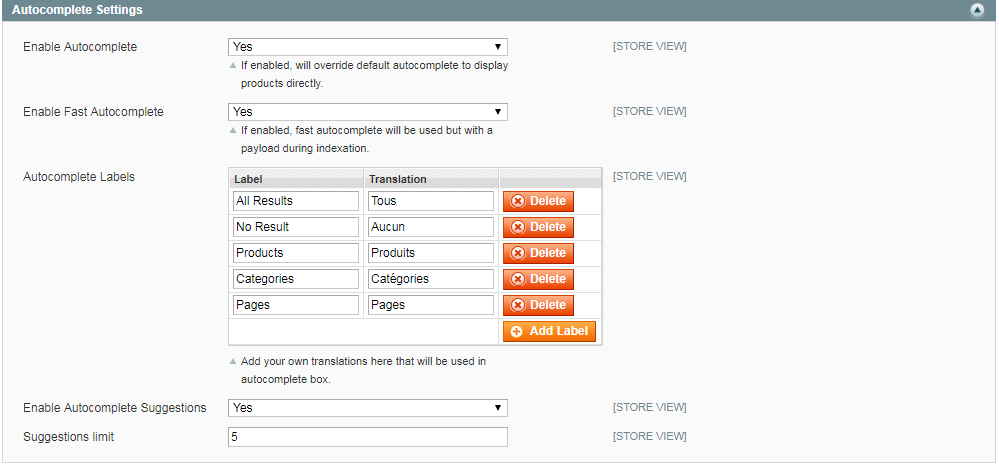
By default, the autocomplete will display terms suggestions for your search.
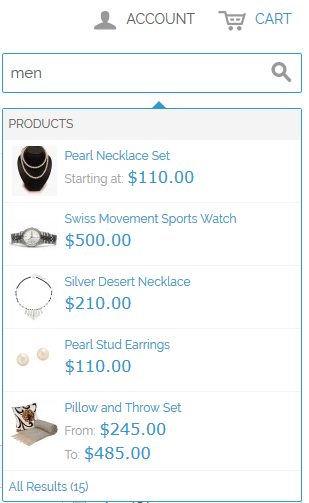
You can choose to Enable Autocomplete in order to override the default autocomplete and to display products directly.
If enabled, 3 additional options will be displayed:
- Enable Fast Autocomplete
Use the fast autocomplete (with a payload during indexation). - Autocomplete labels
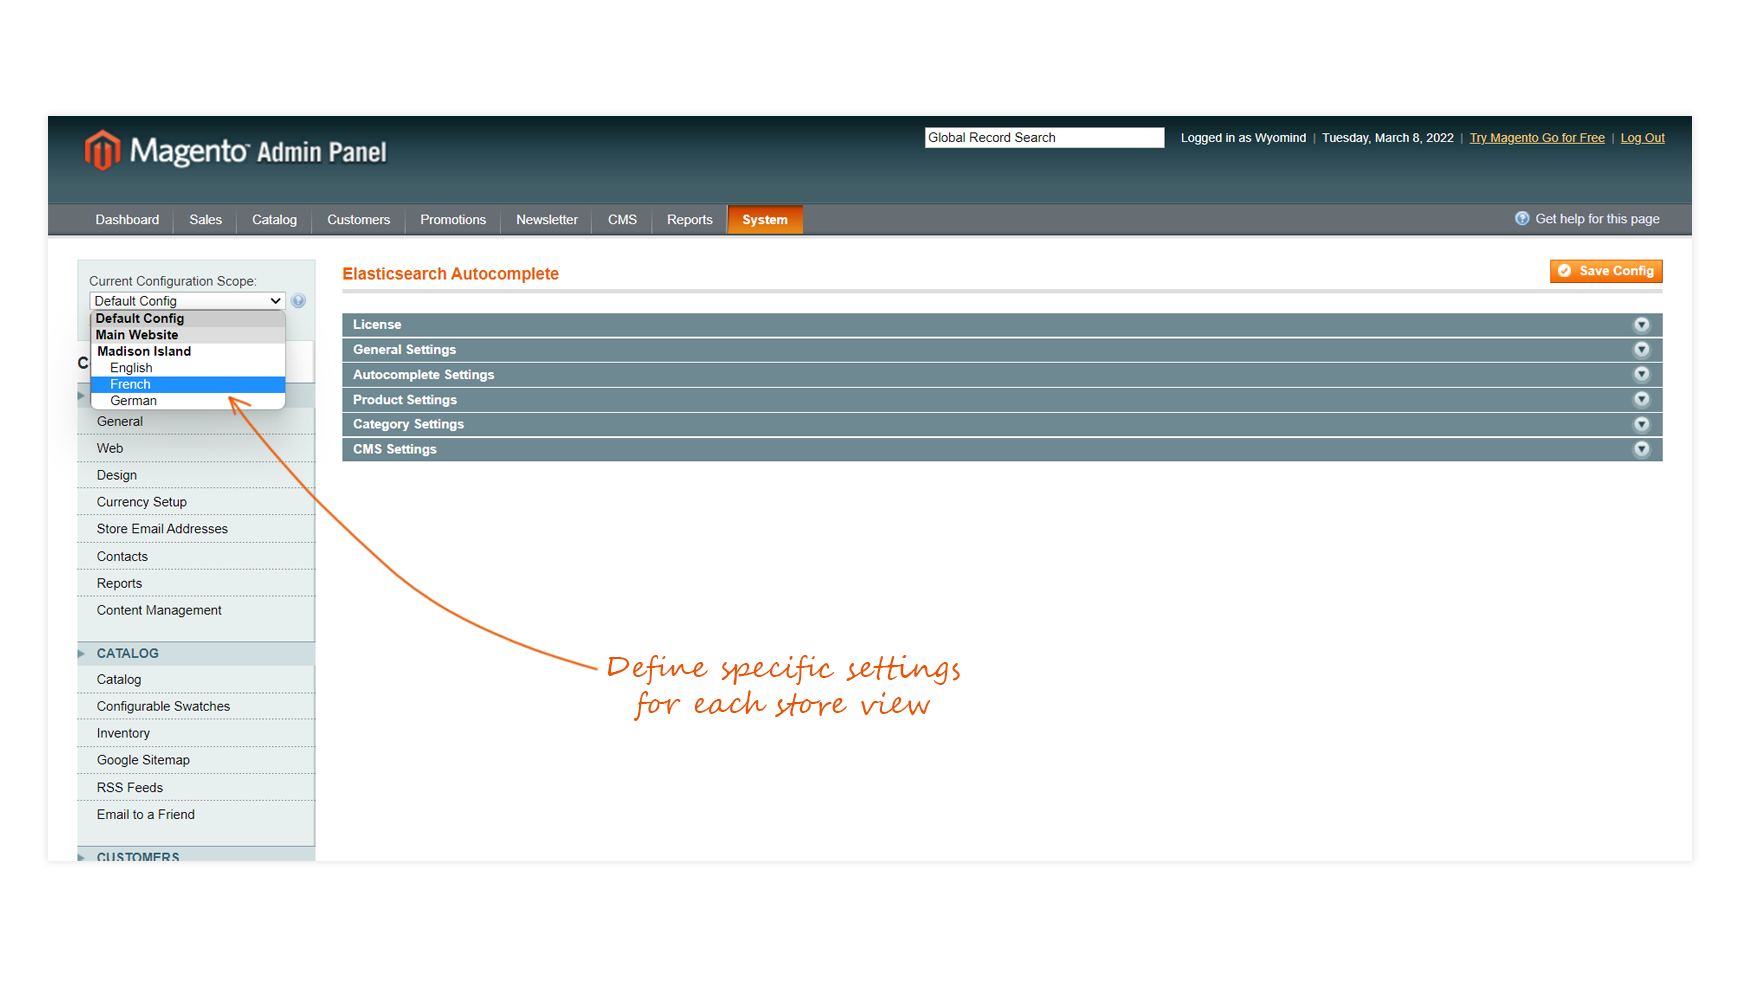
You can also define a translation for each one of the labels that will be displayed in the autocomplete box as well as add new ones in the Autocomplete Labels field.
That option is very useful if your website is available in different languages. You can then change the scope to a store view, for example, the French one, and translate each autocomplete label to the French word. - Enable Autocomplete Suggestions
You can enable the suggestions in the autocomplete (do you mean?). - Suggestions limit
You can define the maximum number of suggestions to display.
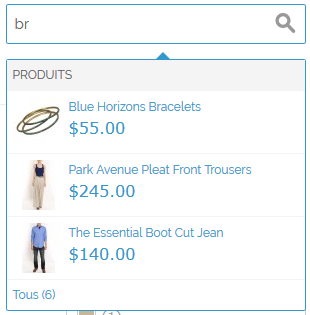
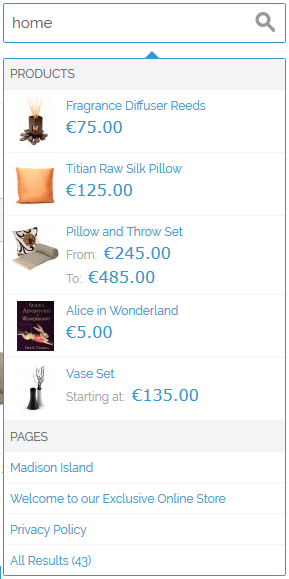
Below is what you should get with the above example:
Product Settings
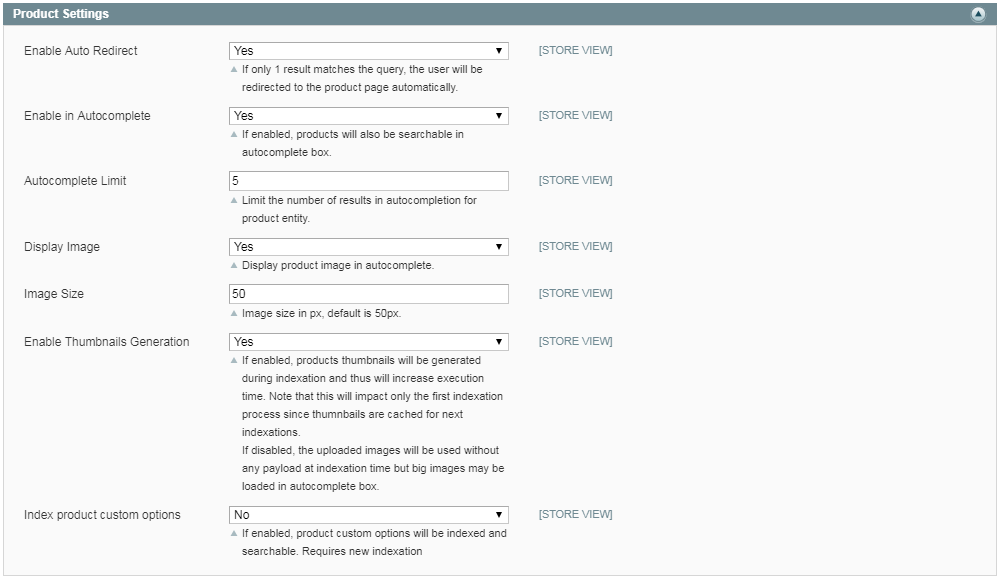
With the Enhanced Autocomplete extension, you can make your products searchable in the autocomplete box. Several options exist to enhance the search.
- Enable Auto Redirect
If only 1 result matches the query, the user will be redirected to the product page automatically. - Enable in Autocomplete
If enabled, products will be searchable in the autocomplete box. - Autocomplete Limit
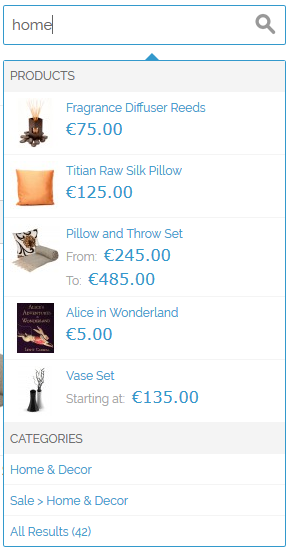
Define the maximum number of results displayed in the autocompletion. For example 3. - Display image
To display product image in the autocomplete.
- Image Size
Define the size of the images in the autocomplete box in px. By default, the value is set on 50 px. - Enable Thumbnails Generation
Enable that option if you want to generate product thumbnails. They’ll be generated during indexation and increase execution time. Note that this will impact only the first indexation process since thumbnails are cached for the next indexations. If that option is disabled, the uploaded images will be used without any payload at indexation time but big images may be loaded in autocomplete box. - Index product custom options
Product custom options will be indexed and searchable. This requires a new indexation.
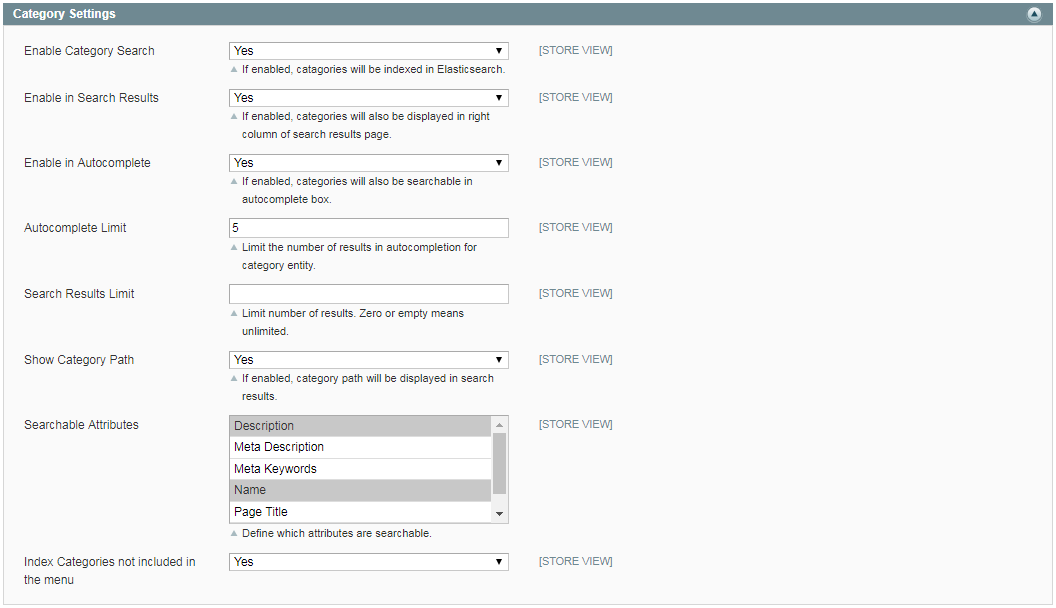
Category Settings
You can Enable Category Search. If enabled, categories will then be indexed in Elasticsearch and new parameters will be displayed in the configuration.
- Enable in Search Results
If enabled, categories will also be displayed in the right column of the search results page. - Enable in Autocomplete
If enabled, categories will also be searchable in autocomplete box. - Autocomplete Limit
Define the maximum number of results displayed in the autocompletion. For example 2.
- Search Results Limit
Is the limit number of results that will be displayed in the right column of the search results page. Note that 0 or empty field means unlimited. - Show Category Path
If enabled, the category path will be displayed in the right column of the search results page. - Searchable Attributes
Define which category attributes are searchable. For example the Description and the Name. - Index Categories not included in the menu
You also have the possibility to index categories that are not in the menu.
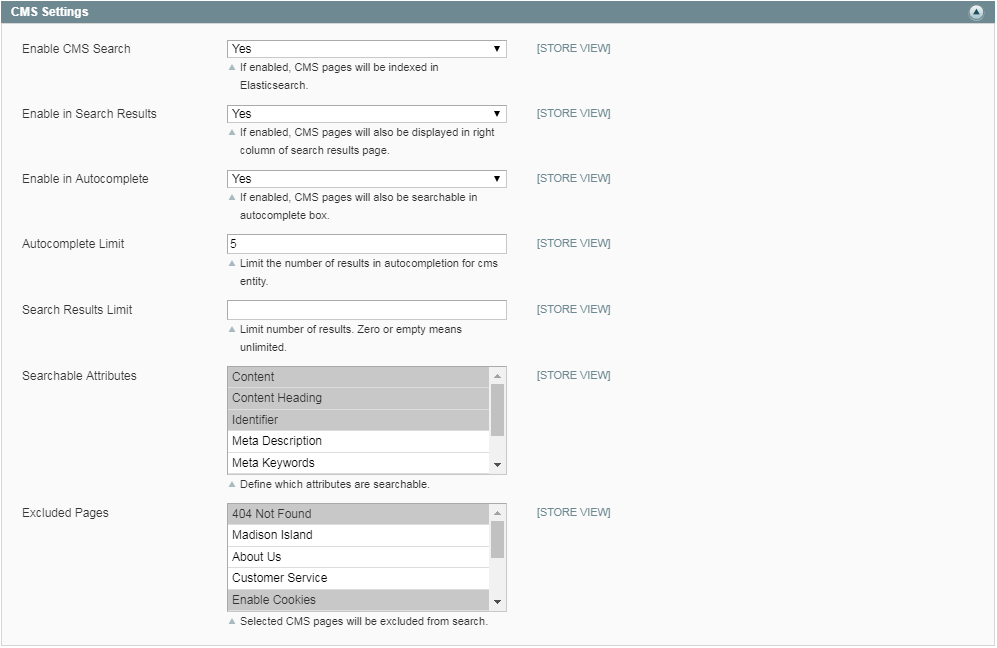
CMS Settings
You can Enable CMS Search. If enabled, CMS pages will be indexed in Elasticsearch and new parameters will be displayed in the configuration.
- Enable in Search Results
If enabled, CMS pages will also be displayed in the right column of the search results page.
- Enable in Autocomplete
If enabled, CMS pages will also be searchable in the autocomplete box. - Autocomplete Limit
Define the maximum number of results displayed in the autocompletion. For example 3.
- Search Results Limit
Limit the number of results displayed in the right column of the search results page. Note that “0” or empty means unlimited. - Searchable Attributes
Define which attributes are searchable. - Excluded Pages
Selected CMS pages will be excluded from the search.
STEP 4: Manage the weight of the attributes and products in order to refine the search results
The Enhanced Autocomplete extension allows you to easily boost your product attributes and products in the search results by giving them a weight.
By product attribute
To define some weight for each one of your attributes, you can go to:
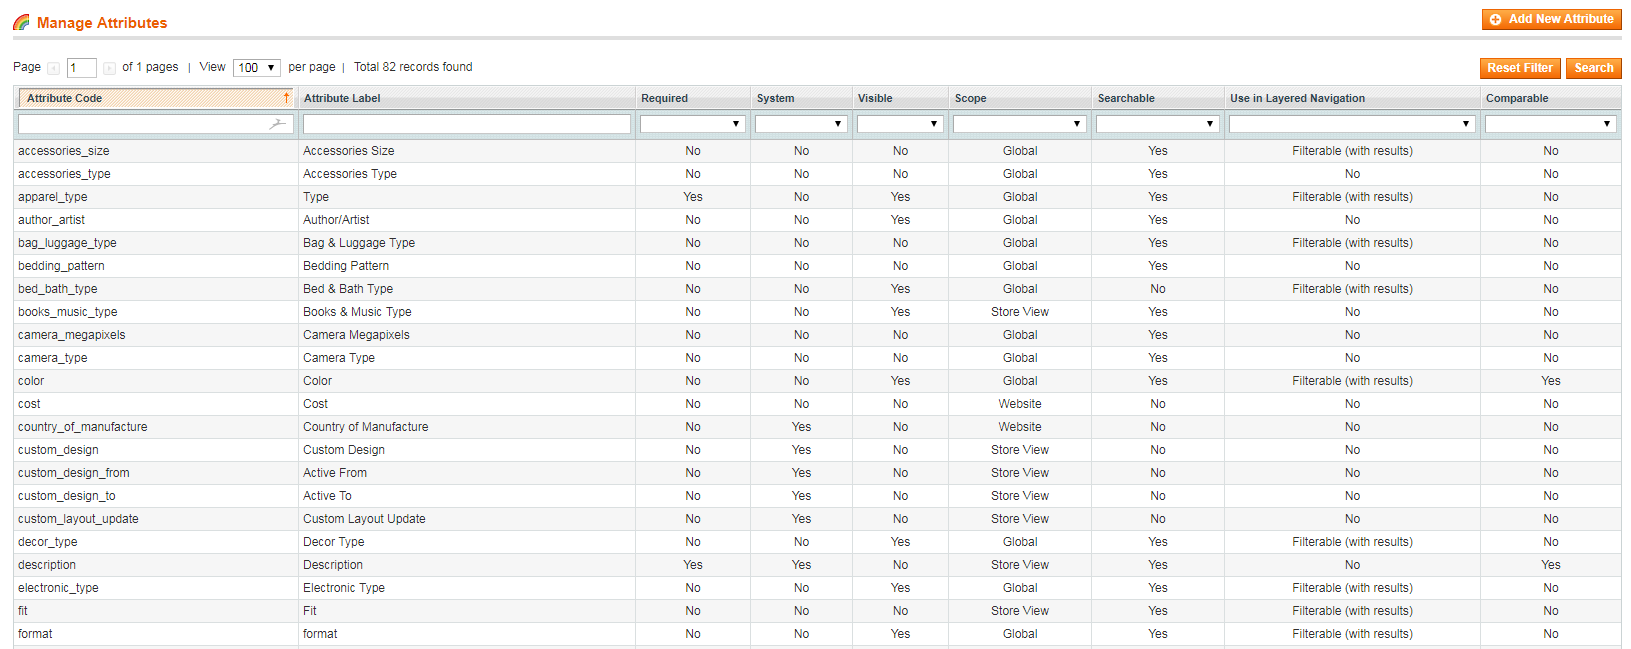
CatalogAttributes Manage ATTRIBUTES
Edit the attribute you want. In the Properties tab and Elasticsearch Settings subtab, you’ll be able to define a value from 1 to 10 depending on the weight you want to assign to it.


 Magento 1





















 The support is quick and efficient. Due to the optimization of the search settings, we were able to improve the search ergonomics of the website. The team is also helpful with the subsequent optimization of the search settings.
 We have used modules for Magento 1 and Magento 2. The first one was much much better and make search even now better as Magento 2 with new Elastic. Our wishes: decrease time to saving categories and more settings for elastic
 The module works perfectly, is better and cheaper than other searchers. I use several times the support and always resolve the problems. The searches have been optimized long after the installation of the module. Customers have told us that it works much better than before that we did not have this module.
 perfect Experience with perfect team support
 It's a very nice and working extension for Magento 1.
 This module has made our search life so much simpler. Great module to work with.
 Simple to configure and easy to tweak to get the best search results for customers.
 We have recently purchased this product due to it's flexibility giving us a powerful search tool than we had on our magento 1 website. We have been impressed with the customisation the extension offers and look forward to fine tuning it to our needs. I'm sure we will recommend this extension to our partners.
 module elastic is top
 The Elasticsearch Autocomplete module is great. It works seamlessly with Elastic Search and offers a really great addition to my website. Without a doubt this has contributed to a better UX and increased sales. I love the way it shows results from both products and pages and having the ability to gives specific products 'weight' in the search makes it super customisable. I would definitely recommend this to anyone.
 Thanks for the extension.
 Easy to configure plug in with good features. Customers enjoy using this search feature and also gives access to our helpful content pages in one place. Our search speed has also improved massively which is great. The layout is tidy and simple to use.
 Really useful.I have done customization for module and with the help of extension provider I was able to resolve issue. Perform better than standard search and so it is a must-have extension. Elasticsearch® Autocomplete is an absolute must have for any store with an extensive product range. We have over 10,000 skus and the search results are fast and relevant. The installation was easy with no conflicts. The settings are easy to understand and configure.
 search autocomplete is very fast, our customers can find the product easily form search. Installation is very easy and can fully maintain from admin. support multi-stores with different languages. support team is very fast to reply and guide. Highly recommended!
 Installation is simple, the extension is really stable. We use it with "Cloud Elasticsearch" and it works really well. Perfom better than standard search and so it is a must-have extension. About "customizations" i can say that is really simple to personalize the "frontend" (the autocomplete lists).
 Must have extension, improves the search,the autocomplete and the performance. Really useful.I have done customization for module and with the help of extension provider I was able to resolve issue.The support of team is very responsive and helpful.
 Elasticsearch® Autocomplete is an absolute must have for any store with an extensive product range. We have over 10,000 skus and the search results are fast and relevant. The installation was easy with no conflicts. The settings are easy to understand and configure. And the support team are very quick to answer and questions you may have.
 We have been using Elasticsearch Autocomplete for some time now on our website and we find it responsive and generates good auto complete suggestions. The extension was easy to install, reliable and has caused no conflicts. We have found Wyomind's support to be quick and very helpful on this and other extensions we have purchased.
 this extension works great, and is great for sales!
 We use the Bubble Elastic Search and Bubblelayer in many of our shops. Works like a charm, basic and reliable.
 Standard Magento search engine isn't good. extension from wyomind boost my magento store to next level. Search results right now are very exact. This is for sure best extension for search for magento stores.
 I bought this extension on strong recommendation. Once installed (which was a fairly straight forward process) the elastic search worked without a glitch. This extension is easy to use but with the benefit of it being highly flexible with many of the options being tailorable to your specific needs. Highly Recommended!
 The basic Magento search gives poor results, with that extension, we got good results, the support team is pretty good. It's easy to customize the frontend to have a great mini-search. The search result page is less useful that preview now.
 We've found the Elasticsearch Autocomplete search extension for Magento to be an effective, feature rich search solution for our website which is great value for money. Setup was easy and we have found that our conversion rate and customer satisfaction has improved
 It's one of the best extensions out there. Works right away out of the box. Easy to configure, accurate and it's fast! We didn't have any problems with our large catalogue of products. At the end of the day you want to deliver the best experience to your customers and Elasticsearch delivers.
 works very well
 extension works great, thanks! Setup is little bit complicated for us but extension is works very well. If you not happy with default search action on magento like us, you need this one!
 This extension is working great ! The support answer very fast with right answer. I recommand it !
 Installing the extension was so easy and fast that we can only recommend it to anyone interested in a better search form than the one included in Magento. All functionalities work out of the box and is easy to integrate with Porto theme.
 This module is easy to install and configure and it deliver fast search results. Developers are always ready to help in case of some problems